






 Free Download

 Windows

Hours of OBS footage can suddenly go missing because of accidental deletion, software errors, or system crashes. Don't give up too quickly. Depending on how the recording was lost and whether its data remains on the storage device, you may be able to recover it.
NOTE: If you permanently delete a recording, for example, by pressing Shift + Delete, stop using the affected storage device as soon as possible. Avoid saving new files to it, as new data may overwrite the deleted recording. This is especially important if you don't have a backup.
Where Does OBS Save Recordings?
OBS stands for Open Broadcaster Software. It is a popular, open-source application for video recording and live streaming. On Windows, its default recording location is typically your Videos folder:
C:\Users\ < your-username >\Videos
If you can't find your OBS recording there, check the configured recording location before assuming the file has been lost or deleted.
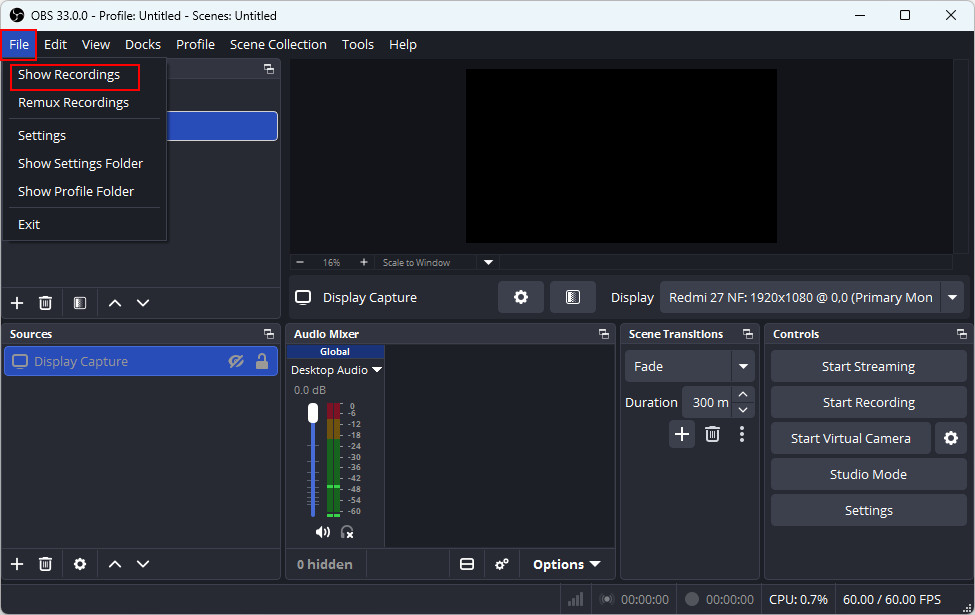
🔸Open OBS Studio.
🔸Click File in the top menu.
🔸 Select Show Recordings to open the recording folder.
This option opens the configured recording location, even if you've changed it from the default.
How to Recover Permanently Deleted OBS Recordings?
If you permanently deleted an OBS recording, emptied the Recycle Bin, or lost the recording after formatting a drive or losing access to a partition, data recovery software may help you get it back.
We recommend RecoveryFox AI, which can scan storage devices for lost files in various data loss scenarios. It supports recovering videos, documents, images, camera photos, and more than 500 file types.
Whether your OBS recordings were lost from an internal hard drive or SSD, an external hard drive, a USB flash drive, or an SD card, RecoveryFox AI can scan the affected storage device and help you find recoverable files.
Try RecoveryFox AI to scan your storage device and preview recoverable files for free before recovery.
⚠️ Important
Install the recovery software on a different drive from the one containing the deleted recording. Saving new data to the affected drive may overwrite the recording and reduce the chances of recovery.
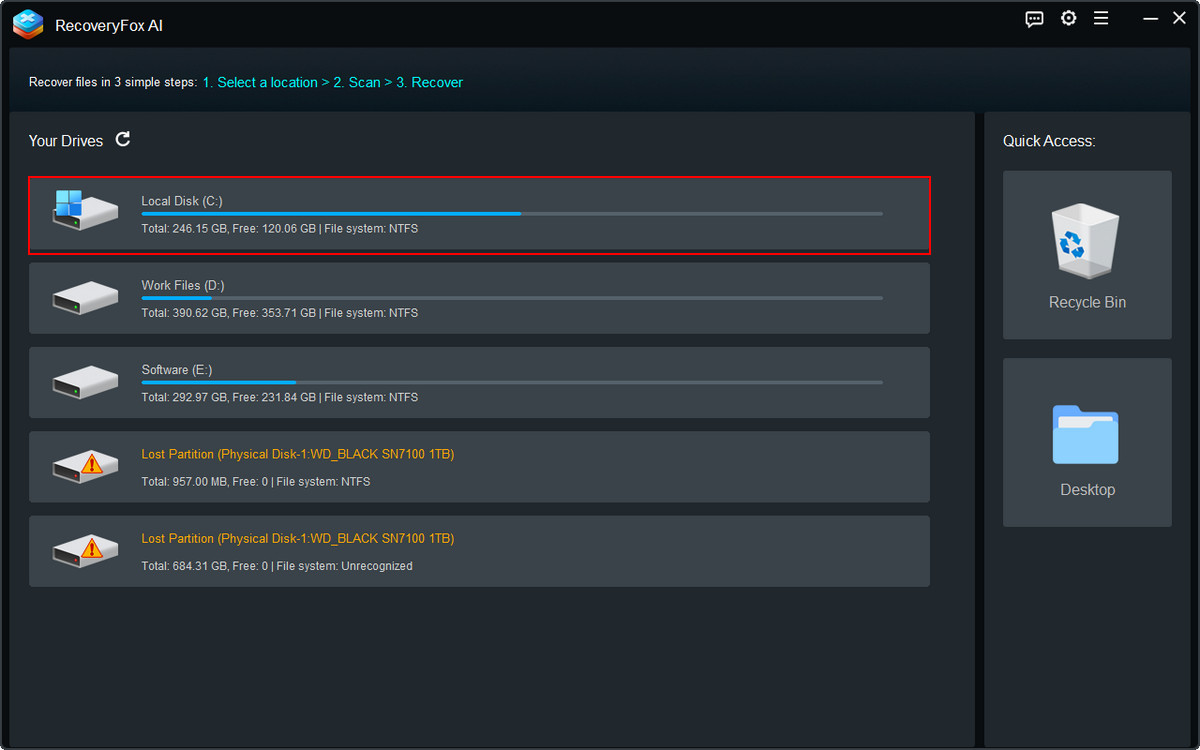
Step 1. Launch RecoveryFox AI and select the drive or storage location where OBS saved the missing recording. Start the scan.
If you recorded to an external hard drive, USB drive, or SD card, connect the device before scanning.
Step 2. Once the scan finishes, browse the found files by File Path or File Type.
Use the keyword filter, modification date, or file size to narrow down the results and locate the missing OBS recording.
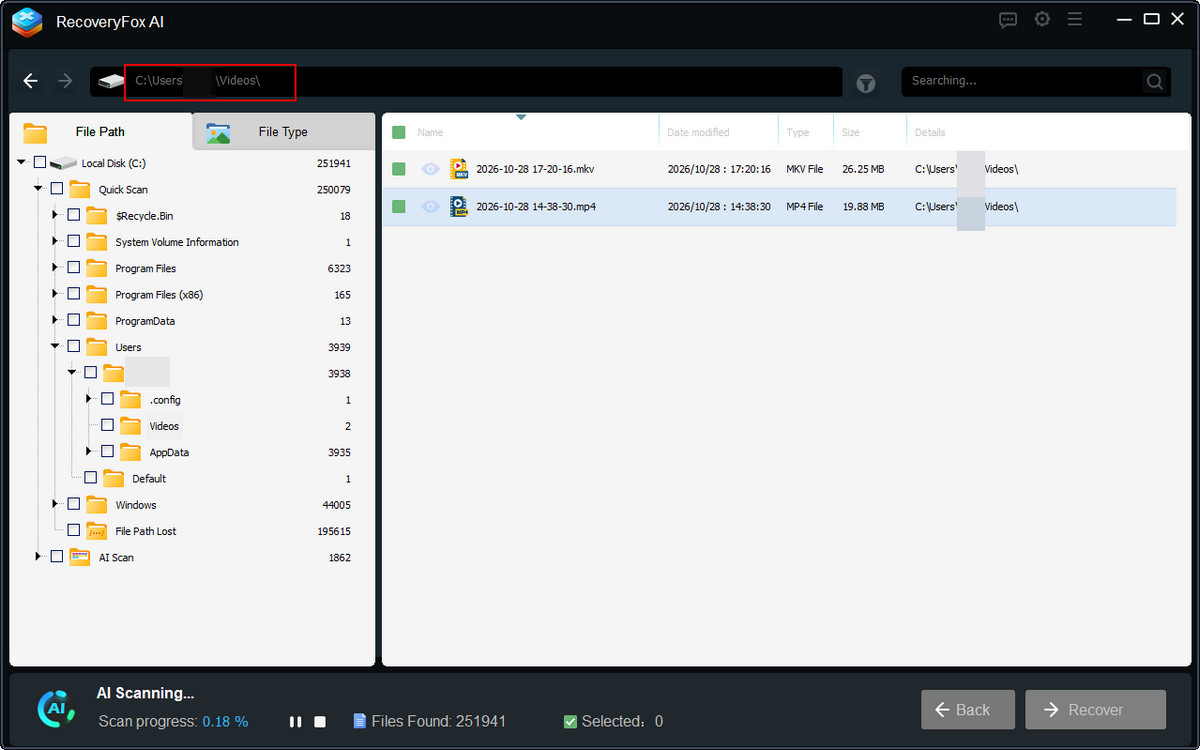
Step 3. You don’t necessarily need to wait for the entire scan to finish before checking the results. If the software allows it, pause the scan and see whether the deleted recording has already been found.
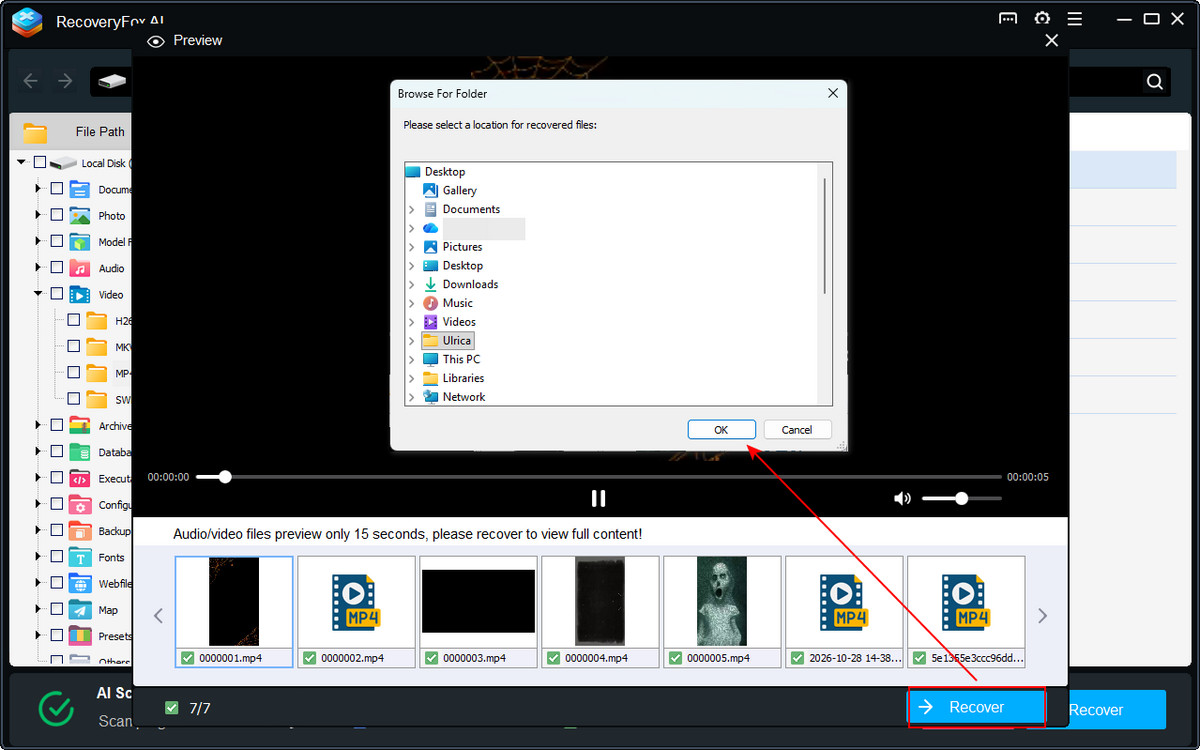
Click the eye icon to preview a file when preview is available.
Select the files you want to recover, click Recover, and save them to a different drive.
How to Recover an Unfinished OBS Recording After a Crash
If OBS Studio crashes or your computer shuts down unexpectedly during recording, can you recover the unfinished OBS recordings?
In many cases, yes. Your chances depend largely on the recording format and whether the recorded video data remains intact.
According to the official OBS Studio documentation, MKV recordings are designed to remain playable and recoverable after an unexpected interruption. Hybrid MP4 is also designed to withstand interrupted writes while maintaining broad compatibility with video players and editing software.
Follow these steps to recover your unfinished OBS recordings:
Step 1. Open OBS Studio. Click File > Show Recordings to open the recording folder.
Step 2. Look for the video recorded during the interrupted session.
If you can't find it, go to Settings > Output to check the configured Recording Path and open it in File Explorer.
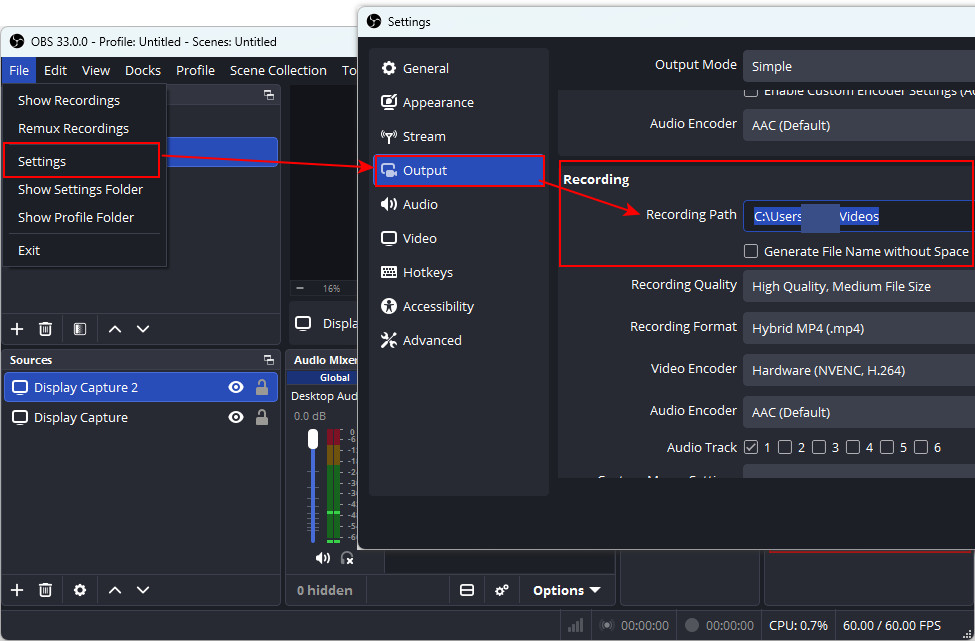
Step 3. Check whether the file has a nonzero size. A 0-byte file contains no video data to recover from that file itself, although another copy or temporary file may exist elsewhere.
Before attempting any repair, make a copy of the recording and work on the copy. This helps preserve the original file if a repair attempt fails.
Step 4. Open the file in a media player that supports its format, such as VLC Media Player. If it plays, check whether the footage recorded before the crash is intact.
Step 5. If the recording is an MKV file that won’t play correctly or isn’t accepted by your editing software, try OBS Studio's built-in remuxing feature.
Open OBS Studio and select File > Remux Recordings.
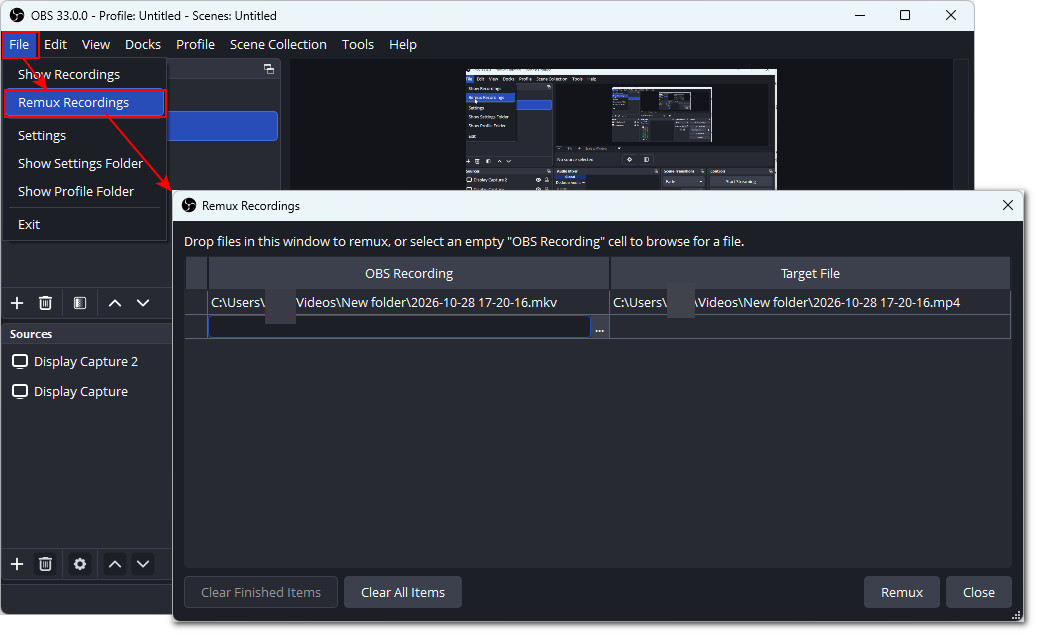
Step 6. Choose the unfinished MKV recording you want to convert and click Remux to create an MP4 copy.
Step 7. Once done, open the resulting MP4 and check whether the footage is playable and complete.
💡💡 Remuxing changes the container format; it is not a general-purpose repair method. It may help when a recording is playable but needs a different container, but it won't necessarily repair an incomplete or damaged file.
If a traditional MP4 or MOV recording won't open after a crash, its metadata may be incomplete because the recording wasn't finalized. A dedicated video repair tool may be worth trying, but success depends on the damage and the available video data.
How to Prevent OBS Recording Loss?
To reduce the risk of losing future OBS recordings:
✅ Use MKV or Hybrid MP4
They both show resilient to unexpected interruptions than traditional MOV or MP4.
Go to Settings > Output > Recording > Recording format to change the output format.
✅Split long recordings into smaller files
OBS Studio includes an Automatic File Splitting feature that can divide long recordings into shorter segments based on duration or file size. This makes large recordings easier to manage and limits the amount of footage potentially affected if an individual file becomes corrupted. To enable it, follow these steps:
🔸Open Settings > Output.
🔸Switch Output Mode to Advanced.
🔸Select the Recording tab, scroll down to Automatic File Splitting, and enable the option.
🔸Choose Split by Time to create a new file at a specified interval (e.g., every 5 minutes) or Split by Size to start a new file when the current recording reaches a specified size.
🔸Click Apply > OK to save your settings.
❗ Test your configuration before an important recording session. OBS Studio 32.0 release notes document a fix for cases in which Hybrid MP4 file splitting did not work correctly. Confirm that splitting behaves as expected in your installed version rather than relying on it as your only safeguard.
✅ Keep backups
Back up important recordings to another drive or a separate backup location. For especially valuable footage, consider keeping more than one copy.
Backups provide another way to retrieve recordings if a file is deleted, corrupted, or lost because of storage failure.
✅ Optimize OBS recording settings
Recording settings affect video quality, file size, and system performance. Adjust the resolution, frame rate, recording quality, and encoder settings to suit your hardware and intended use.
Make sure your storage device has enough free space for the expected recording duration. A drive that runs out of space can interrupt a recording.
✅ Keep OBS Studio Updated
Update OBS Studio to the latest stable version to benefit from bug fixes, performance improvements, and compatibility updates. Keeping the software up to date may help reduce recording issues and improve overall stability.
Before updating, save important recordings and back up any critical configuration files.
Conclusion
Losing an OBS recording doesn’t always mean your footage is gone for good. First, check the OBS recording folder and Windows Recycle Bin. If OBS crashed during recording, check the file's format and size, try playing it in a compatible media player, and use OBS Studio's remuxing feature when appropriate.
For permanently deleted recordings, reliable deletion data recovery software may help if the underlying video data remains recoverable. RecoveryFox AI lets you scan a storage location and preview recoverable files for free before attempting recovery.

A technical content writer for RecoveryFox AI at WonderFox Soft, creating clear guides on data recovery, storage technologies, and Windows troubleshooting. She specializes in simplifying complex technical topics and enjoys exploring technology, running, and discovering new experiences.





 English ^


