


How to Recover Data from Old Hard Drive?
Step 1. Identify Your Old Hard Drive Scenario
Before any attempt of recovery, you need first to identify what’s actually happening to your old hard drive. Different problems, such as deleted files, RAW partitions, missing volumes, or a non-booting system require very different recovery approaches.
Use the table below to match your old hard drive situation with the recommended recovery solution before moving on to the step-by-step instructions.
| Scenario | Recommended Methods |
| Drive recognized normally in File Explorer, but files accidentally deleted or quick-formatted the drive | • Recycle Bin (for recent deletions) • RecoveryFox AI (🔥) • Windows File Recovery • PhotoRec |
| Drive appears in File Explorer but cannot be opened, and prompts “You need to format the disk” | • RecoveryFox AI(🔥) • Windows File Recovery • PhotoRec |
| An old drive from a non-booting PC | Remove the drive, connect it to a working PC, then use: • RecoveryFox AI(🔥) • Windows File Recovery • PhotoRec |
| Drive makes clicking, grinding, or buzzing noises, or disconnects randomly, or is not detected at all | Likely physically damage. Do not attempt DIY recovery. Contact professional recovery service |
Step 2. Connect Your Removed Drive to a Working PC
To access files from a removed hard drive, you’ll need a compatible adapter or drive enclosure to connect it to another operable computer.
When selecting a compatible converter, it is essential to consider the following parameters:
- Interface type (commonly IDE or SATA)
- Drive size (2.5 inch or 3.5 inch)
- Type of USB port
Below are four common connection options to consider:
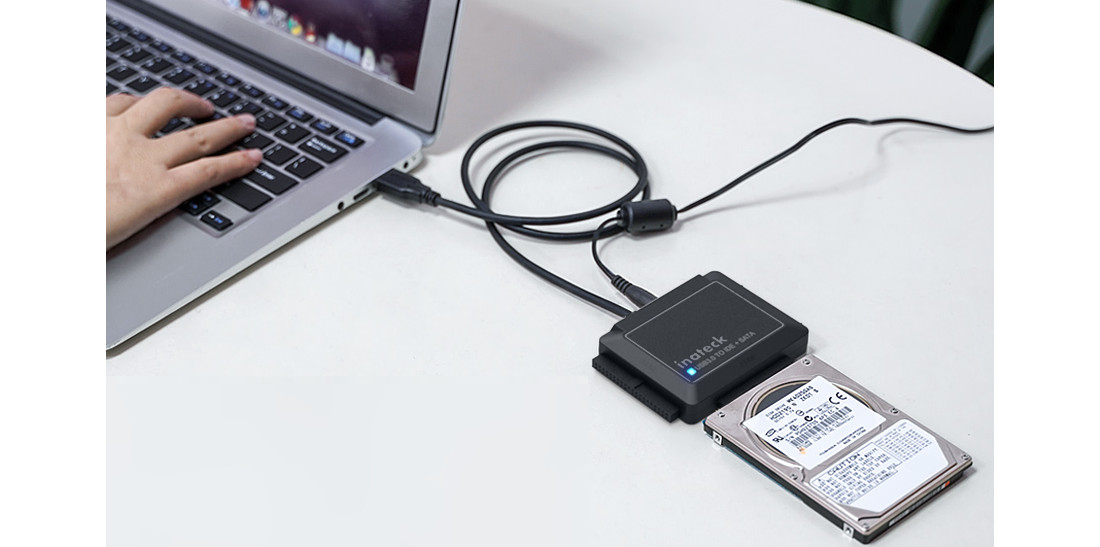
Option 1. IDE/SATA to USB Adapter
Before purchasing, carefully review the product images and specifications to ensure that the adapter’s interface type matches your drive and that its USB connector is compatible with your computer.
If you’re working with a 3.5-inch HDD, be sure to choose an adapter kit that includes an external power supply, as these drives require more power than what a standard USB port can provide.
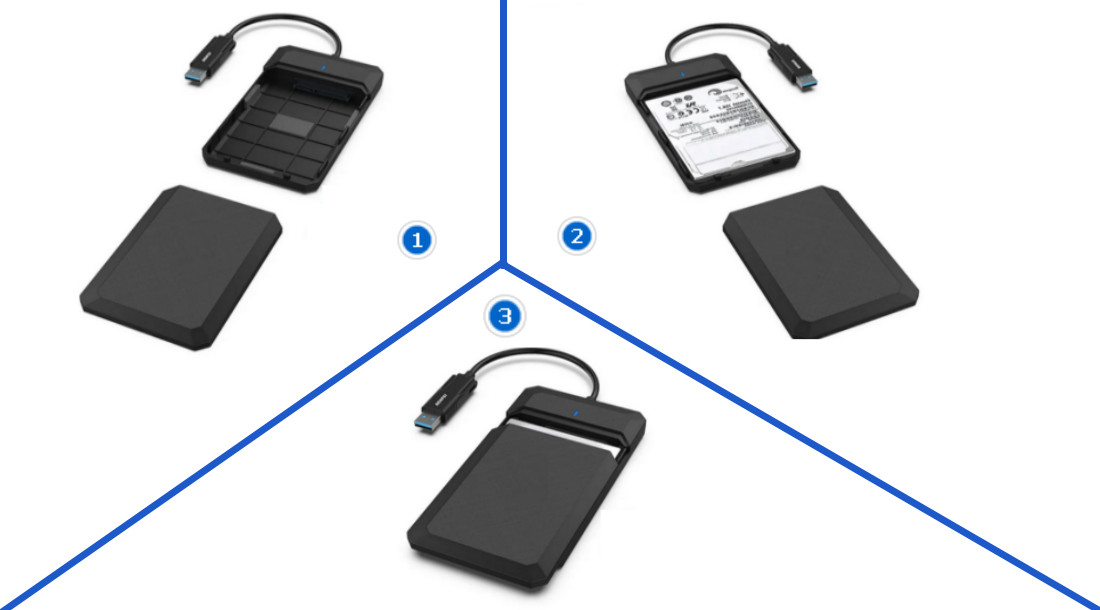
Option 2. Hard Drive Enclosure
This option comes as the best choice because an enclosure can shield your internal hard drive from physical damage, dust, or moisture, significantly extending your drive’s lifespan. Compared to other options, a hard drive enclosure also provides secure portability.
When selecting an enclosure for your old drive, size is an important factor you should consider, besides interface and USB connector type.
Still, keep in mind that 3.5-inch drives require an external power source.
Option 3. Hard Drive Docking Station
If you have multiple old hard drives, whether HDDs or SSDs, a hard drive docking station is an excellent choice. These devices typically feature one or more bays that can accommodate both 2.5-inch and 3.5-inch drives. This allows you to conveniently dock and swap drives from your desktop or laptop computer through a single USB port.
Another advantage is that most docking stations come with a power adapter, so you won’t need to worry about providing sufficient power for 3.5-inch drives.
In addition, some advanced models even support standalone disk cloning, letting you copy data from one drive to another without the need to connect to a computer.

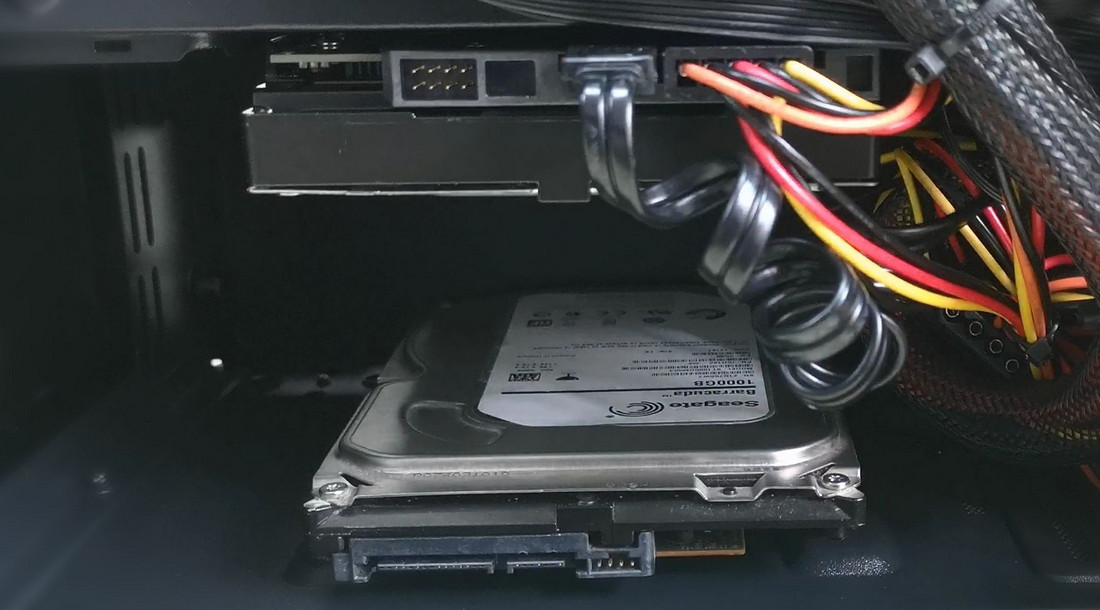
Option 4. Install the Old Drive Internally (Not Recommended for Beginners)
This approach involves mounting the old drive inside your desktop computer. It can work well for experienced users, but it introduces more risks than using an external enclosure, and is generally not recommended for beginners.
Before you begin, ensure that your desktop computer has available drive bays and connectors. You can refer to the motherboard or case manual for exact locations and requirements.
Once installed, only boot from your existing operating system. Do not attempt to boot from the old drive.
Step 3. Access Data from Old Hard Drive (4 Methods)
After connecting the hard drive, you can now safely and easily recover deleted or lost data on Windows using the following methods.
Method 1. RecoveryFox AI 🔥
Deleted? Formatted? Re-partitioned? Or files lost due to a system crash? No matter the scenario, RecoveryFox AI is a reliable solution for recovering data from your old hard drive. Powered by AI, this smart recovery software can precisely identify long-lost files and even reconstruct the data pieces into a complete file.
You can start by trying the unregistered version to scan and preview recoverable files. 100% free and safe!
 Windows
⚠️ Always avoid installing software or saving new files on the drive from which you intend to recover data. This action can overwrite recoverable files, making their recovery difficult or even impossible.
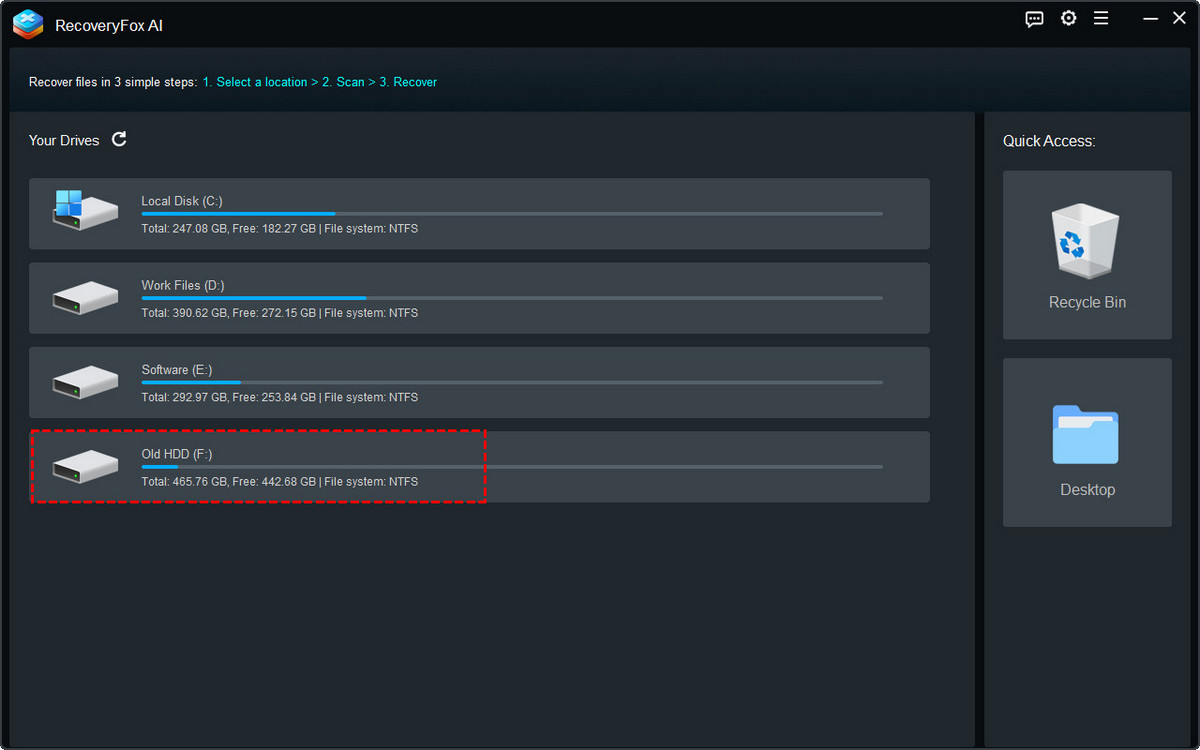
Step 1. Select File Location
Launch RecoveryFox AI. On the home screen, select the connected old drive to start scanning.
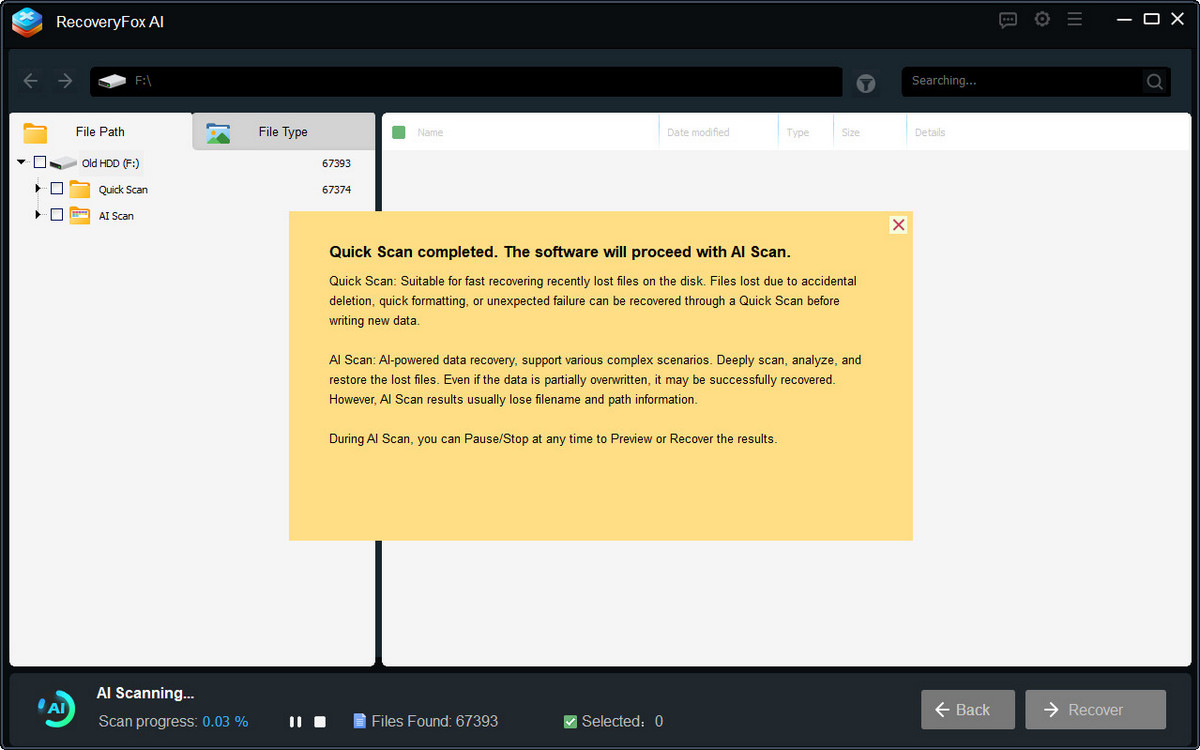
Step 2. Start Scanning
Then, RecoveryFox AI will begin scanning the selected drive. The scan time may vary from minutes to hours and even days, depending mainly on your drive size and file volume.
You can pause or stop AI Scan at any time if you wish to preview found files early.
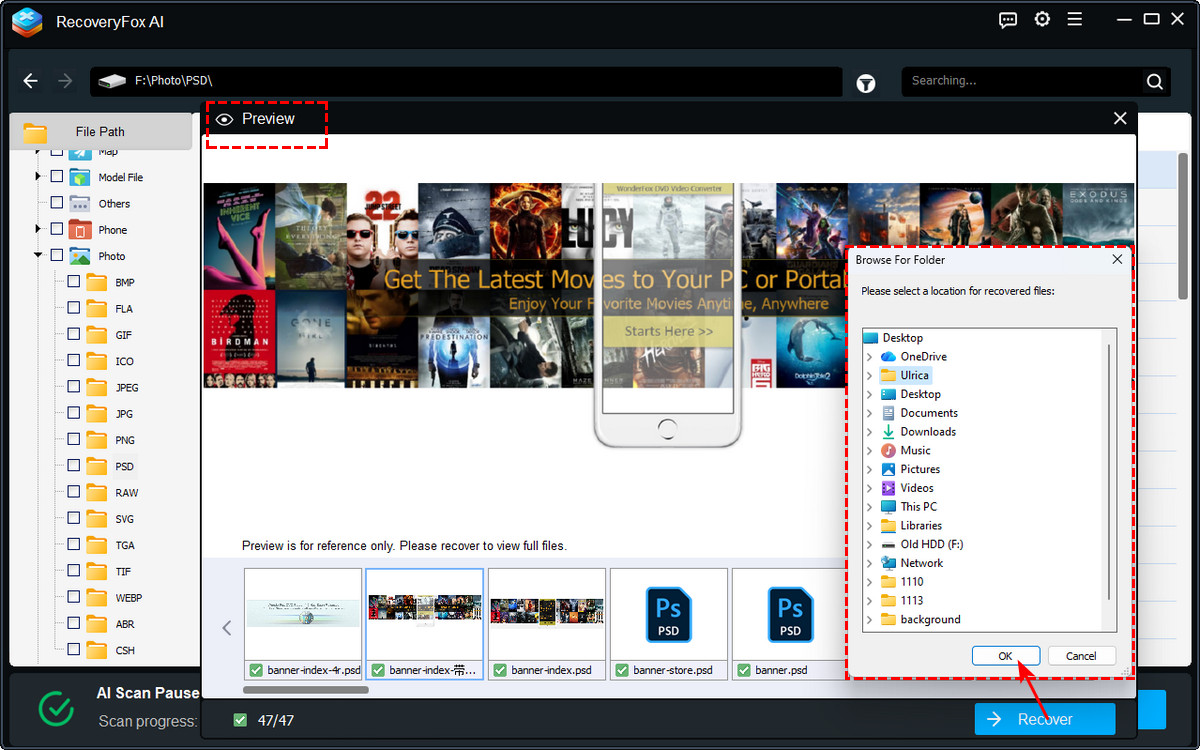
Step 3. Preview and Recover
To preview a file, simply right-click on it and select “Preview”.
Then, select whatever items you want — whether it's the whole scanned list, folders of a specific type, subfolders, or individual files.
Click “Recover”, and then choose a safe location to save your files. To prevent data overwriting, it’s best to select a different drive.
Method 2. Windows File Recovery
Windows File Recovery is a free command-line recovery tool available from the Microsoft Store. It can help recover lost files that have been deleted from both internal and external storage devices.
Here is how to use it to recover old data from your hard drive:
Step 1. Download and install it from the Microsoft Store.
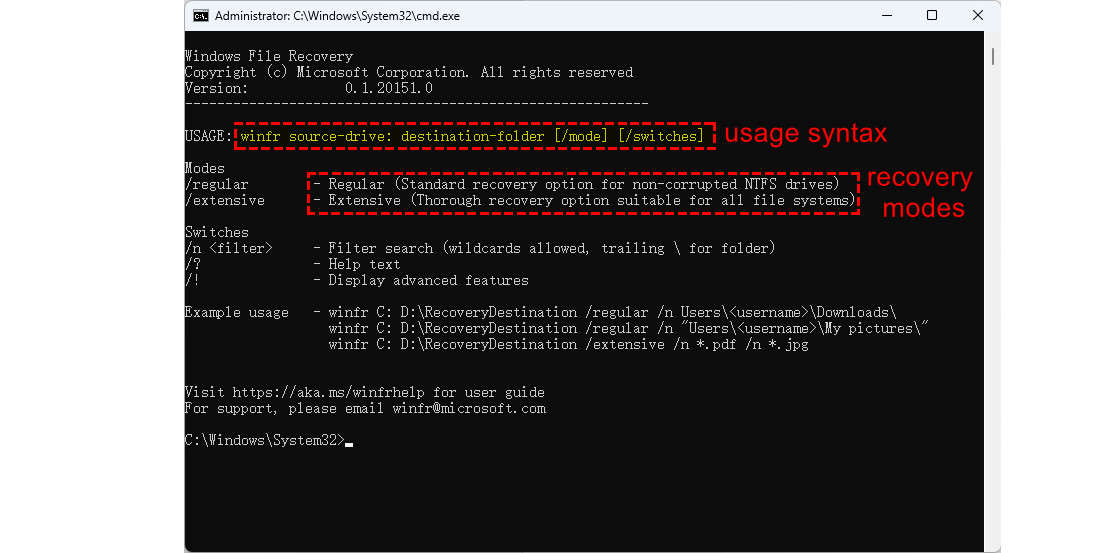
Step 2. Press Windows + S to bring up the search bar. Search for “Windows File Recovery” and open it.
Then, a command prompt window will pop up with a simple instruction sheet inside. It tells you the usage syntax, lists of available modes and switches, and examples of how to use it.
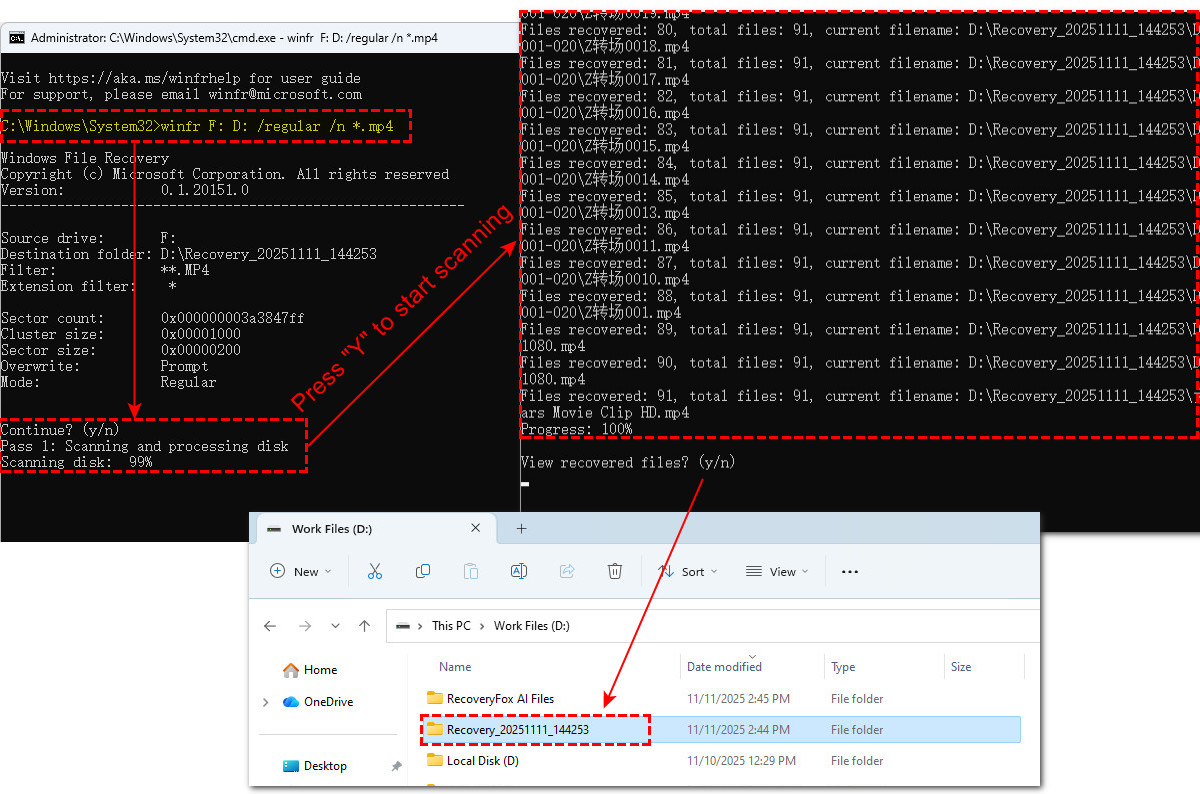
Step 3. Now, input the command to start recovery. For example, I need to recover all MP4 videos from my old HDD drive (F:) and save them to the (D:) drive. I’ll run this command and press Enter:
winfr F: D: /regular /n *.mp4
If you want to recover additional file types, just add the /n *.[fileextension] filter option to your command. For example:
winfr F: D: /regular /n *.mp4 /n *.jpg /n *.pdf
If you still remember the lost file’s or folder’s name, you can use this command and note that if your folder path contains spaces, don’t forget to enclose it in quotes:
winfr F: D: /regular /n “\Test Folder\”
Step 4. The utility won’t start recovering right away. Instead, it summarizes your recovery settings and asks for confirmation before proceeding.
Double-check to make sure you choose a different drive location to save the recovered files.
Then simply press “Y” to continue.
📢 While Windows File Recovery isn’t the easiest tool to use due to its command-line interface, it’s still a powerful and completely free recovery solution. If you want to make the most of it, don’t miss this in-depth guide on how to use Windows File Recovery to recover files efficiently across different scenarios.
Method 3. TestDisk & PhotoRec
Similar to Windows File Recovery, TestDisk & PhotoRec also rely on a command-line interface. However, it’s open-source and you can run it on Windows, Mac, Linux, and various ARM-based platforms to recover data from your old hard drives.
Let’s see how it works:
Step 1. Choose the compatible version and download the software bundle as a zip file from here: https://www.cgsecurity.org/wiki/TestDisk_Download
Although TestDisk and PhotoRec are bundled, they have their own executables. So you can run them separately.
TestDisk can recover lost partitions, reboot non-booting disks, or fix file system errors. If you want to recover media files on your old hard drive, then use PhotoRec.
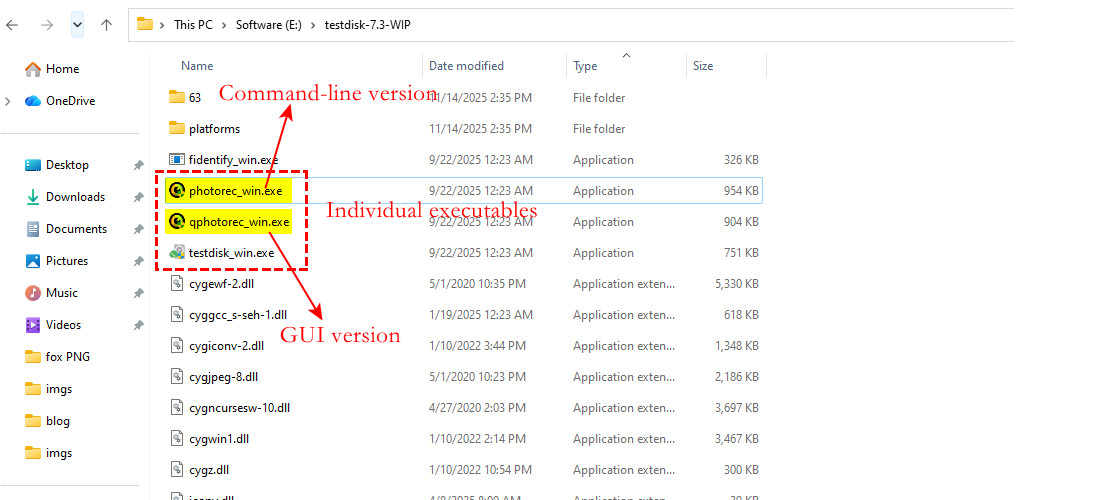
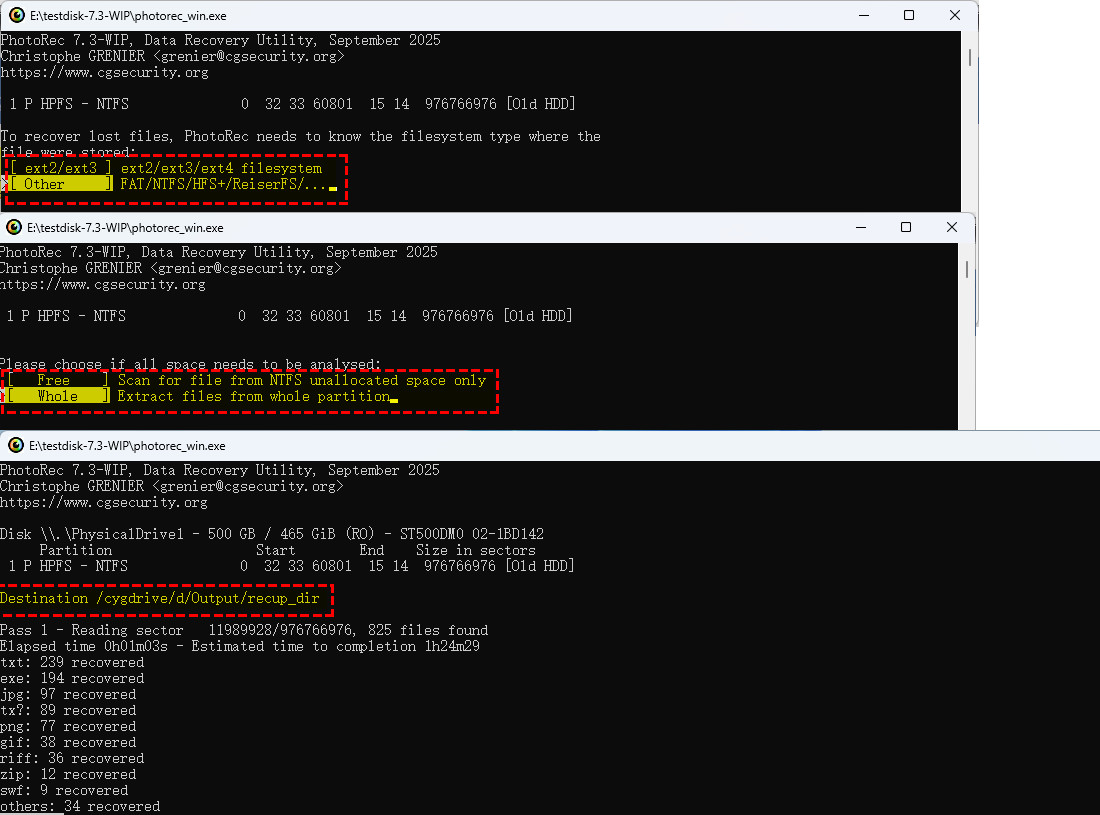
Step 2. PhotoRec has two executables: one runs with commands, while the other one (qphotorec_win.exe) has a graphical user interface (GUI) option.
For starters, the GUI version is easier to work with. Click “Disk” to select the disk or partition containing your lost files.
Step 3. Then select the file system your drive is using and whether you want to scan the full disk or just the unallocated space.
Step 4. Hit “Browse” to select a different drive to save your recovered files.
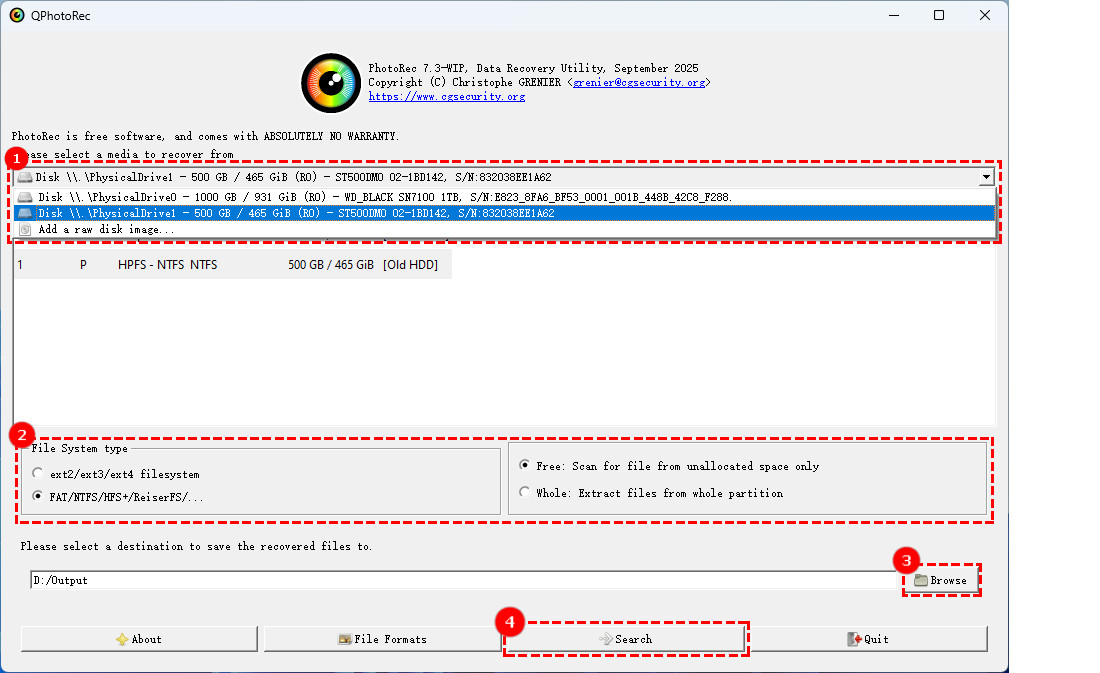
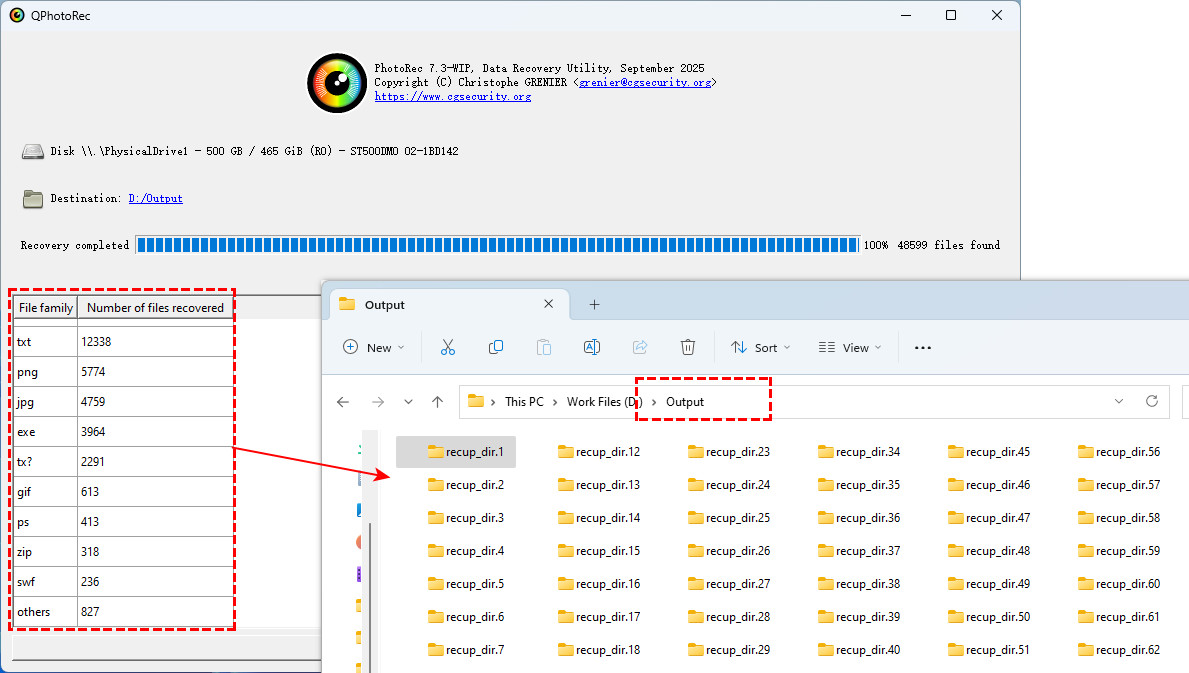
Step 5. Finally, click Research to start recovering. Once complete, it will show you the file types and the number of files it recovered.
Step 6. But if you opt for the CML tool, the operation goes slightly differently.
Double-click on the photorec_win.exe to launch it. Then use the Up/Down arrow keys to select the target drive.
Press “Enter” to confirm your option and proceed.
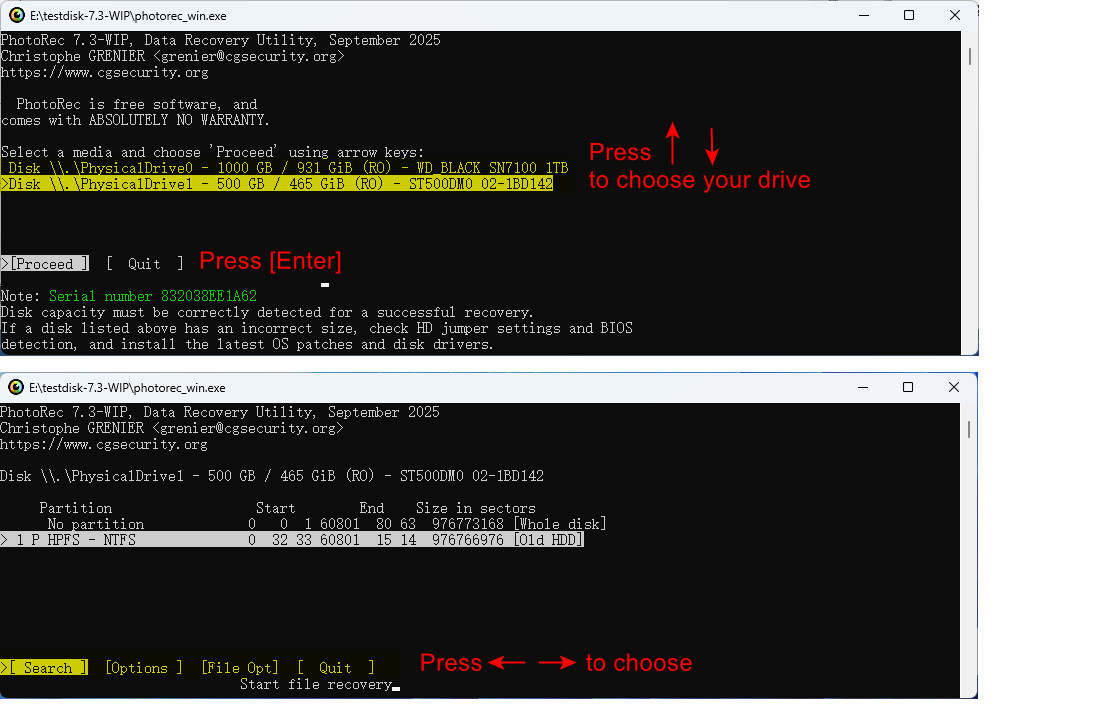
Step 7. PhotoRec will then present you with: [Search], [Options], [File Opt], [Quit]. Press Left/Right arrow keys to make a selection.
Choose [Search] for a full data recovery scan; [Options] to customize how the recovery works; and [File Opt] to control what file types PhotoRec will attempt to recover.
To continue, select [Search] and press “Enter”.
Step 8. Next, you’ll be prompted to select: The file system type (FAT/NTFS/ext/etc.) and the space to analyze (whole disk or free space).
Press “Enter” to start recovering.
Method 4. Consult a Professional Data Recovery Service
In certain situations, it's highly advisable to seek assistance from a professional data recovery service rather than attempting any do-it-yourself (DIY) solutions. You should consider this option if:
- The data is too valuable to risk further damage.
- The drive has been exposed to water, fire, or severe impact.
- The drive has been physically damaged (e.g., clicking, humming, buzzing noises).
- You notice burning smells or abnormal heat when connecting the device.
- The system fails to detect the drive even after trying on multiple computers or with different cables.
Conclusion
That’s everything you need to know about how to recover data from an old hard drive. This beginner-friendly guide walks you through the entire process, from connecting the drive to performing the actual recovery, so you can bring your files back with confidence.
When it comes to ease of use, RecoveryFox AI is the most beginner-friendly option. It requires no technical experience, and unlike the other methods, it supports file previewing, which can save you a lot of time, especially when recovering old photos or documents.
Of course, tools like Windows File Recovery and PhotoRec also have their strengths. Despite their more complex command usage, they are completely free, making them great choices for users who don’t mind the learning curve.
The final choice depends on your situation and comfort level. Pick the one that suits your needs, and you’ll be well on your way to getting your lost files back.
Thanks for reading till the end. Have a nice day!
Recover Data from Old Hard Drive FAQs
Here are some common issues encountered when attempting to recover data from old hard drives, along with their solutions.
If your drive is connected properly, check its power supply requirement. You may need an additional power source for a 3.5-inch drive or consider using to a different connection adapter.
If everything seems correct, open "Disk Management" to see if the drive is recognized. If it isn’t, you may need to assign it a drive letter.
To safely access data from your old drive, connect it using a compatible adapter or enclosure. Avoid booting from the old drive or installing its operating system on your current machine to prevent any potential issues.
Data recovery results depend heavily on the condition of your storage device and whether your lost data has been overwritten.
Files on older hard drives may be corrupted or not fully recovered during the scanning process, resulting in incomplete or damaged file structures that cannot be opened. This is a common problem with old or faulty hard drives. If the original data blocks of a file have been partially or completely overwritten by new data, it may also be impossible to recover or open that data.


