






 Free Download
 Windows


You can right-click the Recycle Bin icon on the desktop and select Empty Recycle Bin. Alternatively, you can use Disk Cleanup, Storage Sense, Command Prompt, or Windows PowerShell to empty the Recycle Bin or the hidden $RECYCLE.BIN system folders on each drive.
TL;DR:
If you want to empty the Recycle Bin in Windows 10/11, you can try the following 6 common methods:
- One-click desktop option: Right-click the Recycle Bin icon on your desktop and select “Empty Recycle Bin.”
- Clear in File Explorer: Open File Explorer, navigate to the Recycle Bin, and delete files from there.
- Storage Sense: Enable Storage Sense in Settings to automatically delete Recycle Bin contents on a schedule.
- Disk Cleanup: Use the built-in Disk Cleanup tool to remove Recycle Bin files and other temporary data.
- Command Prompt: Run commands in Command Prompt to empty the $RECYCLE.BIN contents or the entire folder via command line.
- Windows PowerShell: Use PowerShell commands to force empty all $RECYCLE.BIN folders in Windows 11/10.
Although the Recycle Bin temporarily stores deleted files for easy recovery, keeping unnecessary items can take up valuable storage space. Once you’re sure those files are no longer needed, knowing how to empty the Recycle Bin properly becomes essential.
The quickest method is to right-click the Recycle Bin icon on your desktop and select Empty Recycle Bin, but there are also more efficient and secure options, especially for sensitive data or automatic storage management. In this guide, we’ll show you 6 proven ways to empty the Recycle Bin in Windows 11/10, helping you clean up storage safely and efficiently in 2026.
How to Empty Recycle Bin in Windows 11/10? 6 Methods Here!
Method 1. Empty the Recycle Bin from Desktop
This is the simplest and quickest method, ideal for everyday cleanup.
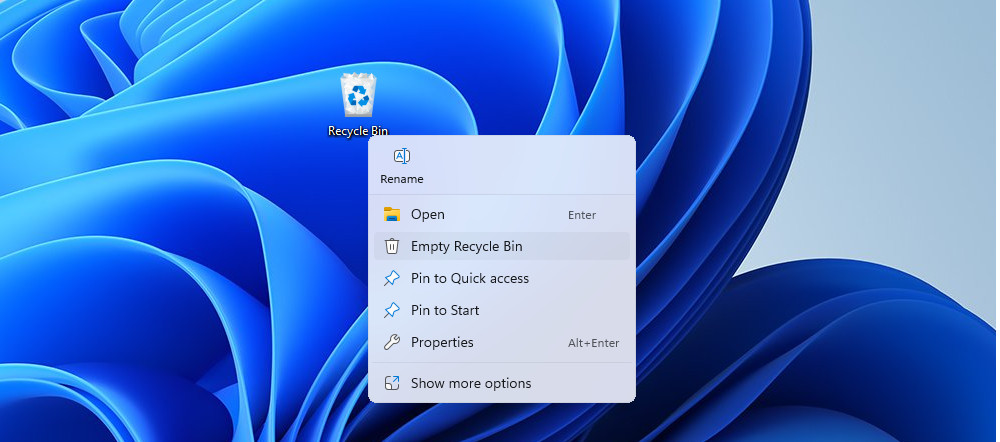
Step 1. Locate the “Recycle Bin” icon on your Windows 11 or Windows 10 desktop
Step 2. Right-click the icon and select “Empty Recycle Bin”.
Step 3. Then a confirmation window will pop up “Are you sure you want to permanently delete XX items in this folder?”. Click “Yes" to start deleting.
📢
Note: This one-click deskop option will empty the Recycle Bin on all drives. Avoid this method if you need to keep specific files.
Method 2: Empty Recycle Bin in File Explorer
If you don’t want to delete everything and prefer more control, this method allows precise file selection.
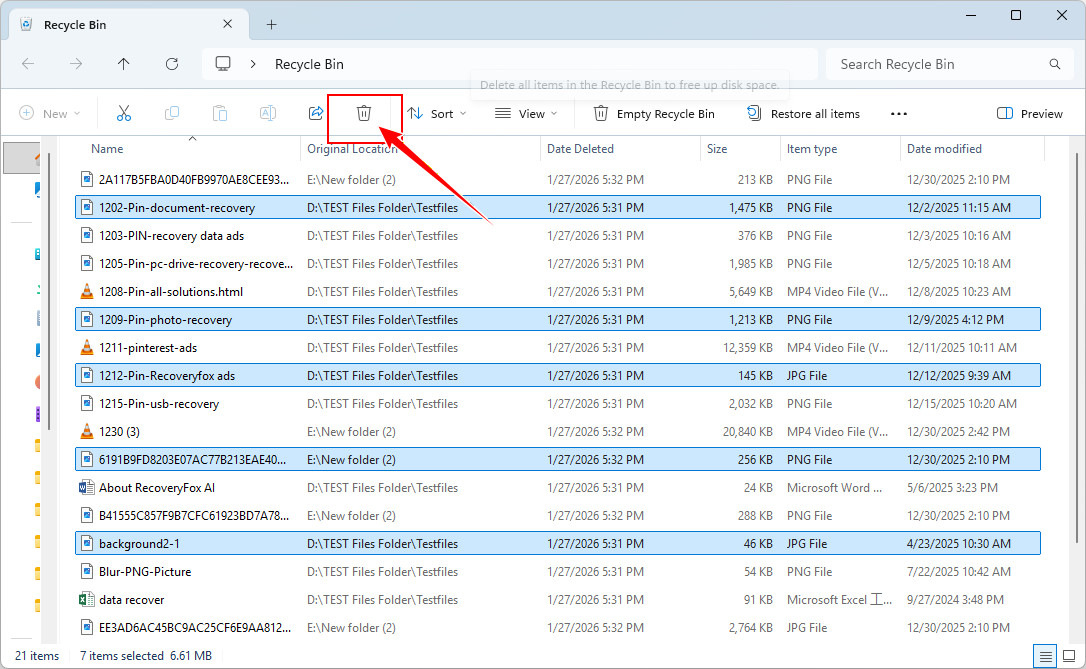
Step 1. Double-click the “Recycle Bin” icon to open it.
Step 2. Browse the deleted files. Hold “Ctrl” to select the items you want to delete permanently, or press “Ctrl + A” to select all.
Step 3. After selecting files, you can right-click and select “Delete” or click “Empty Recycle Bin” from the top toolbar.
Method 3: Automatically Empty Recycle Bin Using Storage Sense
Windows 11 and Windows 10 include a “Storage Sense” feature, which automatically deletes unnecessary files, including items in the Recycle Bin. You can enable this feature to free up disk space without manual cleanup.
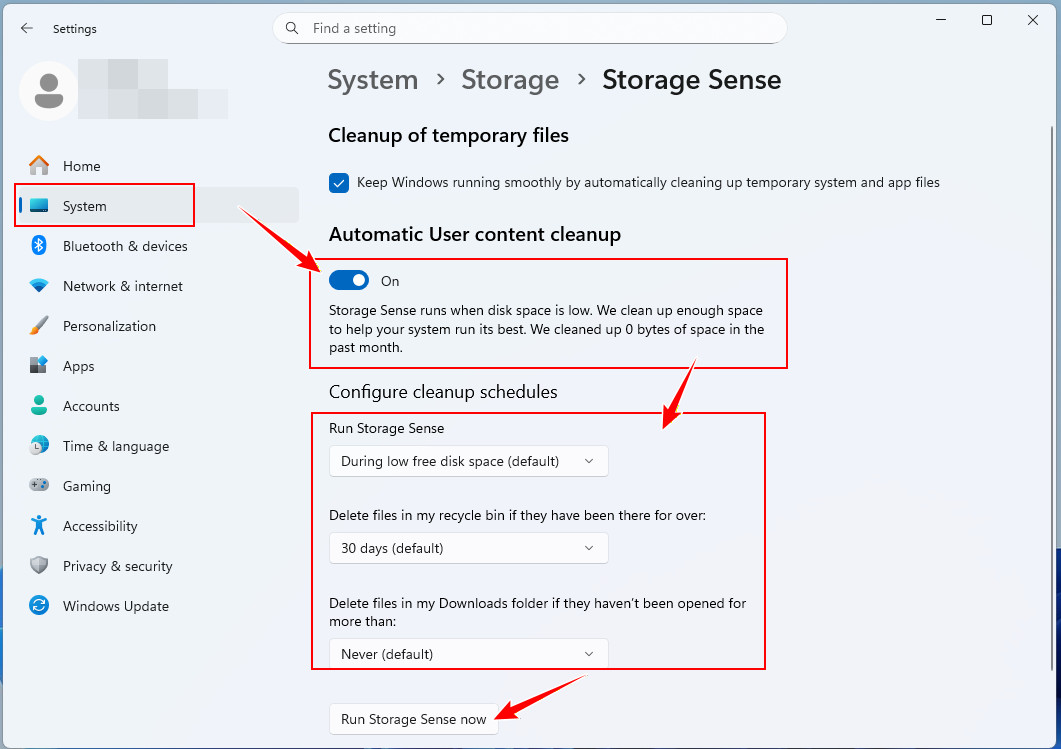
Step 1. Press Win + I to open Settings.
Step 2. Go to System >Storage.
Step 3. Check the option under the “Cleanup of temporary files” tab.
Step 4. Turn on “Automatic User Content Cleanup”.
Step 5. Then, configure the Storage Sense settings to your preference, including when Storage Sense should run and how long files are kept (Never, 1day, 14 days, 30 days, 60 days).
You can also configure Downloads folder cleanup if desired.
Step 6. If you want to clean the Recycle Bin immediately, choose “Run Storage Sense now”.
📢 If you’ve already enabled Storage Sense but it still fails to automatically clean up disk space, it’s often due to scope limitations, file locks, or background processes interfering with cleanup. To better understand the root causes and how to resolve them, you can refer to this detailed guide: Why Storage Sense Is Not Working on Windows & How to Fix It
Method 4: Use Disk Cleanup to Empty Recycle Bin
Disk Cleanup is a built-in Windows tool that clears the Recycle Bin along with system cache, temporary files, and old updates.
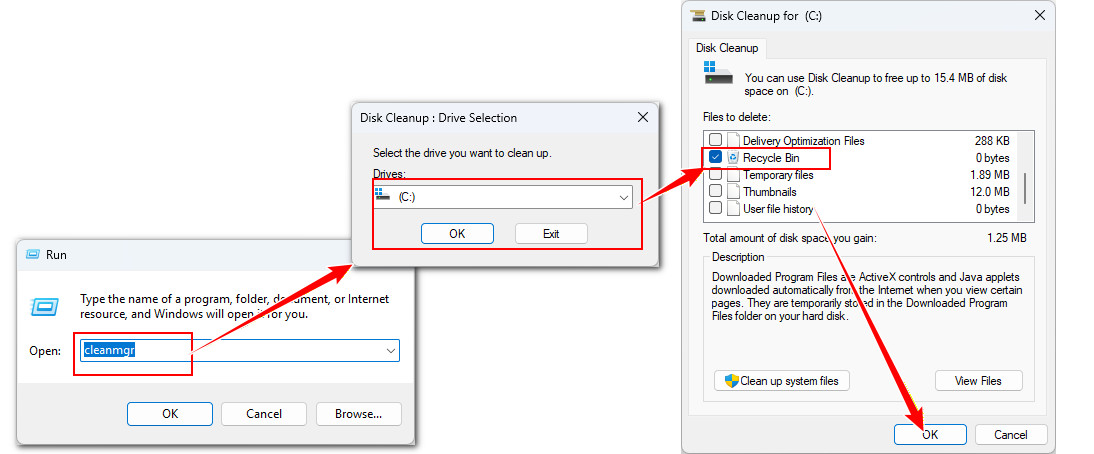
Step 1. Press Win + R, type “cleanmgr”, and press Enter; or search Disk Cleanup from the Start bar to open it.
Step 2. Select the drive you want to clean (usually C:), then click OK.
Step 3. Wait for the scan to complete.
Step 4. Check the Recycle Bin and other options like “Temporary files”, “Update cache”, etc.
Step 5. If you just had a major Windows update and want a deeper cleanup, choose “Clean up system files”. This help free up more storage space by removing your old Windows update leftovers.
Select the drive again, and choose additional items.
Step 6. Click OK > Delete Files to confirm.
Method 5: Force Empty Recycle Bin via Command Prompt
Each drive has its own hidden system folder called $RECYCLE.BIN. If you want to free up space on a specific disk without emptying the entire Recycle Bin, you can do this using Command Prompt.
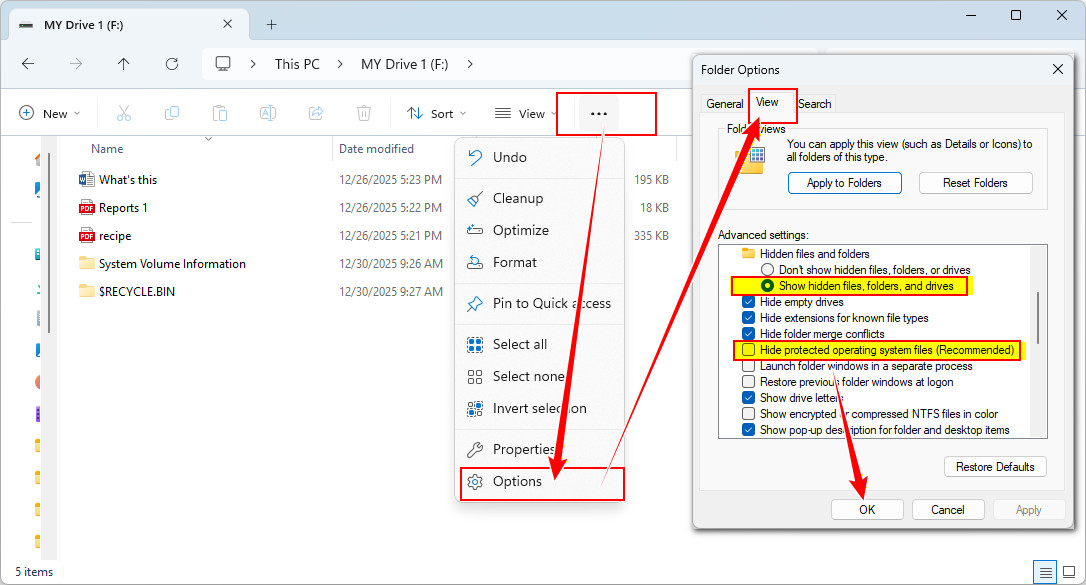
Step 1. Enable the hidden $RECYCLE.BIN folder by clicking Options > View.
Then check “Show hidden files, folders, and drives” and uncheck “Hide protected operating system files (Recommended)”.
Click OK.
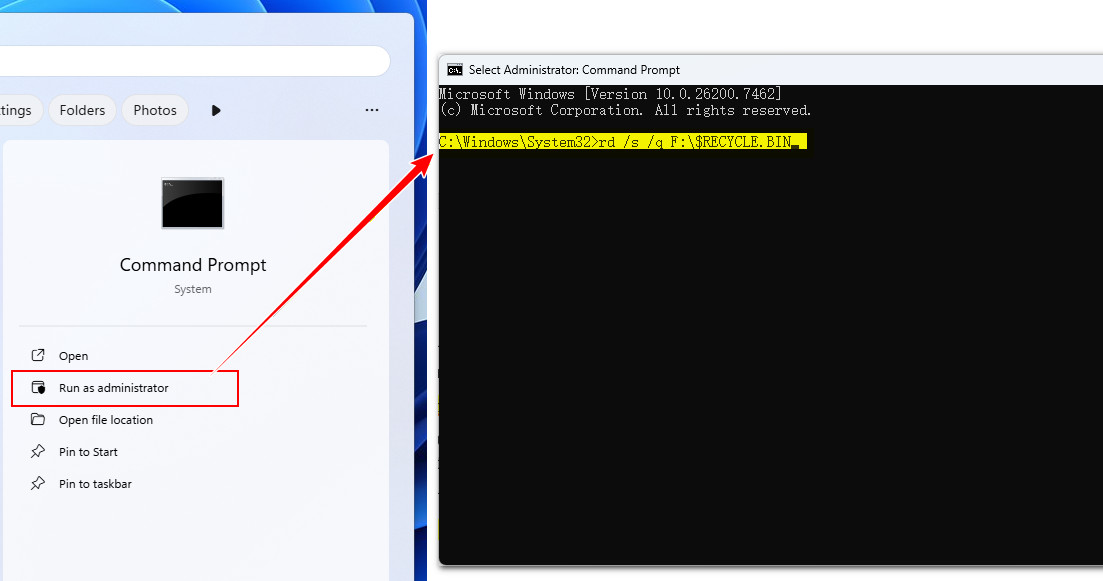
Step 2. Now, press Windows + S and type “cmd” to search for the Command Prompt tool.
Step 3. Right-click on it and choose to run as an administrator.
Step 4. To empty the $RECYCLE.BIN on the target drive. For example, the F: drive, you should type this command and press Enter to run it.
rd /s /q F:\$RECYCLE.BIN
Don’t forget to replace F: with the drive letter you want to clean (D:, E:, etc.).
Step 5. Windows will automatically recreate the $RECYCLE.BIN folder the next time you delete a file.
📢
What this command does:
rd – Removes a directory
/s – Deletes all subfolders and files
/q – Runs quietly (no confirmation prompts)
rd – Removes a directory
/s – Deletes all subfolders and files
/q – Runs quietly (no confirmation prompts)
Method 6: Use PowerShell to Empty Recycle Bin Windows 10/11
Another command-line tool you can use to empty $RECYCLE.BIN on Windows 11/10 is Windows PowerShell. This built-in tool can also target the Recycle Bin of specific drives.This method is especially useful for advanced users.
Step 1. Search for "PowerShell", right-click Windows PowerShell, and select "Run as administrator".
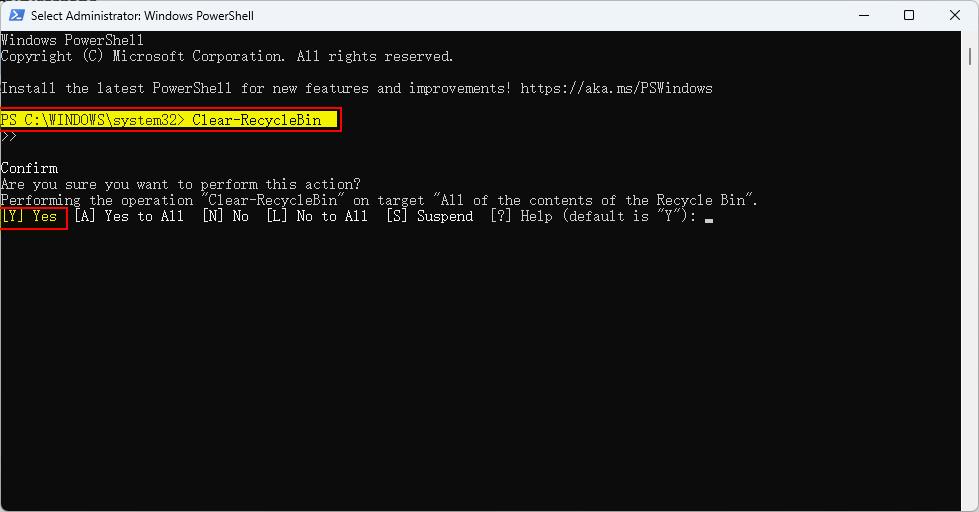
Step 2. To empty the Recycle Bin for all drives, type the following command and press Enter.
Clear-RecycleBin
Step 3. When PowerShell asks for confirmation, press Y and then Enter to proceed.
If you want to skip the confirmation prompt, you can use this command:
Clear-RecycleBin -Force
Step 4. To empty the Recycle Bin for a specific drive, e.g., F, run this command:
Clear-RecycleBin -DriveLetter F
Bonus: Need to Recover from Emptied Recycle Bin? Try RecoveryFox AI!
Emptied the Recycle Bin and realized accidentally delete important files? Don’t panic! In many cases, deleted files are still recoverable as long as they haven’t been overwritten.
RecoveryFox AI is a smart Windows data recovery tool that helps you recover files from a permanently emptied Recycle Bin, no matter which cleanup method was used.
Quick scan, free preview, and smart recovery! Try it now!
✅ Steps to Recover Files from an Emptied Recycle Bin
Launch this powerful Recycle Bin recovery tool and click Recycle Bin to start scanning immediately.
It can scan the $RECYCLE.BIN system folders across all connected drives and intelligently identify previous partitions, including lost or repartitioned volumes.
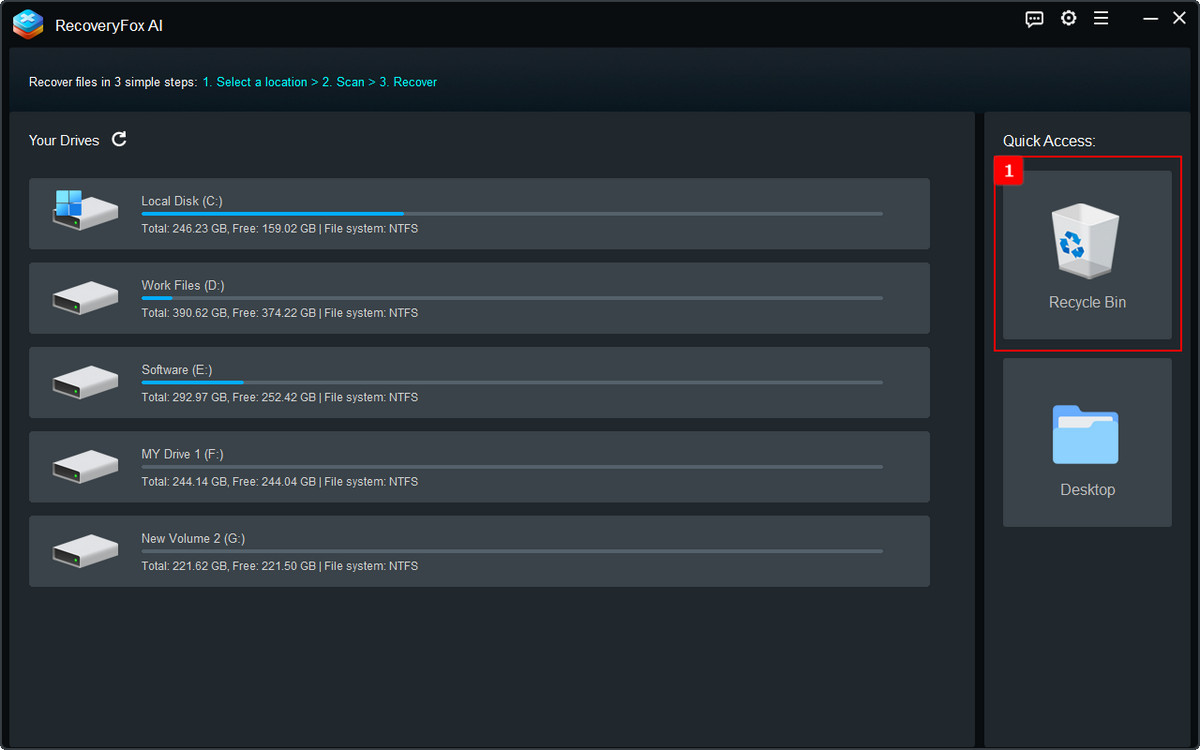
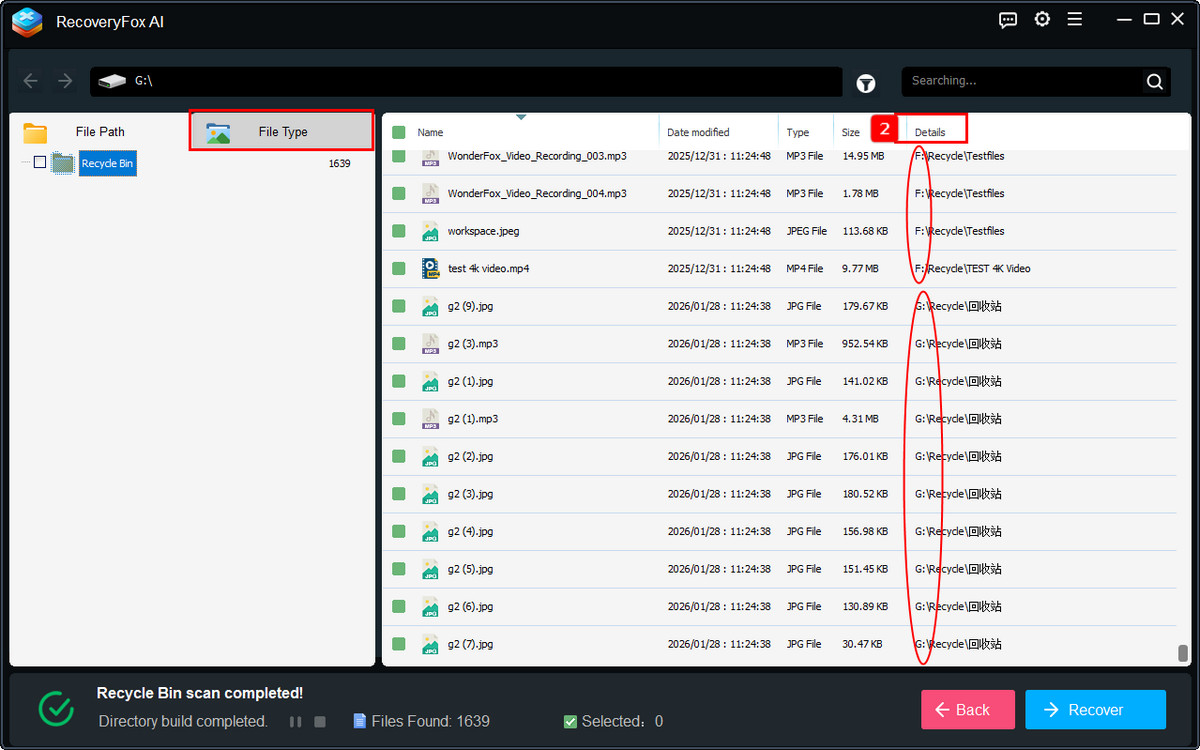
Once the scan is complete, all recoverable files will be displayed according to their detected Recycle Bin locations on different drives.
Alternatively, you can browse files by File Type to quickly find specific items.
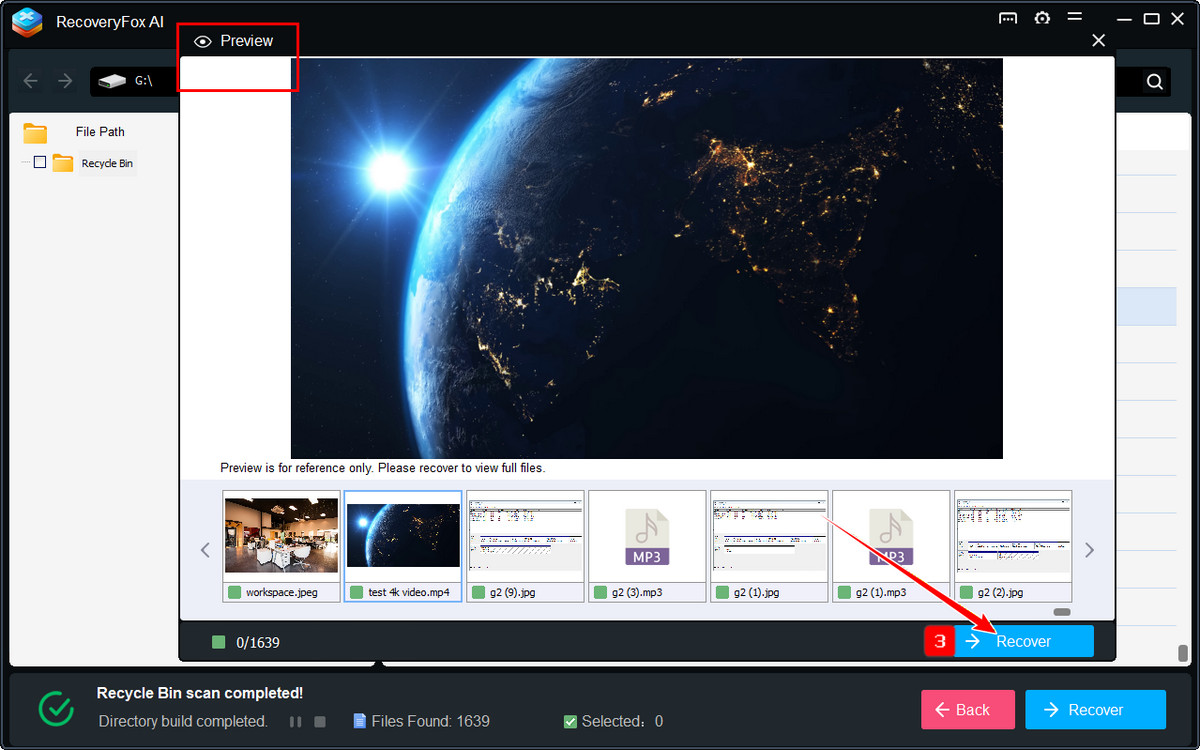
Simply click the eye icon to preview a file.
After confirming the files you want to recover, click Recover.
To avoid overwriting deleted data, it is highly recommended to save recovered files to a different location instead of restoring them to their original path.
📢 The Quick Access option (Recycle Bin and Desktop) performs a Quick Scan, which can restore files whose file index has not been overwritten.
If the results are incomplete or the files cannot be recovered, we recommend running a full scan on the drive where the deleted files were originally stored.
If the results are incomplete or the files cannot be recovered, we recommend running a full scan on the drive where the deleted files were originally stored.
In Conclusion
These 6 methods cover all common scenarios for how to empty the Recycle Bin in Windows 10 or 11.
Regularly clearing the Recycle Bin helps reclaim disk space, reduce system clutter, and keep your PC running smoothly in 2026 and beyond. Choose the method that works best for you and take control of your storage with ease.
FAQs
Here are some commonly asked questions about empty the Recycle Bin on Windows.
There is no default one-click shortcut, but you can select the Recycle Bin icon and press Ctrl + D, then confirm deletion.
This usually happens due to file corruption, insufficient permissions, files in use, or disk errors. Restarting Windows or emptying the Recycle Bin using Command Prompt or PowerShell often resolves the issue.
📚 Related: Can’t Delete a File or Folder Because It Is in Use on Windows? Try This Fix
First, connect your external hard drive to your computer. Next, run Command Prompt or PowerShell as an administrator, and execute the command provided in this guide to delete the hidden $RECYCLE.BIN folder on that drive.

A technical content writer for RecoveryFox AI at WonderFox Soft, creating clear guides on data recovery, storage technologies, and Windows troubleshooting. She specializes in simplifying complex technical topics and enjoys exploring technology, running, and discovering new experiences.





 English ^


