






 Free Download

 Windows


Yes, but you must back up your important files before formatting. Copy them to another storage device, format the drive, and then restore your files. If the drive is inaccessible, use data recovery software to retrieve recoverable files before formatting.
Formatting an external hard drive usually erases its existing files. However, you can format an external hard drive without permanently losing your data if you back up or recover your important files before formatting.
The right approach depends on your drive’s current condition:
If the drive is still accessible, you can copy your files to another storage device first.
If Windows cannot access the external drive or prompts you to format it, you should recover your data before attempting to format it.
First, identify your drive’s situation and follow the corresponding instructions below to protect your files and format the external hard drive safely.
💡💡 Note: Formatting an internal hard drive is different from formatting an external hard drive. You cannot format the Windows system drive (usually C:) while Windows is running from it because the operating system and its files are in use. To format it, you need to boot from external installation or recovery media, such as a Windows installation USB.
How to Format an External Hard Drive Without Losing Data?
The key to formatting an external hard drive without losing important files is to secure your data before formatting. Depending on whether your external hard drive is accessible, you may need to back up your files manually or use formatted data recovery software to retrieve them first.
Let’s look at the two common situations and the appropriate solutions for each.
💠 Case 1: If Your Hard Drive Data Is Inaccessible >>
💠 Case 2: If Your Hard Drive Data Is Accessible >>
💠 Case 1: If Your Hard Drive Data Is Inaccessible
If your external hard drive suddenly becomes inaccessible, disappears from File Explorer, or displays the error message “You need to format the disk in drive X before you can use it”, don’t format it immediately.
These symptoms may indicate file system corruption, a RAW file system, an unallocated partition, or other logical errors. Although Windows cannot access your files normally, your data may still be recoverable.
The safest approach is to recover your important files first and then format the drive to make it usable again.
Step 1. Check Whether Windows Detects Your External Hard Drive
1. Connect the external hard drive to your Windows computer.
2. Press Win + X and select Disk Management. Alternatively, press Win + R, type diskmgmt.msc, and press Enter.
3. Locate your external hard drive and check its status.
If the drive appears as RAW or Unallocated, its file system may be corrupted, unrecognized, or missing. Proceed to the next step to check for recoverable files.
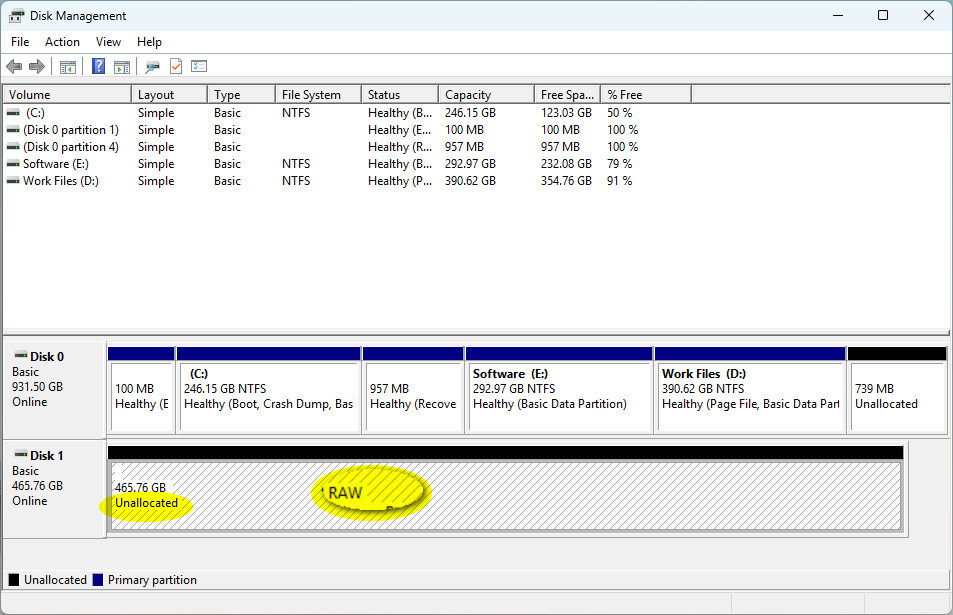
👁️🗨️ If the drive appears here with a valid file system, like NTFS, but cannot open normally in File Explorer, it may simply need a drive letter assigned. First, try assigning a drive letter in Disk Management. If the drive remains inaccessible, move on to # Step 2.
However, if the drive is not detected at all, try another USB port, cable, or computer. Even worse, if you hear grinding or scraping, repeated hard clicking, and clunking noises, the hard drive may have physical damage. Stop using it and consider professional data recovery service rather than attempting DIY recovery or repairs.
Step 2. Recover Data from the Inaccessible Hard Drive Using RecoveryFox AI
If Windows detects the external hard drive but cannot open it, you can try RecoveryFox AI to scan for recoverable files before formatting.
This hard drive recovery software supports common file systems, including NTFS, exFAT, and FAT12/16/32, as well as unrecognized file systems such as RAW. Its AI-powered scanning technology can help locate and reconstruct fragmented data into complete files if the data has not been overwritten. The intuitive interface also makes the recovery process straightforward.
1. First, free download RecoveryFox AI and install it on a different drive.
2. Launch RecoveryFox AI. Select the inaccessible hard drive from the software’s drive list and click it to start scanning.
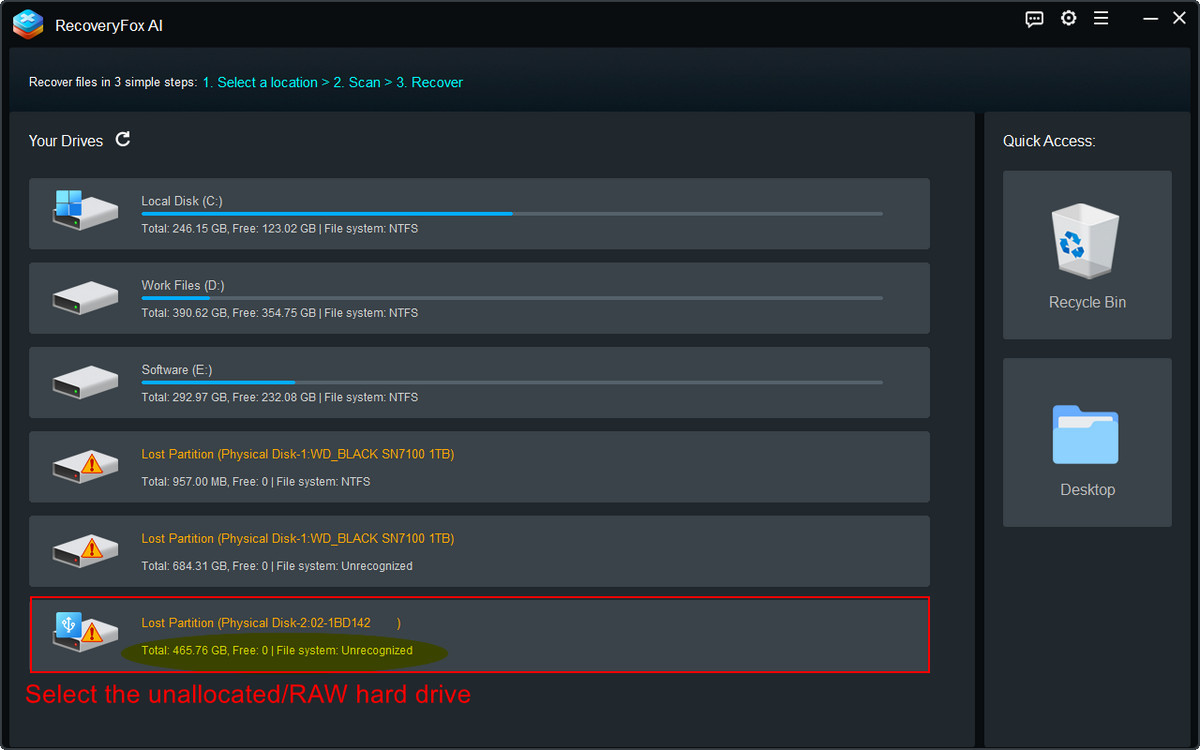
3. Wait for the Quick Scan and AI Scan to search for files. You can browse the scan results while scanning is in progress.
Use the file type filters, keywords, modification date, or file size to locate the files you want to recover.
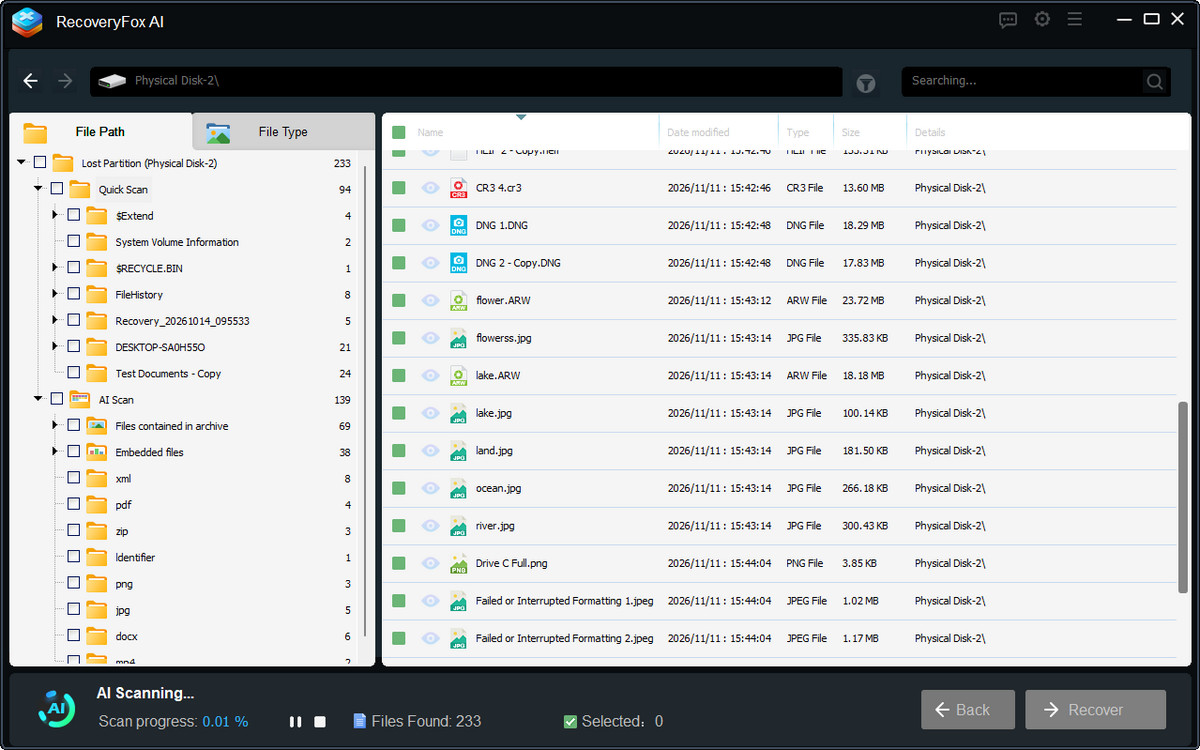
4. RecoverFox AI also lets you preview the scan results without waiting for the entire scan to finish. You can pause the AI Scan at any time to preview the files.
5. To preview a found file, click the eye icon to open it in the Preview window.
This software currently supports previews for various common file types, including videos, audio, images, Word documents, PowerPoint presentations, PDF files, camera photo formats, and even some professional software’s project formats, such as 3DMAX and CAD files.
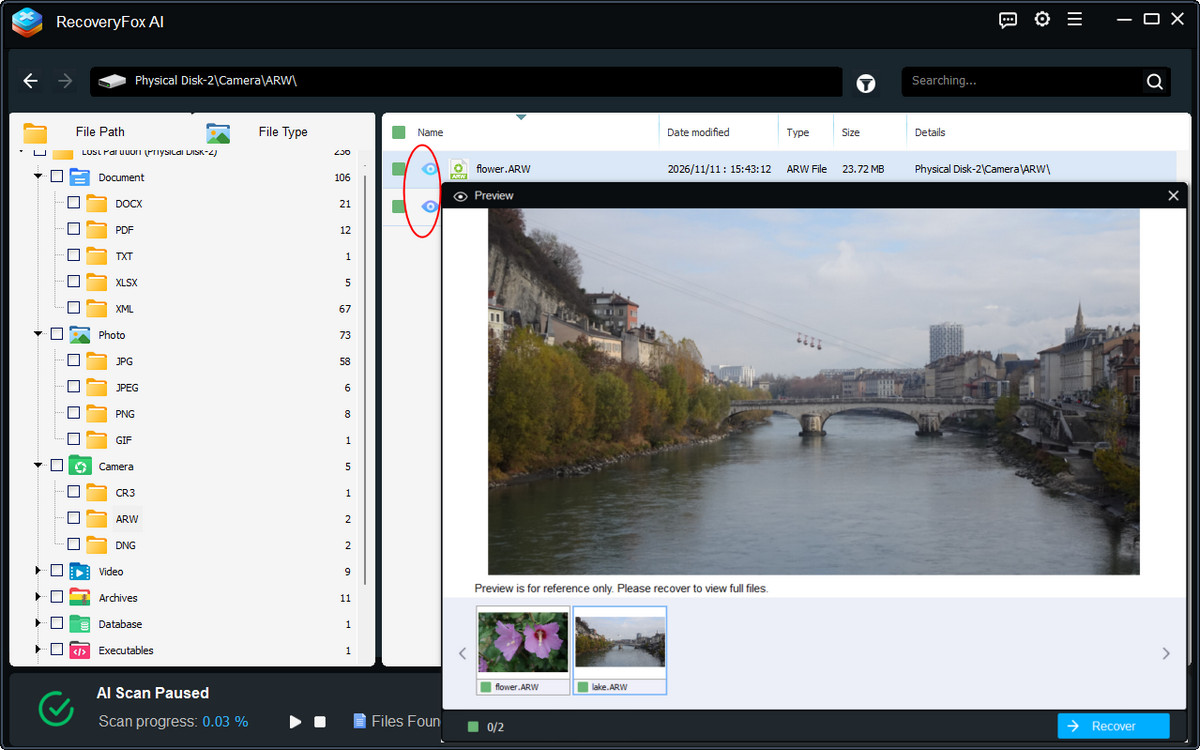
6. Finally, select the files you need and click Recover to save them to another healthy storage device.
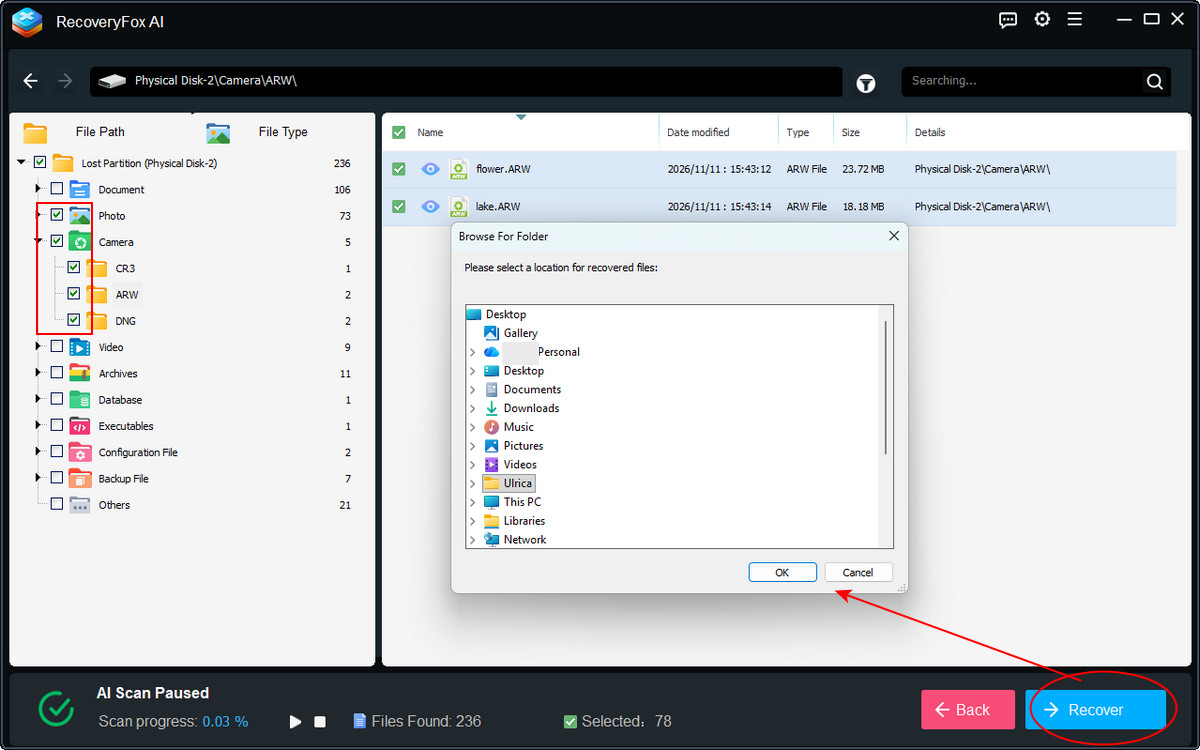
Step 3. Reformat the External Hard Drive
After recovering your important files, open them to verify that they are intact and make sure you have a separate backup.
You can now format the external hard drive to make it usable again.
Usually, you can format an external hard drive directly in File Explorer. However, if the drive is inaccessible or has a RAW or unallocated partition, this option may not be available or may fail.
In this case, you can use either of these two Windows built-in utilities:
👉 Here is how to format your hard drive using Disk Management:
1. Press Win + X and select Disk Management.
2. Locate the hard drive in the list of disks and volumes. Double-check its capacity to ensure you choose the right one.
➡️ If it shows “RAW”: Right-click the RAW volume and select Format if the option is available. If formatting is unavailable or fails, right-click the volume, select Delete Volume, and then right-click the resulting Unallocated space and choose New Simple Volume.
➡️ If it shows “Unallocated”: Right-click it and choose “New Simple Volume”.
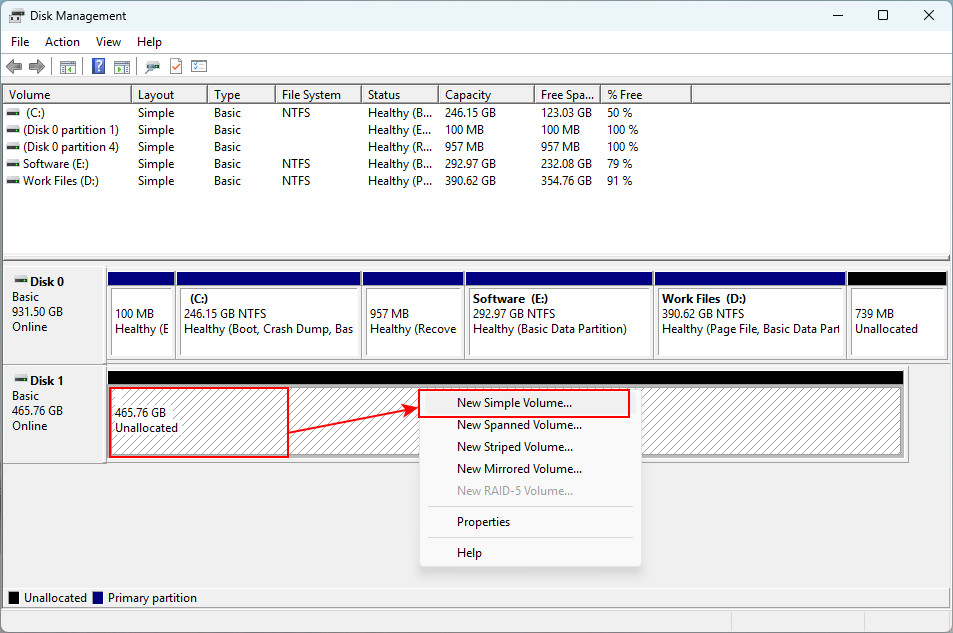
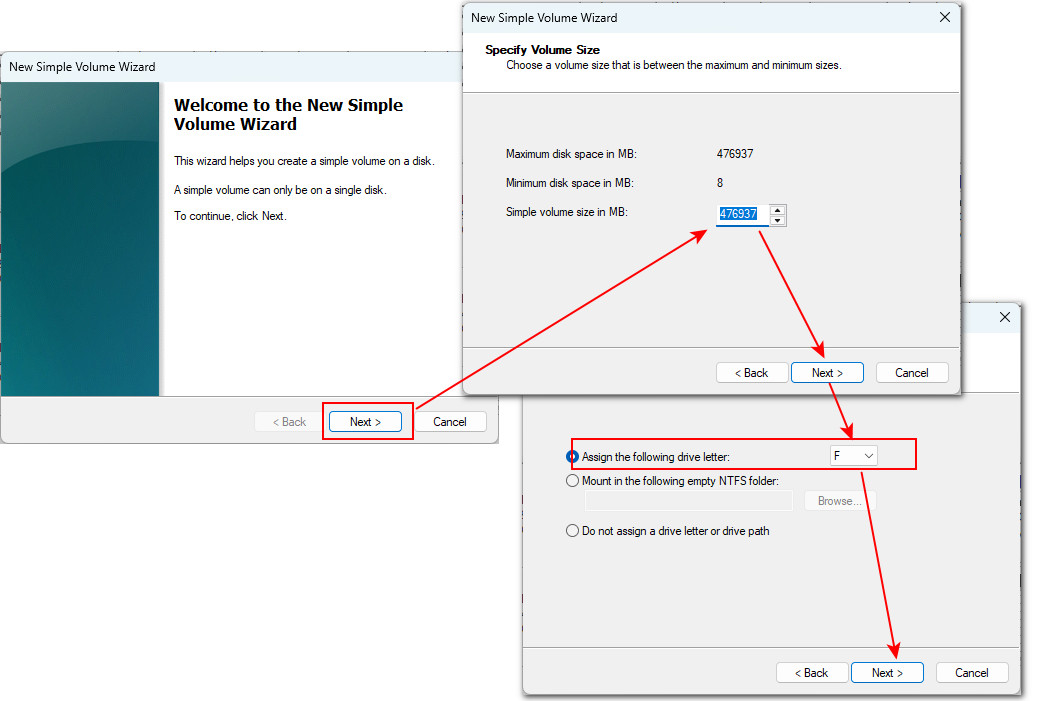
3. In the New Simple Volume Wizard window, click Next and set a volume size. You can leave the default value to use all available space. Click Next.
4. Then, assign a drive letter and click Next.
5. Select a file system for your needs. For an external hard drive, it is recommended to format it as NTFS for Windows devices or exFAT if you need compatibility across different operating systems.
6. Leave “Allocation unit size” on “Default” unless you have a specific requirement.
7. Enter a “Volume Label”, such as "Work" or "Backup," to make the drive easier to identify.
8. Check the “Perform a quick format” option if you want to finish the formatting process faster.
If you uncheck this option, Windows performs a full format, which takes considerably longer, writes zeros to the volume, and checks for bad sectors.
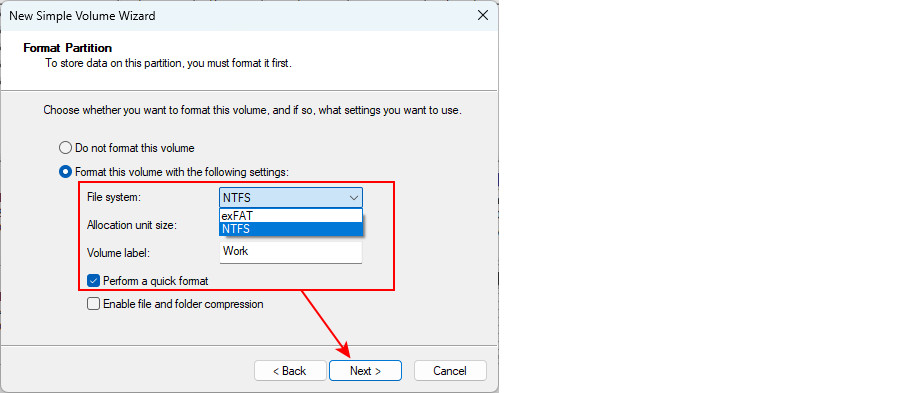
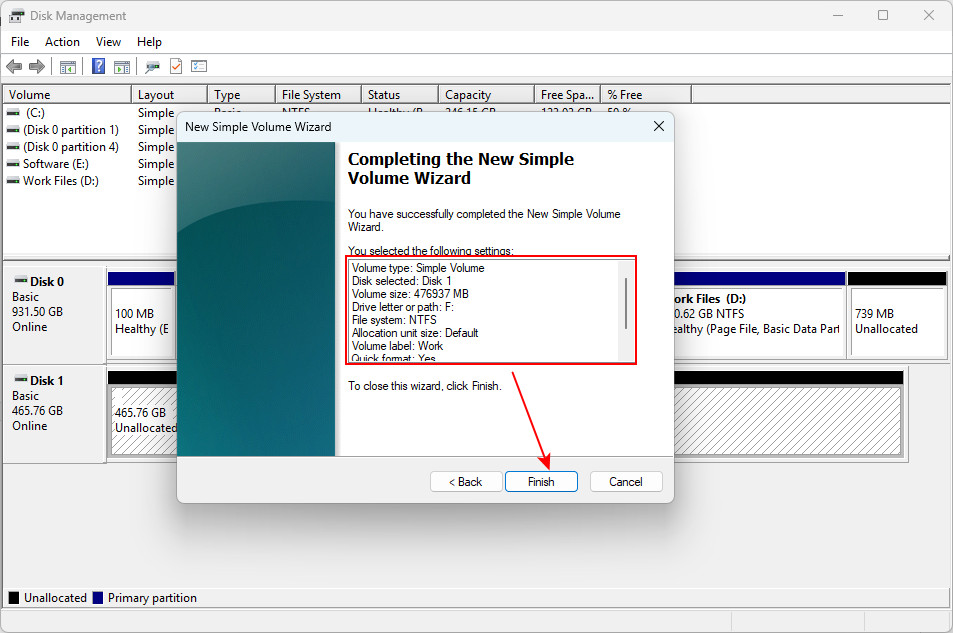
9. Click Next, then carefully review your format settings, and click Finish to start formatting your external hard drive.
10. Once done, you can open File Explorer to check whether the external hard drive is accessible and ready for use.
👉 Here Is How to Format Your Hard Drive Using DiskPart:
⚠️ Warning: The clean command removes the partition information from the selected disk. All existing volumes on that disk will become inaccessible. Only proceed after recovering and verifying your important files. Selecting the wrong disk can cause permanent data loss.
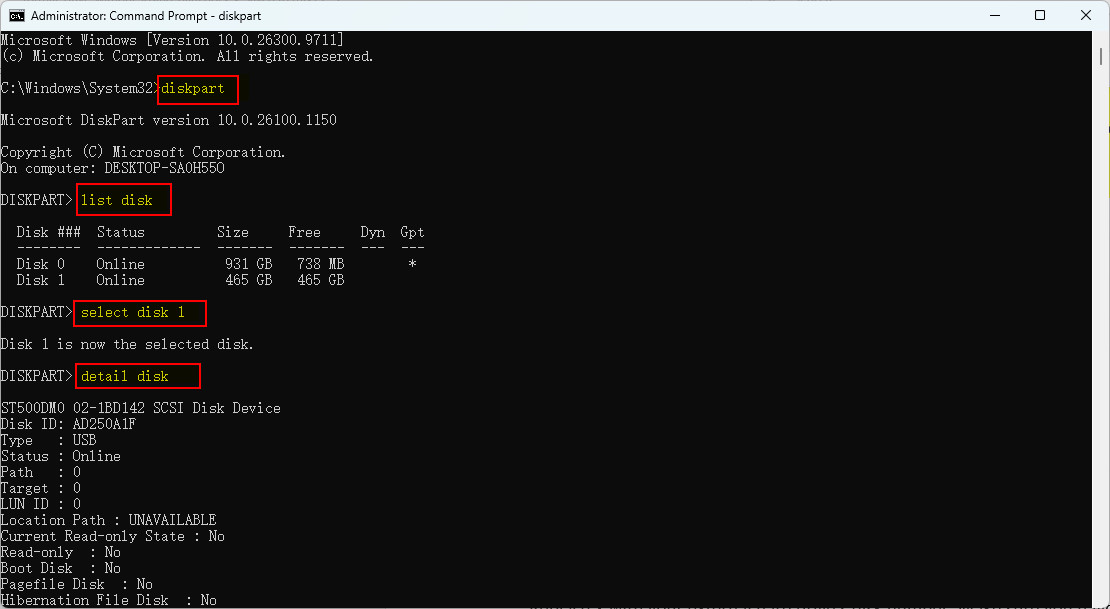
1. Press Win + S, search for “Command Prompt”, and choose “Run as administrator”.
2. Enter the following command and press Enter to launch DiskPart.
diskpart3. Enter this command and press Enter to list connected disks:
list disk4. Identify your external hard drive by its capacity. To double-check the disk information, you can enter:
select disk X
detail disk
Replace X with your external hard drive's disk number. Make sure you have selected the correct disk before proceeding.
5. Once you have confirmed the target disk, run the following command to remove its existing partition information:
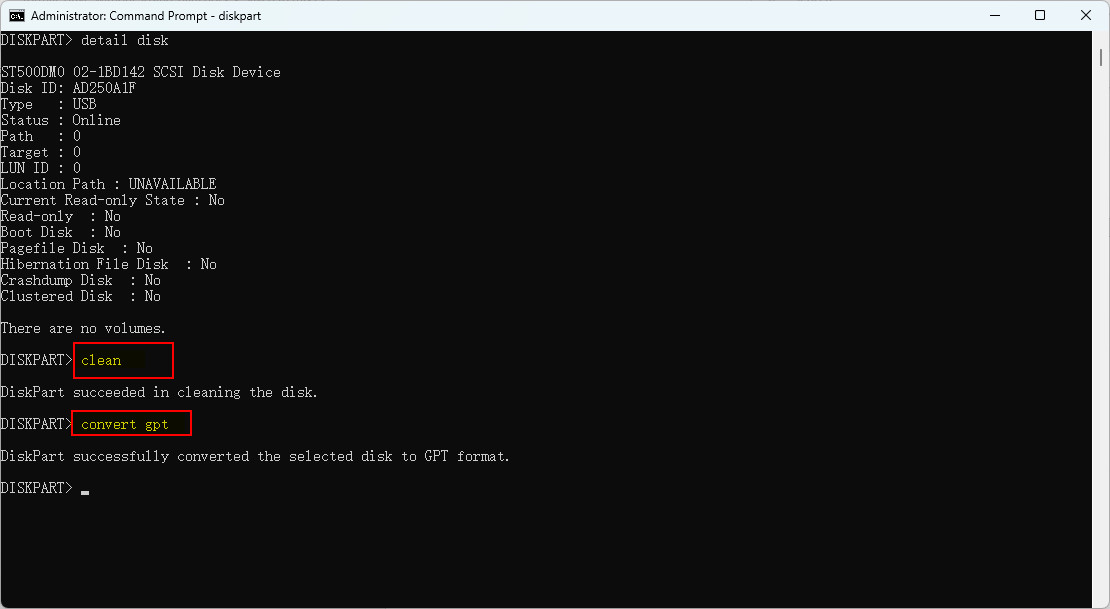
clean6. Choose a partition style. For most modern Windows computers, GPT is recommended. If you need compatibility with older systems, MBR may be more suitable.
🔸 For GPT:
convert gpt🔸 For MBR:
convert mbrRun only one of these commands.
7. Continue with this command and press Enter:
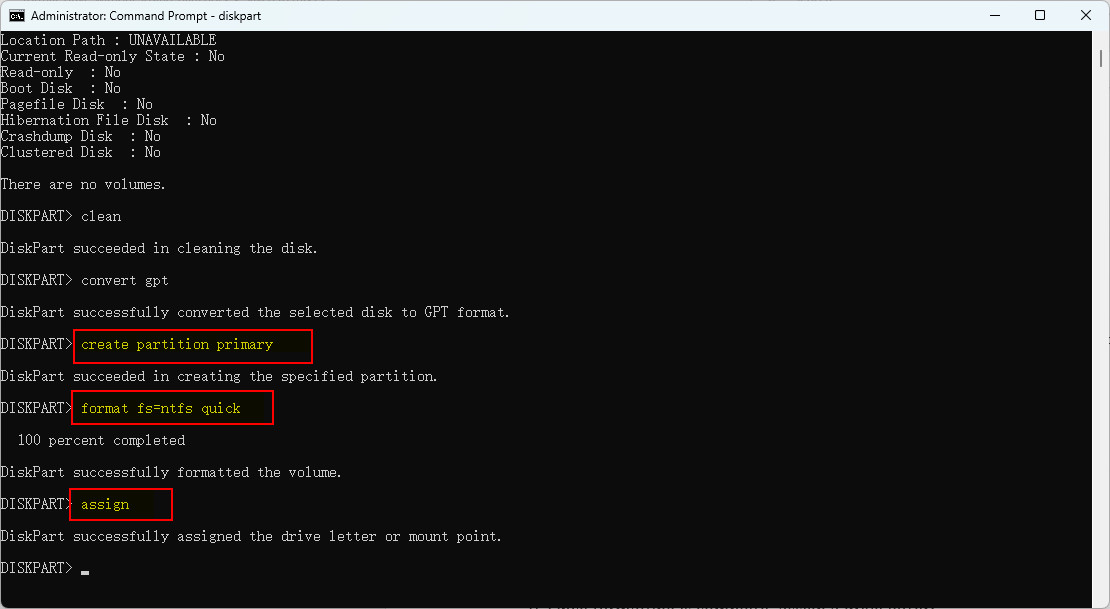
create partition primary8. Then, based on your needs, for example, to format the hard drive as NTFS using quick format, enter:
format fs=ntfs quickIf you prefer exFAT for cross-platform compatibility, use:
format fs=exfat quick9. Once formatting is complete, assign a drive letter:
assign10. When everything is done, run this command and press Enter to exit DiskPart:
exit11. Your external hard drive should now have a new partition and file system. Open File Explorer to check whether it is accessible.
💠 Case 2: If Your Hard Drive Data Is Accessible
If your external hard drive is working normally and you can open your files in File Explorer, you can back up your data directly without using any third-party software.
Step 1. Back Up Your Important Files
1. Connect your external hard drive to your computer and open File Explorer.
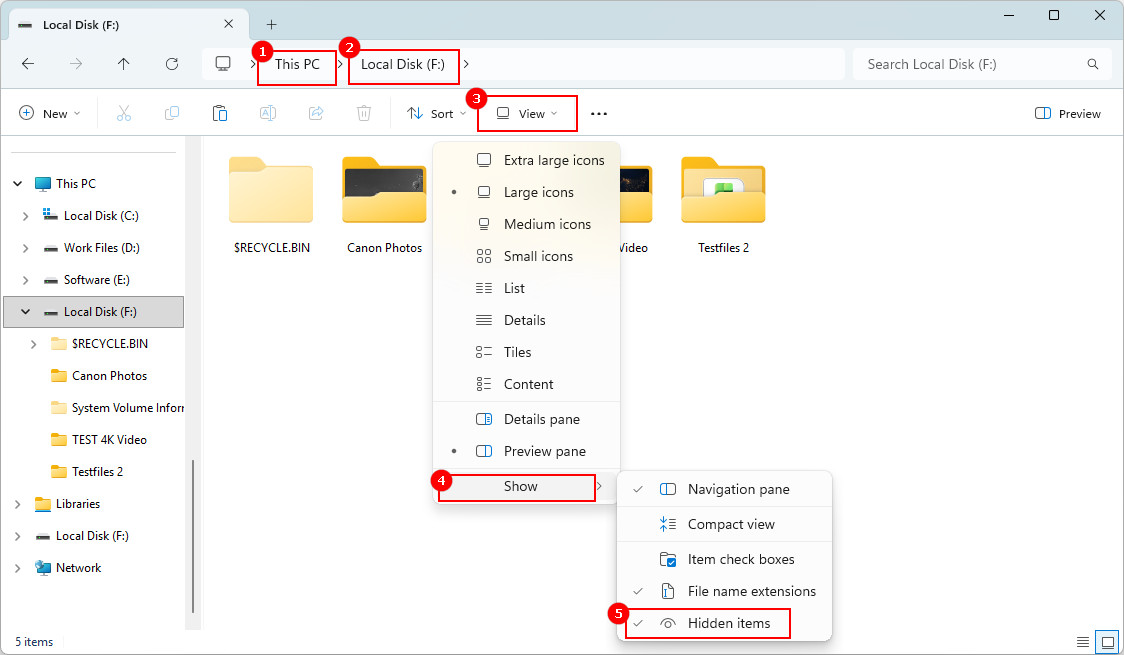
2. Navigate to your external hard drive and go to View > Show. Make sure “Hidden items” is checked so that hidden files and folders are also displayed.
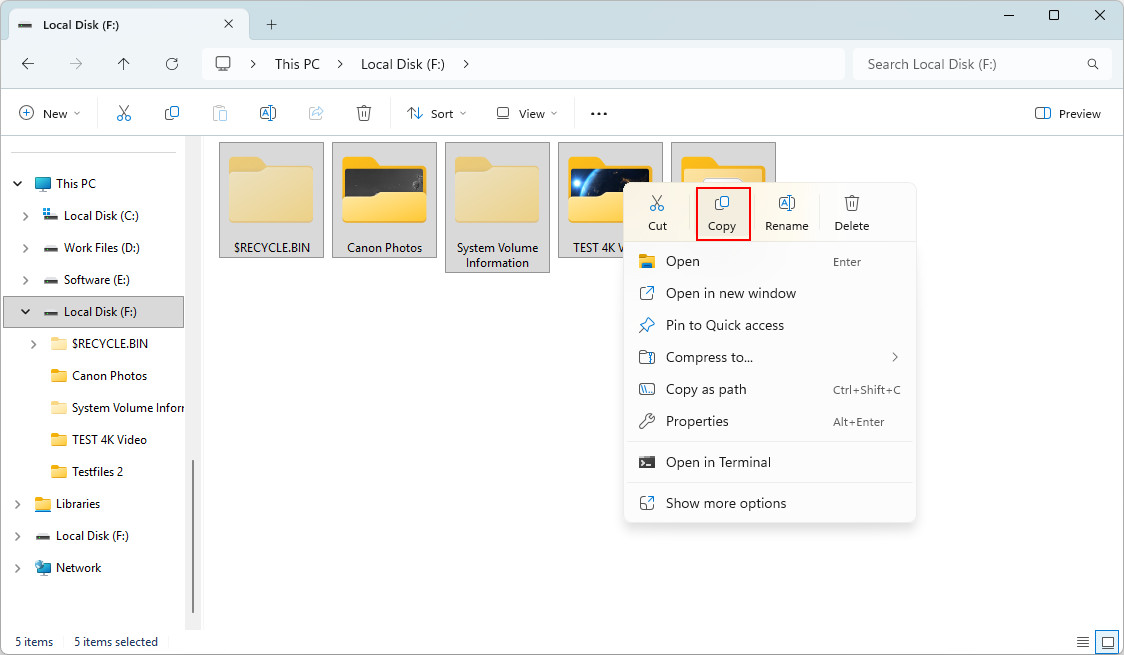
3. Select and copy all the contents of the hard drive.
4. Paste them to a separate, healthy storage location.
5. Wait for the transfer to finish. Then, open several backed-up files to make sure they are accessible and intact.
Step 2. Format the External Hard Drive
Once you have backed up and verified your important files, you can directly format the external hard drive using File Explorer.
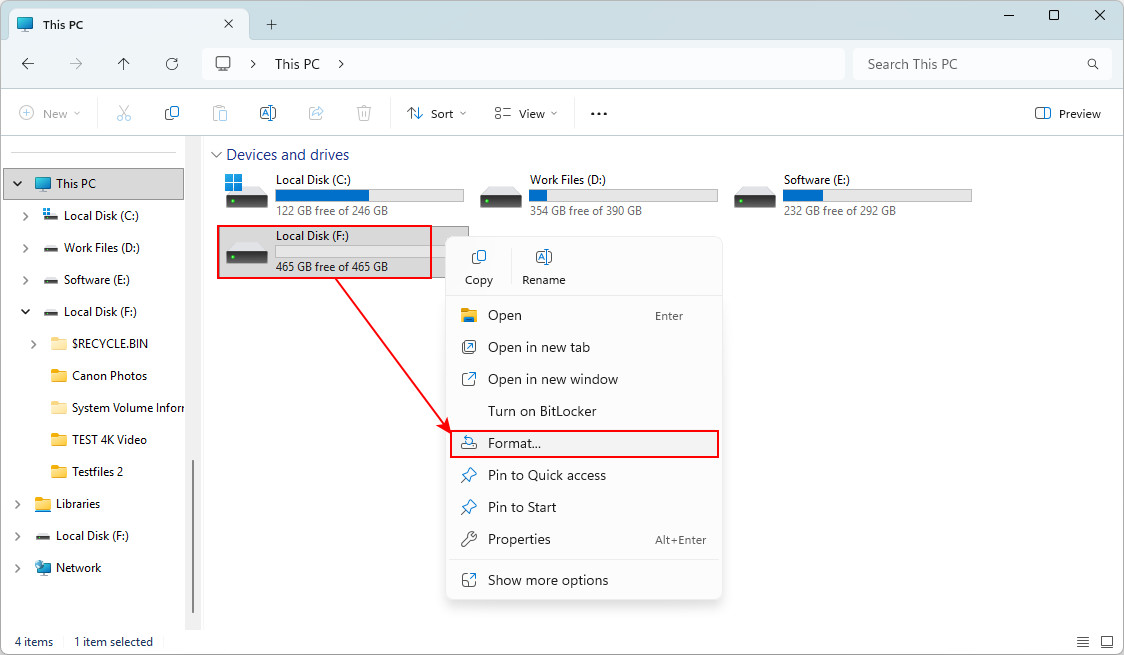
1. Open File Explorer and select This PC from the left panel.
2. Under Devices and drives, right-click your external hard drive and select Format.
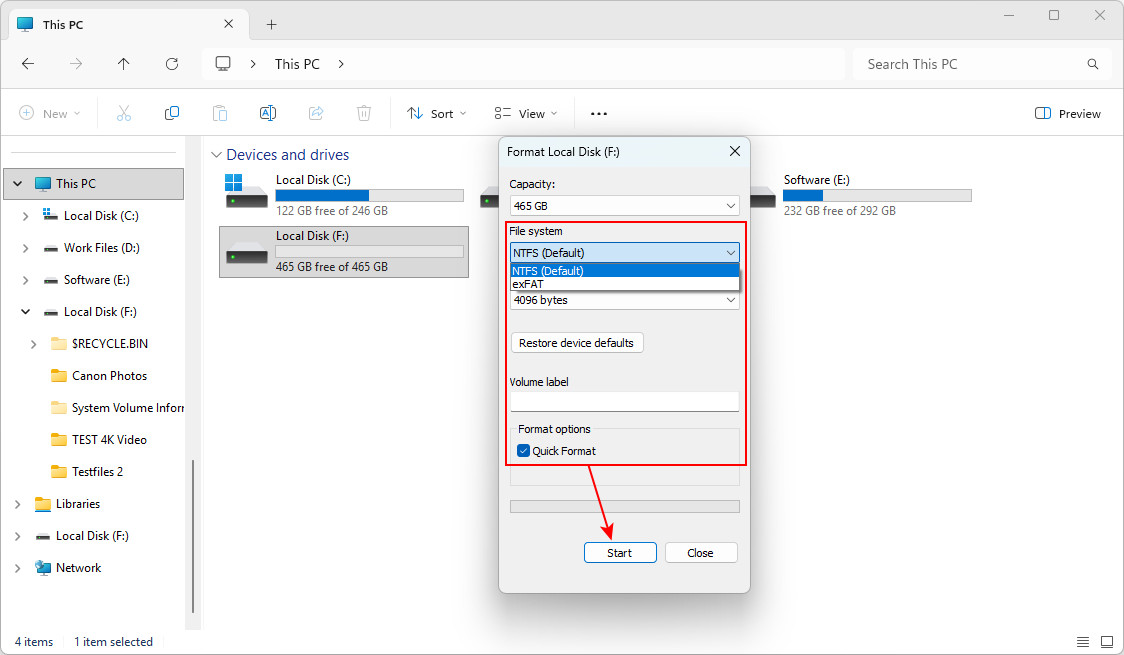
3. In the Format window, choose the file system that best suits your needs:
🔸 NTFS: A suitable choice if you mainly use the drive with Windows computers.
🔸 exFAT: A good option if you need to use the drive across Windows, macOS, and other supported devices.
4. Leave Allocation unit size set to Default.
5. Enter a volume label to give your hard drive a name.
6. Keep Quick Format checked if you want to finish the formatting process faster. If you uncheck it, Windows will perform a full format, which takes longer, checks the drive for bad sectors, and overwrites data areas.
If you simply want to prepare the drive for reuse after backing up your files, a quick format is usually sufficient.
7. Click Start and confirm the warning to begin formatting.
8. Once formatting is complete, open the drive in File Explorer to confirm that it is accessible and ready to use.
Trouble Formatting Your External Hard Drive?
Sometimes, Windows may fail to format your external hard drive or display errors such as "Windows was unable to complete the format." This can happen due to file system corruption, bad sectors, write protection, or other disk-related issues.
If you cannot format your external hard drive using File Explorer, Disk Management, or DiskPart, try the following solutions.
Solution 1️⃣: Remove the disk’s read-only attribute. If your external hard drive is write-protected, you can try DiskPart to check and run “attributes disk clear readonly” to clear its read-only attribute. This may not work if the write protection comes from a physical switch, hardware failure, or another underlying problem.
Solution 2️⃣: Check the external hard drive for physical problems. Sometimes, formatting problems are caused by an unstable USB connection. Try connecting the drive using another USB cable or port, or test it on another computer.
If the drive continues to disconnect, makes unusual clicking or grinding noises, or reports incorrect capacity, stop attempting to format it. These symptoms may indicate hardware failure and require professional diagnosis.
Already Formatted Hard Drive, What To Do Next?
If you have already formatted your external hard drive and then realized that some important files were missing, you may still be able to recover some of your data, depending on how the drive was formatted and whether the original data has been overwritten.
🔸Quick format: This removes the file system metadata but does not overwrite all the data sectors. Your original files may still be recoverable if they have not been overwritten.
🔸Full format: On modern Windows systems, a full format writes zeros to the volume and checks for bad sectors. This can make the original data much harder or impossible to recover.
Step 1. Stop Using the Formatted Hard Drive
The most important thing to do now is to stop using the formatted hard drive immediately. Do not copy new files to it, download anything onto it, or format it again. Any new data written to the drive may overwrite the files you want to recover.
Step 2. Recover Data from the Formatted Hard Drive
If you performed a quick format, or if the original data may still be present, you can try using RecoveryFox AI, the data recovery software mentioned above, to scan the formatted drive. In addition to recovering files from unrecognized file systems, RecoveryFox AI can also help retrieve data from formatted hard drives.
However, recovery is not guaranteed. If new data has overwritten the original file contents, those files may no longer be recoverable. For SSDs, the TRIM command may further reduce the chances of recovery after formatting, depending on the device and system configuration.
People Also Ask
You cannot reformat a hard drive while keeping its existing files intact. Instead, back up your files to another drive first, reformat the hard drive with your preferred file system, and then copy your files back.
Not directly using Windows’ built-in formatting tools. Formatting a drive as exFAT erases its existing file system information. To avoid losing files, back them up to another storage device, format the drive as exFAT, and restore your data afterward.
Yes. You can format one partition without directly affecting other partitions on the same physical drive, provided you select the correct partition. However, all files on the formatted partition will be erased. Back up important data before proceeding.
If Windows detects the external hard drive but cannot open it, you can try RecoveryFox AI to scan for recoverable files and recover your important files to another healthy storage device. If the drive is not detected or has physical damage, consider professional data recovery instead.

A technical content writer for RecoveryFox AI at WonderFox Soft, creating clear guides on data recovery, storage technologies, and Windows troubleshooting. She specializes in simplifying complex technical topics and enjoys exploring technology, running, and discovering new experiences.





 English ^


