






 Free Download
 Windows


TL;DR
In most cases, data can be recovered from a RAW drive without formatting because the file system may be damaged while the actual file contents remain on the storage device. If you just need the fastest RAW drive recovery solution, follow these steps:
1. Stop using the RAW drive immediately.
2. Scan the RAW drive and recover files using RecoveryFox AI .
3. Recover important files to another storage device.
4. Only after your data is safely recovered, repair the RAW drive or partition using Disk Management.
Improper ejection is one of the most common reasons why external storage devices, such as USB flash drives, SD cards, or HDDs, can turn into RAW drives.
You may wonder, “What does RAW mean?” That’s exactly what this guide aims to explain. Here, we’ll walk you through everything you need to know about RAW drive recovery, including what a RAW drive is, what causes this issue, how to safely recover data from a RAW drive, and how to repair your RAW disk.
What Is a RAW Drive?
A RAW drive is a storage device whose file system can no longer be recognized by Windows.
Normally, Windows expects every drive to use a valid file system, such as NTFS, FAT32, exFAT, or ReFS. If the file system metadata becomes corrupted or unreadable, Windows may still detect the physical drive but cannot access the stored data. As a result, it labels the partition as RAW instead of displaying the original file system format.
The easiest way to confirm whether your drive has become RAW is to check Disk Management. If the file system is shown as RAW instead of NTFS, FAT32, or another recognized format, the drive is experiencing a RAW file system issue.
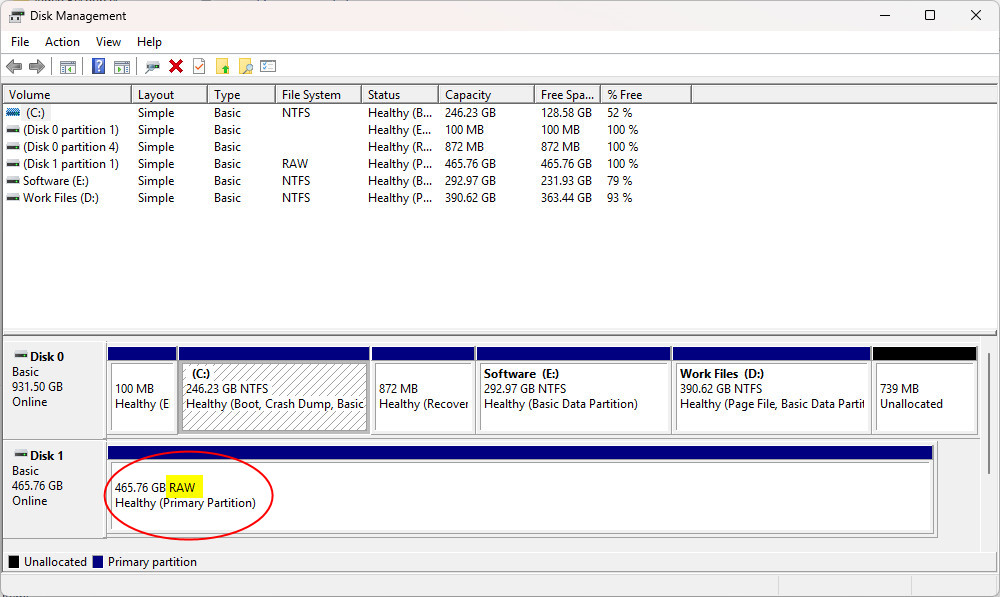
In addition to seeing the RAW label in Disk Management, you may notice one or more of the following symptoms or error messages:
- The external drive is detected but does not appear in File Explorer.
- The drive reports 0 bytes used and 0 bytes free.
- File Explorer cannot open the drive or displays an access error.
- When attempting to open the drive, Windows prompts: “You need to format the disk in drive X: before you can use it.”
- Running CHKDSK returns the error: "CHKDSK is not available for RAW drives."
- The drive suddenly becomes unreadable after an improper ejection, unexpected power outage, or system crash.
So, why does a drive become RAW?
Besides the aforementioned “improper ejection”, other common factors may include file system corruption, partition errors, incompatible file systems, damaged boot sectors, or bad sectors on the drive.
The chance of RAW drive recovery depends on the underlying cause and whether new data has overwritten the original files.
The table below shows the typical recovery chance for different RAW drive scenarios:
| Situation | Recovery Chance |
| File system corruption only | Very High |
| Deleted partition | High |
| RAW USB drive after improper removal | High |
| Damaged boot sector | High |
| Some bad sectors | Moderate |
| SSD with TRIM after extensive use | Lower |
| Severe physical hardware failure | Low without professional service |
How to Recover Data from a RAW Hard Drive Without Formatting?
Choosing the “Format Disk” option and re-assigning it a valid file system is obviously the simplest way to fix a RAW drive issue. However, if the data stored on the RAW disk is important, formatting it indeed fixes the problem but also erases all data, making data recovery much harder.
Method 1. Recover Data from a RAW Drive Using RecoveryFox AI (🔥)
A safer approach is to recover your files from the RAW drive before formatting. RecoveryFox AI is a reliable option for RAW disk recovery. It can scan and recover data directly from logically damaged storage devices, including RAW drives, RAW partitions, and corrupted file systems.
You can use it to recover data from RAW USB drives, SD/TF cards, hard drives, and other storage devices. Follow the steps below:
Step 1. Connect the affected drive to your computer.
Press Win + X and open Disk Management to ensure that your drive is detected by Windows.
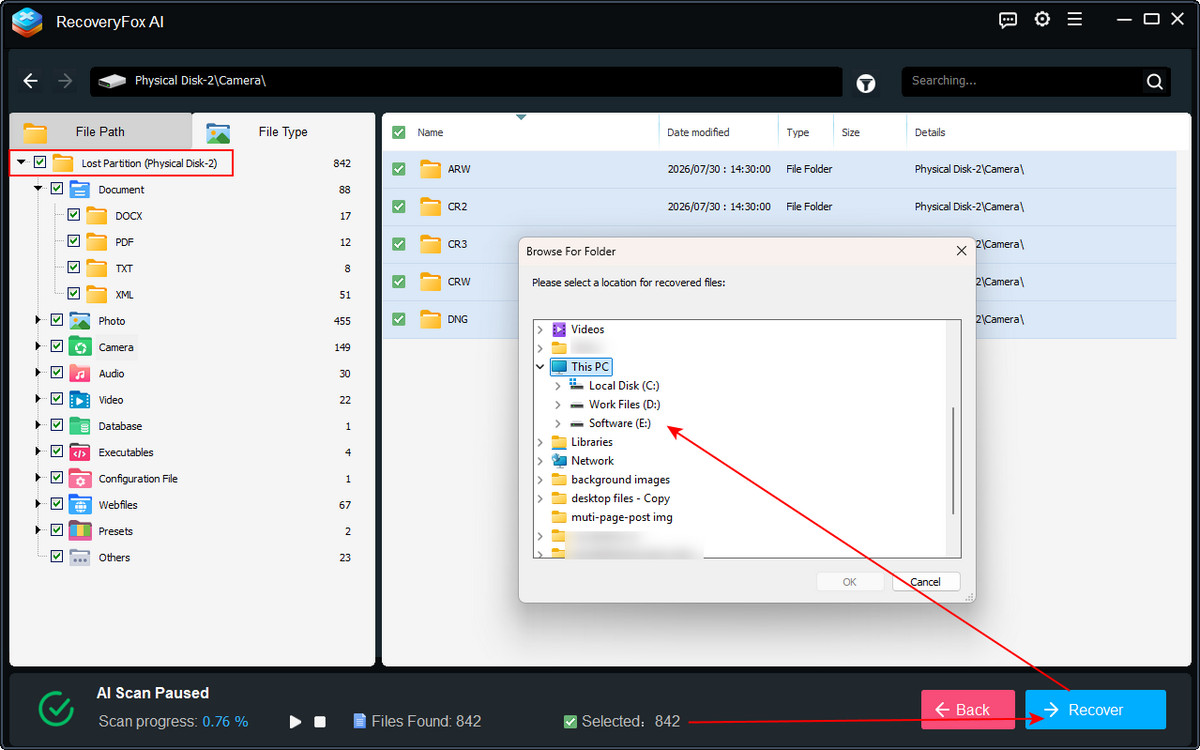
Step 2. Launch RecoveryFox AI and choose the RAW partition or disk from the drive list.
Double-check that you have selected the correct drive, then click it to start scanning.
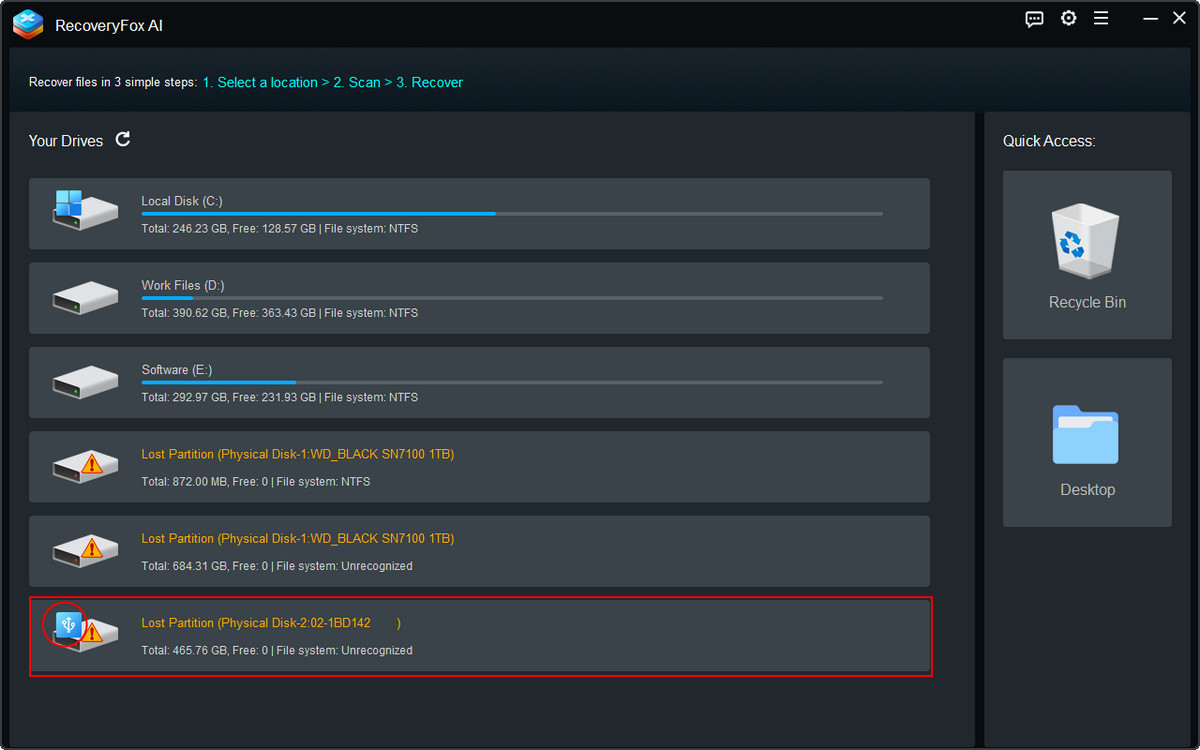
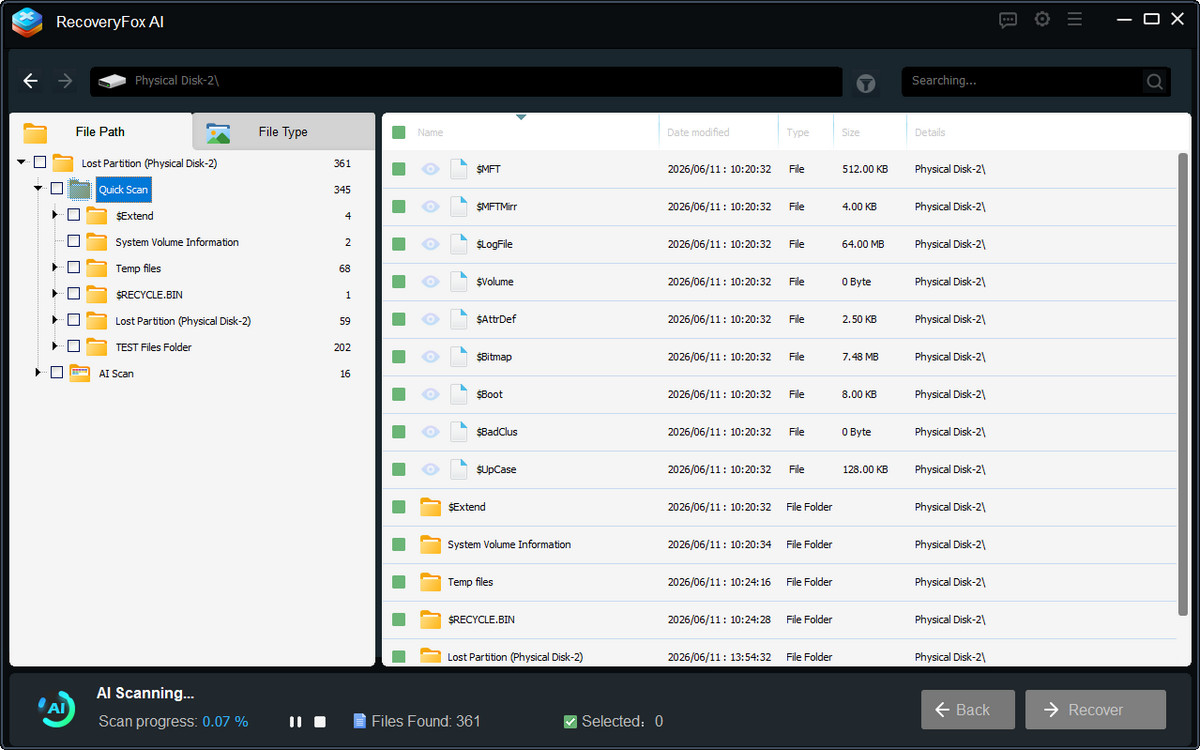
Step 3. RecoveryFox AI begins with a Quick Scan, which typically completes in less than a minute.
After Quick Scan finishes, AI Scan automatically starts to perform a deeper and more comprehensive analysis of the drive.
During the scanning process, you can browse the detected files and check whether the results with original file names or AI-predicted names are the files you need.
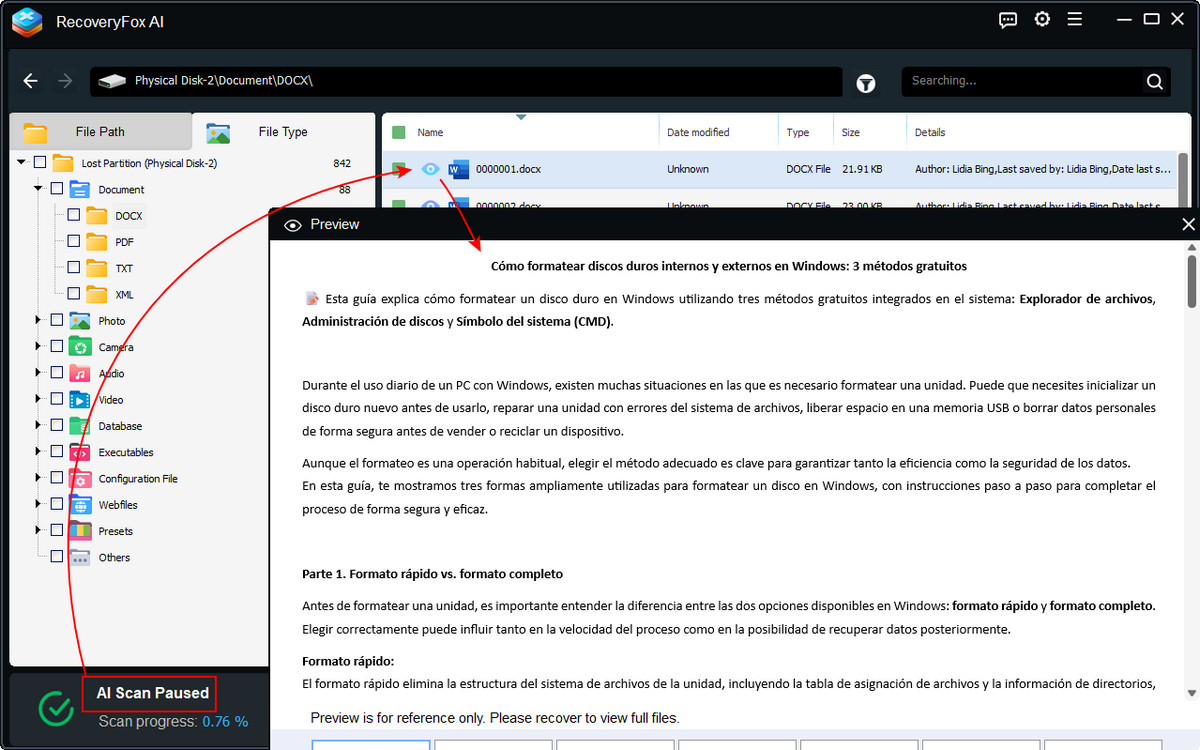
Step 4. You can pause the AI Scan at any time and select a file to preview its contents.
RecoveryFox AI currently supports previewing various file types, including images, documents, text files, camera photos, videos, audio, web files, and also popular professional project files such as CAD drawings and PSD files.
Step 5. Once you confirm the files you need, select individual items or the complete scan results, click “Recover”, and choose a different storage location to save the recovered files.
Method 2. Recover a RAW Partition Using TestDisk
If your goal is to restore a RAW partition and make it accessible again, TestDisk is a solid option. This free, open-source recovery utility runs through a command-line interface and is primarily designed to repair partition tables, recover lost partitions, and fix boot sector issues, allowing Windows to detect and access the drive again in many cases.
However, TestDisk works by writing changes to the disk, which means incorrect operations may further affect the existing data or make recovery more difficult. Therefore, it is strongly recommended to recover important files from the RAW partition before attempting any partition repair.
Now, follow these steps to see how to recover the RAW partition using TestDisk.
Step 1. Download the latest version of TestDisk from its official website.
Run the program as an administrator.
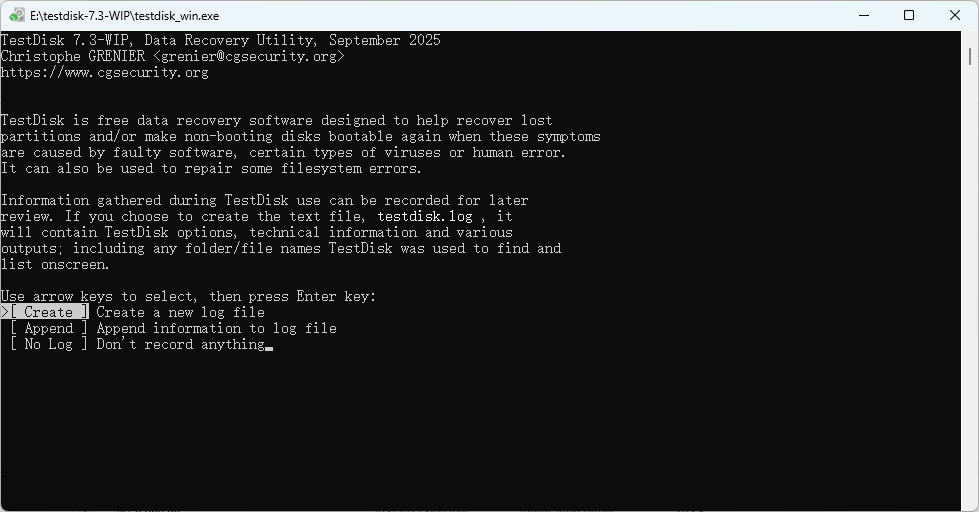
Step 2. After launching TestDisk, select Create and press Enter to allow TestDisk to create a log file. This log can help troubleshoot issues if problems occur.
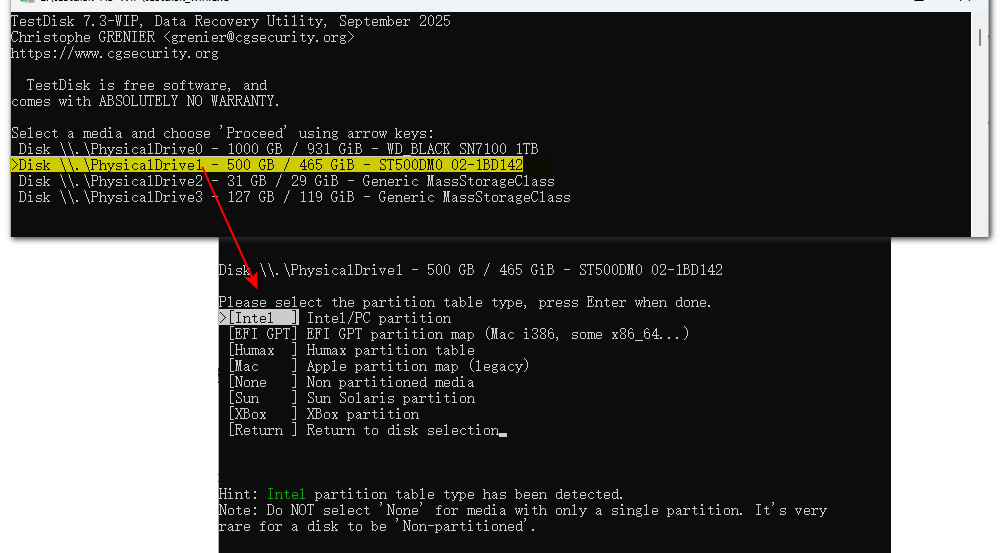
Step 3. Use the Up/Down arrow keys to find and select the storage device that has become RAW.
Press Enter to continue.
Step 4. TestDisk usually automatically detects and highlights the recommended partition table type.
For example, traditional hard drives typically use [Intel], while newer GPT-based drives use [EFI GPT].
Press Enter to accept the default recommended option.
Step 5. Select Analyse from the menu and press Enter.
Select Quick Search and press Enter. TestDisk will display detected partitions in real time. After the scan completes, check whether all partitions have been found.
To preview files, press the P key. If you can view the file list normally, it indicates that the partition data is intact. Press Q to exit the file preview.
If some partitions are still missing, select Deeper Search and press Enter. This process performs a deeper scan to locate partitions by searching for backup boot sectors and other file system structures.
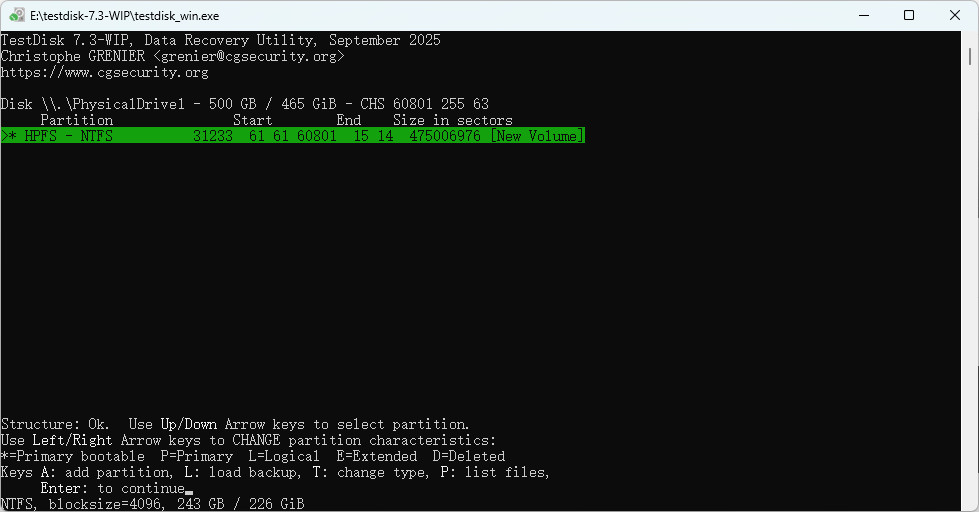
Step 6. After confirming the correct partition, use the Left/Right arrow keys to change its status from D (Deleted) to P (Primary) or L (Logical).
Logical partitions should be set to L, while primary partitions should be set to P. The correct setting depends on the original partition type in the partition table.
Step 7. After confirming that all partitions are correctly identified, their statuses are properly set, and there are no overlapping partition conflicts, select Write from the menu, press Enter, and type Y to confirm.
After the changes are written, restart your computer as prompted.
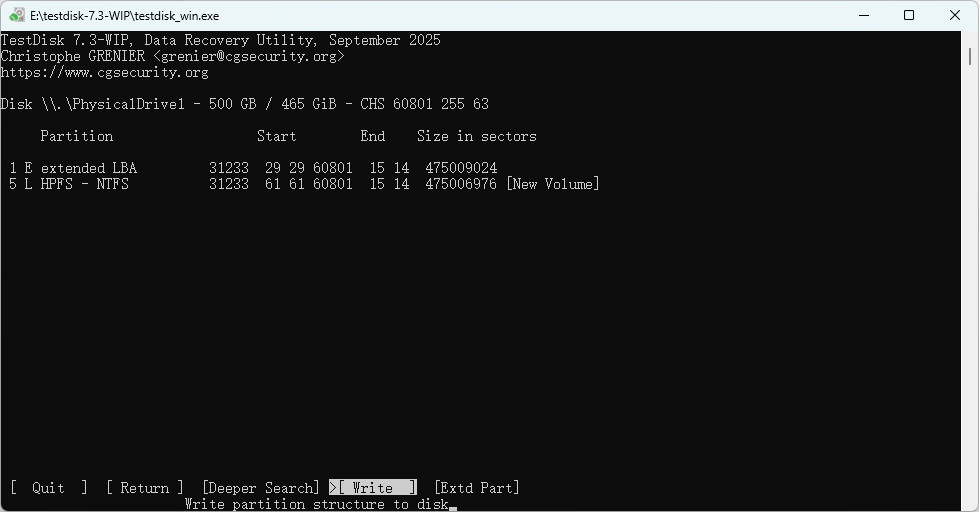
⚠️ Only select Write after verifying that the number of partitions, partition sizes, and file contents listed by TestDisk are correct and that there are no obvious overlapping conflicts. If you are unsure, do not write changes yet.
How to Fix a RAW Drive or Partition?
If you have already recovered your important files from the RAW drive, or restoring the drive for normal use is your priority, you can try the following built-in Windows tools.
Windows includes several built-in utilities that may help repair file system issues and restore access to affected storage devices.
Method 1. Running CHKDSK on a Suspected RAW Drive
Although CHKDSK is commonly used to detect and repair file system errors, it usually cannot repair RAW drives because RAW partitions do not have a file system that Windows can recognize. When you run CHKDSK on a RAW drive, it typically returns the error message: “The type of the file system is RAW. CHKDSK is not available for RAW drives.”
However, there is a special case where CHKDSK may still help. If the drive was originally formatted as NTFS but became RAW due to corrupted NTFS boot information, the underlying file system and data may still be intact. Because NTFS usually maintains a backup copy of the boot sector, and CHKDSK may be able to use this backup boot sector to repair the damaged boot information and restore the drive to a readable NTFS state.
Here is how to repair A RAW hard drive without formatting through CHKDSK:
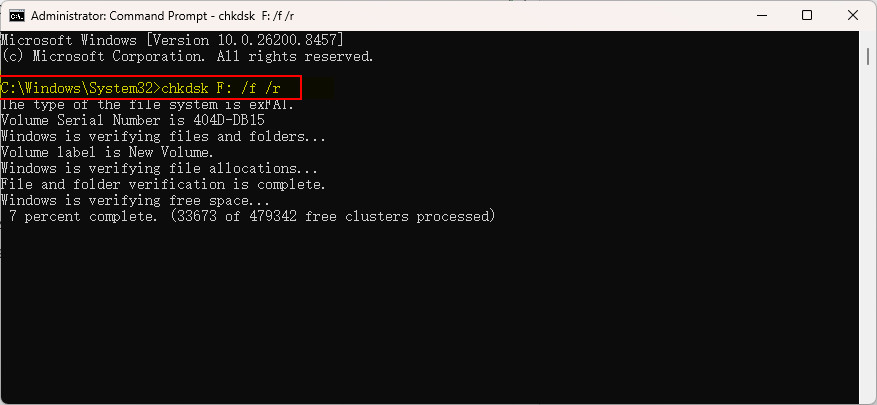
Step 1. Search for “cmd”, select Command Prompt, and run it as Administrator.
Step 2. Run this command:
chkdsk F: /f /r.
Don’t forget to replace “F” with your drive letter.
Step 3. Wait until Windows finishes scanning and repairing the RAW drive.
Method 2. Fix a RAW Drive by Reformatting
Since a RAW drive usually indicates that the file system is corrupted or no longer recognized by Windows, reformatting the affected drive can recreate a valid file system and restore normal access. Disk Management is one of the most straightforward built-in Windows utilities for formatting a RAW drive.
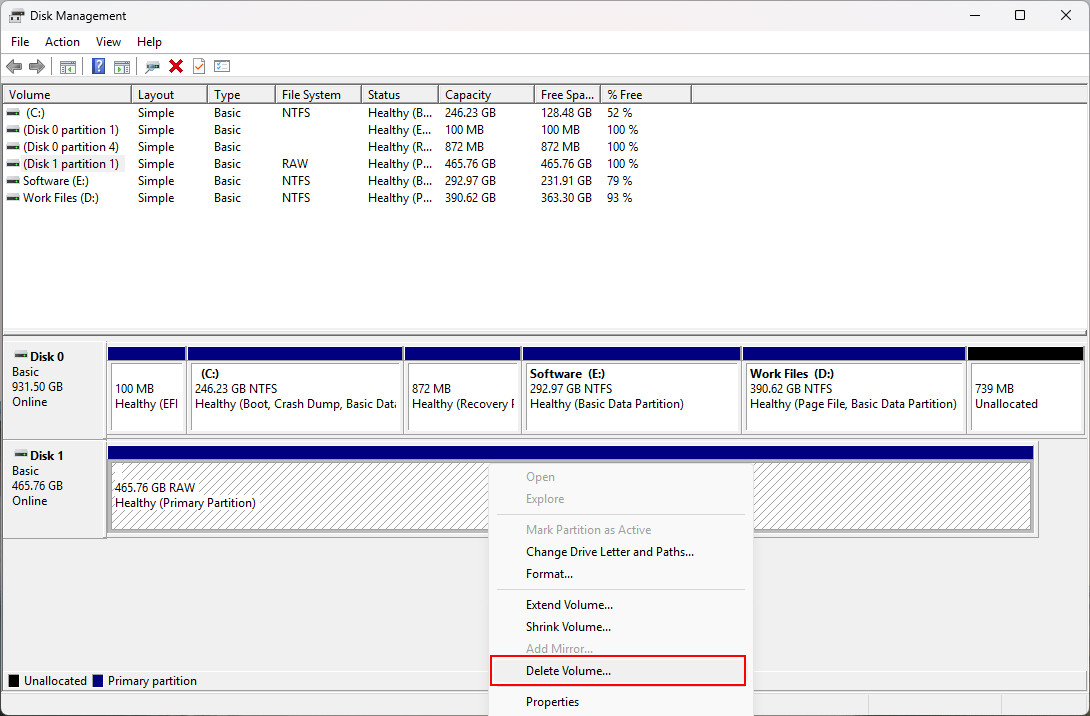
Step 1. Press Win + X and select Disk Management.
Step 2. In the lower section of Disk Management, locate the drive labeled as RAW.
Step 3. Right-click the RAW partition and select Delete Volume.
Step 4. The partition will become Unallocated. Right-click the unallocated space and select New Simple Volume.
Step 5. Follow the New Simple Volume Wizard to recreate the partition. Assign a drive letter, select the desired file system, and keep the remaining settings at their default values.
Step 6. Review your settings and click Finish to complete the process.
Once the process is complete, the drive should appear in File Explorer again and be ready for normal use.
How to Prevent Drives from Becoming RAW in the Future
Although RAW drives can often be recovered, preventing the issue from happening in the first place is always better than dealing with data loss afterward.
Many RAW file system problems are caused by improper device handling, unexpected interruptions, or storage failures that can often be reduced with a few simple habits.
To minimize the risk of your drives becoming RAW, follow these best practices:
💻 Always Eject External Storage Safely
📚 Keep Regular Backups
🔋Avoid Sudden Power Loss
👨⚕️Monitor Drive Health
🦠Protect Your Computer from Malware
🗃️ Handle Storage Devices Carefully
In Conclusion
RAW drive recovery does not have to mean losing your important files. The safest approach is to follow the right order: recover your data first, then repair the drive.
Start by using a reliable hard drive data recovery tool like RecoveryFox AI to scan the RAW drive directly and recover your important files to another storage device.
Once your data is safe, you can proceed with repairing the drive by restoring the partition structure with TestDisk or reformatting the drive with Windows built-in tools such as CHKDSK or Disk Management to create a new file system and restore normal access.
Following this workflow minimizes the risk of permanent data loss and gives you the best chance of recovering your files successfully.
FAQs about RAW Drive Recovery
Q1. Can I recover data from a RAW drive without formatting?
Yes. You can recover files from a RAW drive without formatting by using data recovery software like RecoveryFox AI. Avoid formatting the drive first, as it may make recovery more difficult.
Q 2. Is a RAW drive permanently damaged?
No. RAW status usually means file system corruption, not physical disk failure. Common causes include power loss, bad sectors, malware, or unsafe removal, and the data is typically recoverable. However, severe physical damage may require professional data recovery services.
Q 3. Can CHKDSK fix a RAW drive?
Usually, no. CHKDSK is not available for most RAW drives because Windows cannot recognize the file system. However, in some NTFS cases where the primary boot sector is damaged but the backup boot sector remains intact, CHKDSK may still be able to access and repair the volume.
📚 Related: Why Does Windows Think Your USB Drive Is RAW? Explained
Q 4. Can I convert a RAW drive to NTFS without losing data?
Not directly. Perform a RAW drive recovery to save files to another drive first, then format the RAW drive as NTFS.
Q 5. Can SSDs become RAW?
Yes. SSDs can become RAW due to file system corruption, power loss, or other errors. However, RAW recovery from SSDs is often more difficult than from HDDs because TRIM may permanently remove deleted data blocks, reducing the chance of successful recovery.

A technical content writer for RecoveryFox AI at WonderFox Soft, creating clear guides on data recovery, storage technologies, and Windows troubleshooting. She specializes in simplifying complex technical topics and enjoys exploring technology, running, and discovering new experiences.





 English ^


