






 Free Download

 Windows

⚠️ This guide focus on how to recover and fix unallocated partition caused by logical damages. If your drive shows signs of physical failure, such as clicking noises, overheating, frequent disconnections, or recurring read errors, stop using it and contact a professional data recovery service to reduce the risk of further damage and permanent data loss.
If you suddenly cannot access files through a normal drive letter in File Explorer and Windows recognizes it as “Unallocated” in Disk Management, don’t worry! Whether you want to restore the unallocated partition to make it usable again or recover both the partition and its data, here are some solutions.
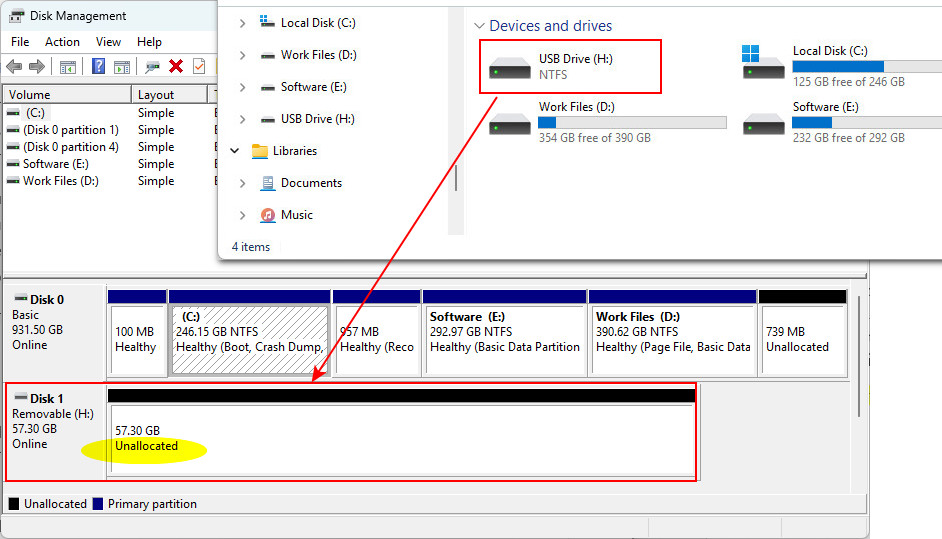
Common Causes of an Unallocated Partition
An unallocated partition means that a section of a drive, whether internal or external, is marked by Windows as not assigned to any recognized partition.
So, why does a partition become unallocated? Common causes include:
🔸 Accidental partition deletion
🔸 Accidental partition deletion
🔸 Partition table corruption
🔸 File system corruption
🔸 Sudden power loss during disk operations
🔸 Failed formatting or repartitioning
🔸 Malware or software conflicts
Also, physical damages sometimes can interfere with a drive’s operation and cause an unallocated partition issue. Possible causes include a faulty connection, an aging or failing drive, liquid exposure, or other physical damage.
Identifying the likely cause helps you choose the next step. However, if the lost partition contains important files, don’t attempt to repair or format it before trying to recover your data.
The files are not necessarily erased when a partition becomes unrecognized. The underlying data may remain on the disk until it is overwritten or otherwise becomes unrecoverable.
The safest next step is to use reliable partition data recovery software to recover your files.
How to Recover Data from an Unallocated Partition?
To recover unallocated partition data, you’ll need professional data recovery software that is able to access the data without relying on a recognized file system. RecoveryFox AI is best suited to this unallocated data recovery.
This partition data recovery tool also excels at recovering accidentally deleted files, formatted data, RAW partitions, and data lost in other common scenarios. It supports over 500 file types, including documents, photos, videos, and audio files.
Best of all, you can run a free scan and preview recoverable files before recovery. Here are the steps:
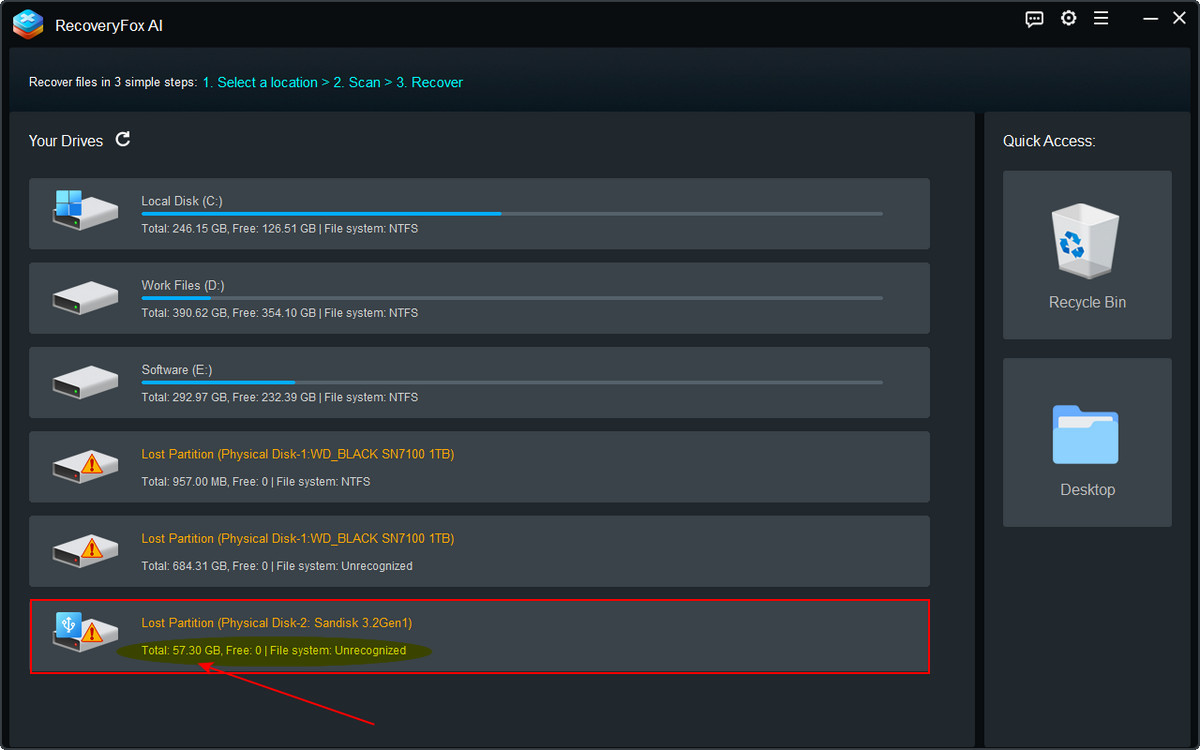
Step 1. Launch RecoveryFox AI and find the unallocated partition in the drive list and select it to start scanning.
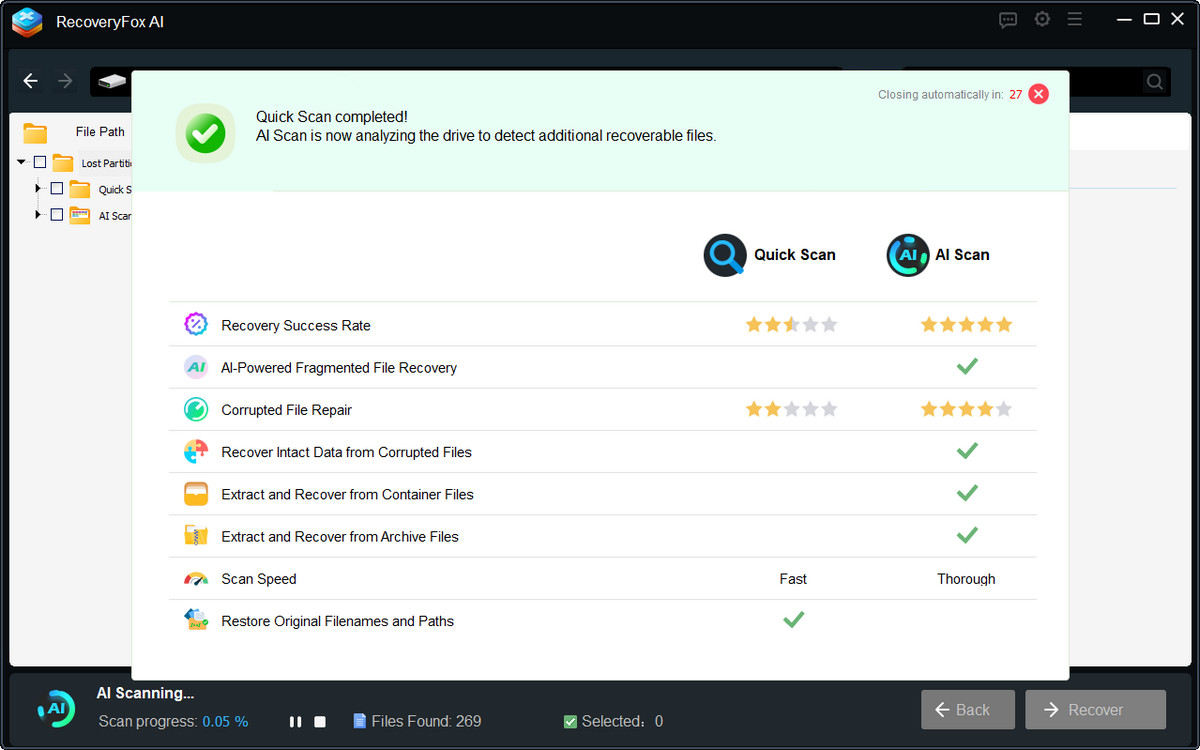
Step 2. RecoveryFox AI first performs a Quick Scan and then automatically proceeds to an AI Scan for a more thorough search.
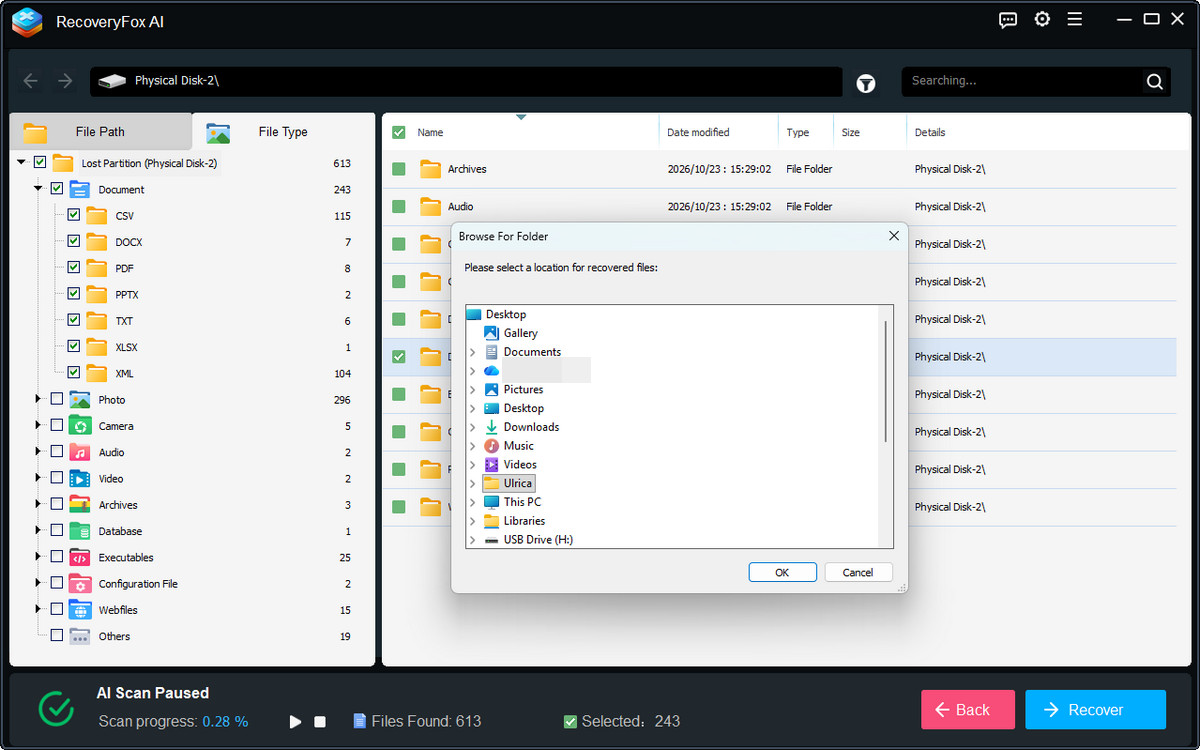
During the scanning process, you can browse the results organized by “File Path” and “File Type”.
Step 3. Once scanning completes, you can view the scan results to look for your missing files.
You can also narrow down the results using the Keyword, Modified Date, and File Size filters.
Click the eye icon to preview supported files before recovery.
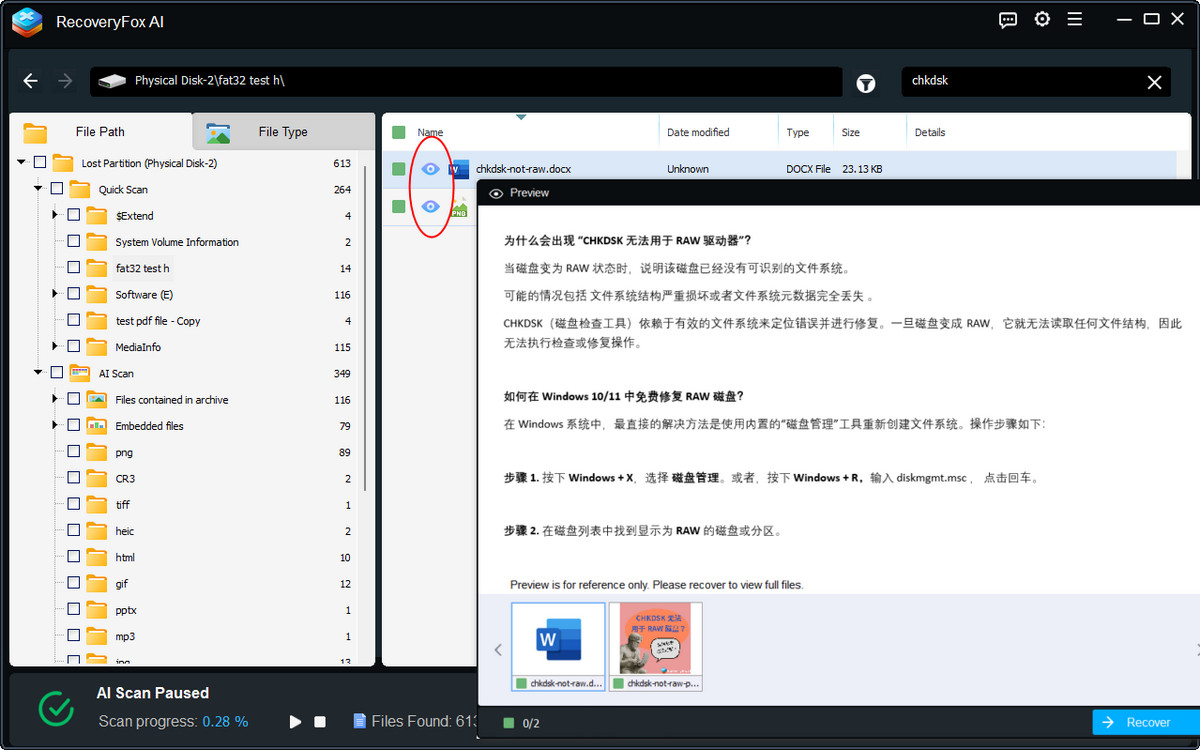
Step 4. Finally, select the files you want to restore and click “Recover”.
Choose a safe destination to save your recovered partition data.
[5 Methods] How to Fix an Unallocated Partition?
After recovering your important files, or if the unallocated space is on a new drive and contains no data you need, you can try the following methods to make the disk usable again.
Method 1. Recover the Unallocated Partition with TestDisk
If your partition becomes unallocated due to accidental deletion or logical corruption, such as a damaged boot sector, TestDisk may help. This free, open-source tool can analyze the disk structure and restore a lost partition if the necessary partition information is still recoverable.
⚠️ TestDisk is not beginner-friendly. It performs tasks with commands, and some operations write changes to the drive, including partition table updates and boot sector repairs. Selecting the wrong disk or option may make your data harder to access and put existing data at risk.
Here’s how to recover an unallocated partition using TestDisk:
Step 1. Download and extract TestDisk.
Step 2. Then, open testdisk_win.exe to launch the tool.
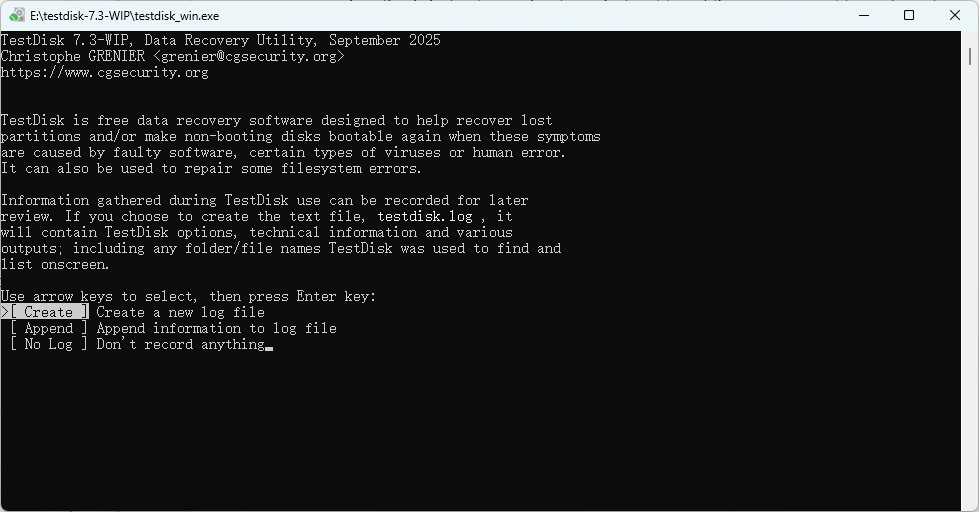
Step 3. Select [Create] and press Enter to allow TestDisk to create a log file.
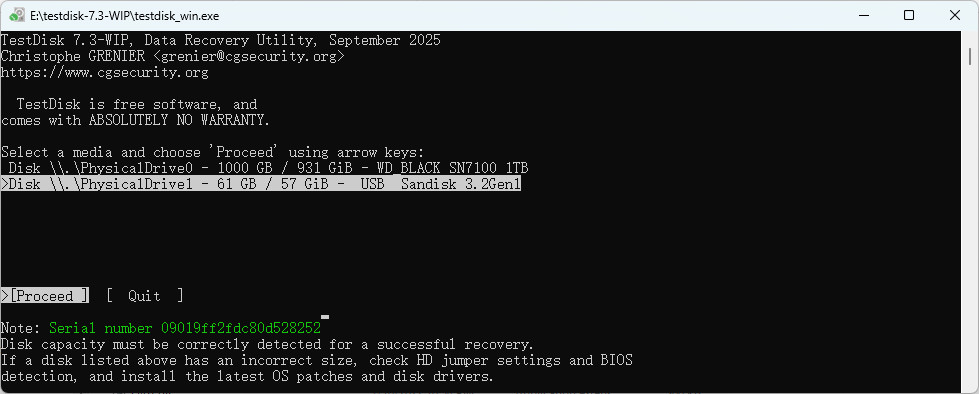
Step 4. Use the arrow keys to select the affected disk and press Enter.
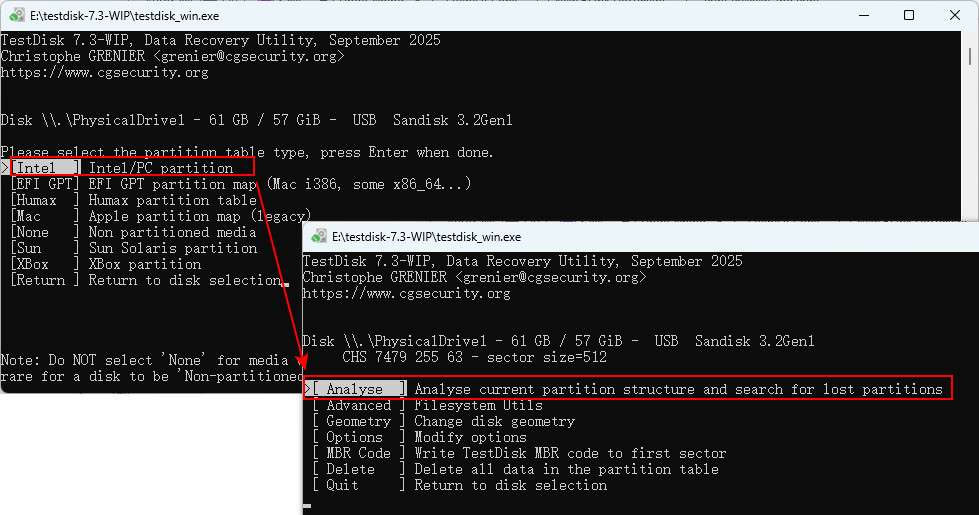
Step 5. Select the detected or appropriate partition table type and press Enter.
Step 6. Select [Analyse] and press Enter to examine the current partition structure.
Step 7. Start [Quick Search] and wait for TestDisk to scan the disk.
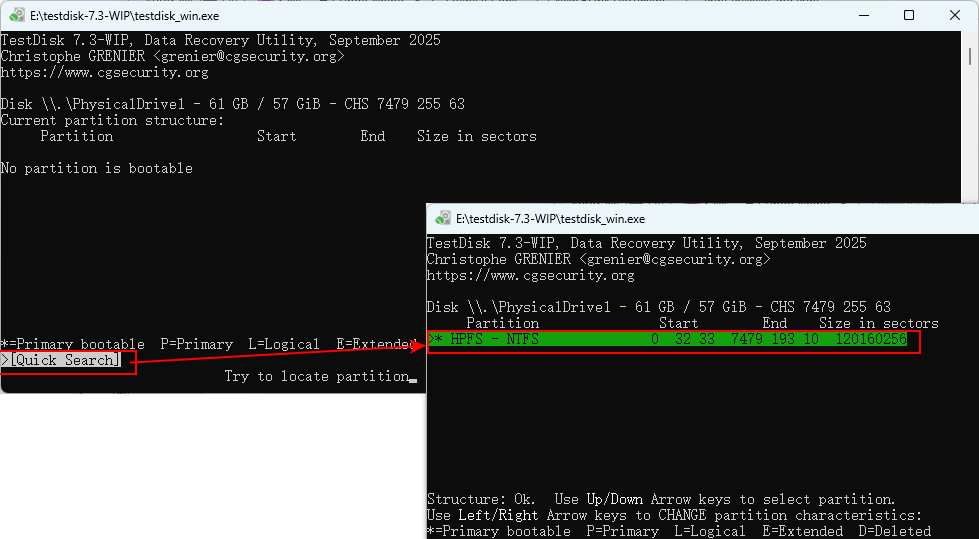
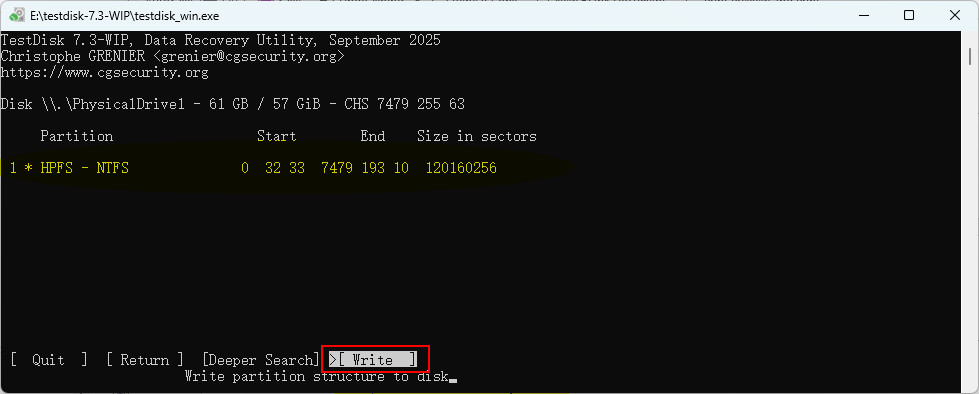
Step 8. If the correct partition is found, verify that it matches the missing partition before selecting [Write] to save the recovered partition information.
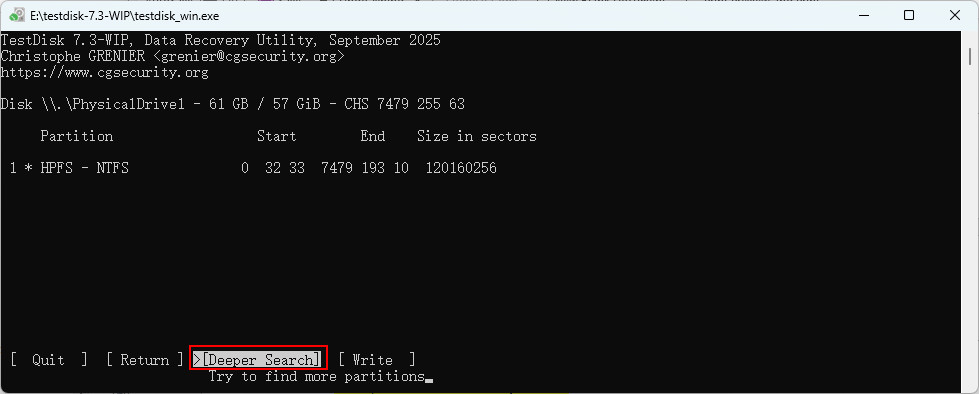
Step 9. If the expected partition isn’t found, run [Deeper Search].
Afterward, follow TestDisk’s prompts. You may need to restart your computer for Windows to recognize the restored partition.
Method 2. Create a New Volume in Disk Management
If you no longer need the missing partition’s contents, creating a new volume is one of the simplest ways to use the unallocated space.
⚠️ Creating and formatting a new volume does not restore the original partition's contents. It creates a new file system and may make the previous data more difficult to recover. Only do this after your data is safely stored.
Step 1. Press Win + R, type diskmgmt.msc, and press Enter.
Step 2. Find the unallocated partition in the lower panel of Disk Management. Confirm its capacity and status before making any changes.
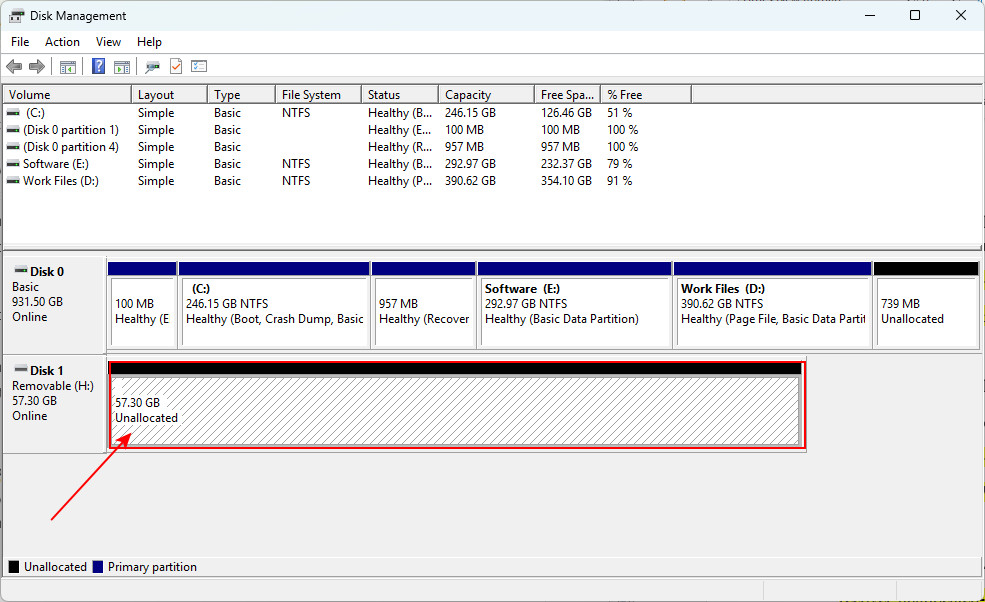
Step 3. Right-click the unallocated space and select New Simple Volume.
Follow the wizard to specify a volume size.
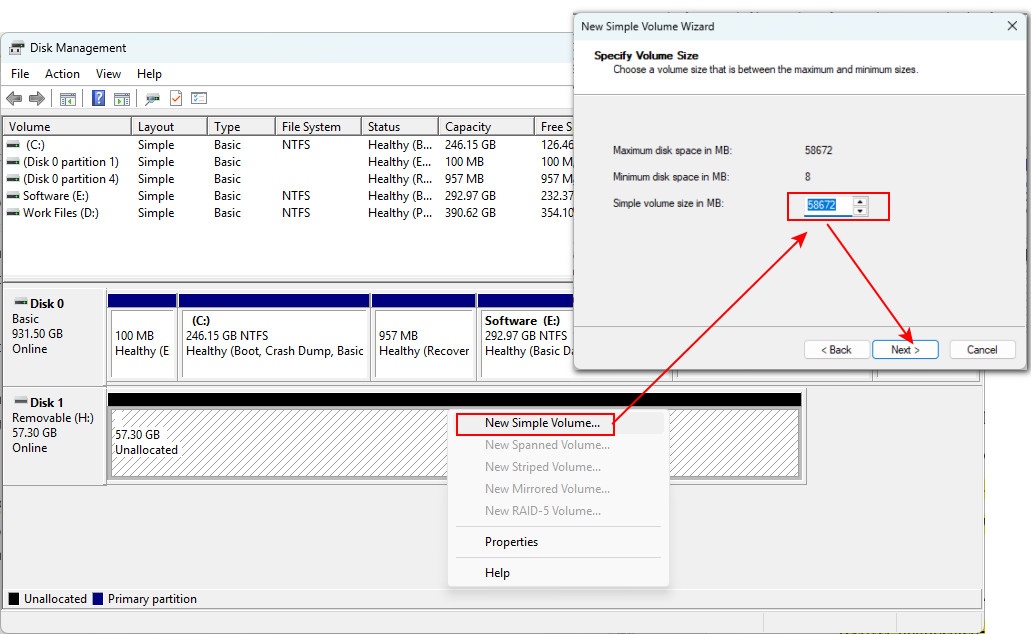
Step 4. Assign a drive letter and click Next.
Step 5. Choose a file system. NTFS is a common choice for Windows-only use, while exFAT may be suitable if you need to use the drive across Windows and macOS.
Check the “Perform a quick format” option if you want to a quick process.
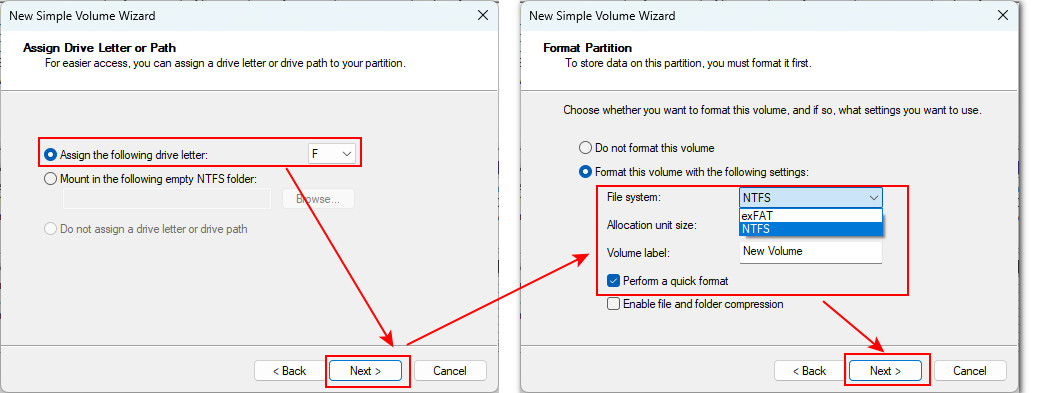
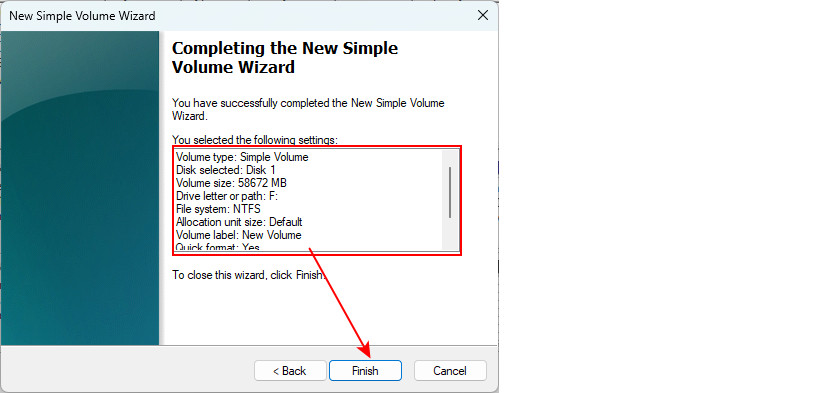
Step 6. Review all settings and click Finish to create and format the unallocated space.
Once the process is complete, the new volume should appear in File Explorer if the operation succeeds.
Method 3. Extend the Unallocated Partition to Existing Volume
If you don’t need to restore the unallocated partition nor its data, you can use Windows Disk Management to add the space to an existing volume.
💡 💡 💡 But to do so, the unallocated partition must follow these prerequisites:
①the unallocated space must be on the same physical disk as the volume you want to extend.
② the unallocated partition must be located immediately to the right of the extended volume, without in-betweens.
③The existing volume must be formatted with NTFS or ReFS.
Now, follow the steps to extend the unallocated partition to an existing volume in Disk Management.
Step 1. In Disk Management, right-click the volume that you want to extend, and then select “Extend Volume”.
Step 2. In the Extend Volume Wizard, select Next.
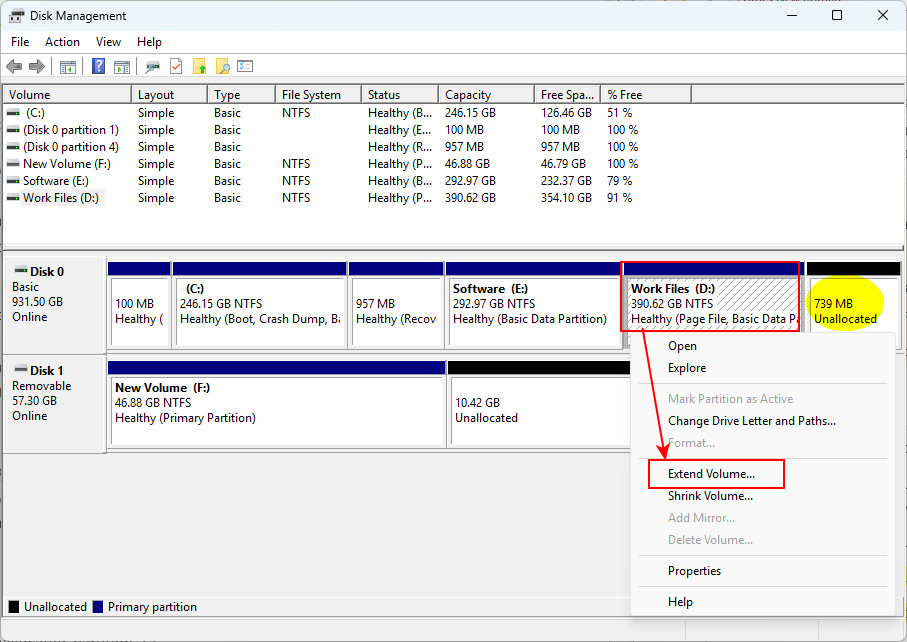
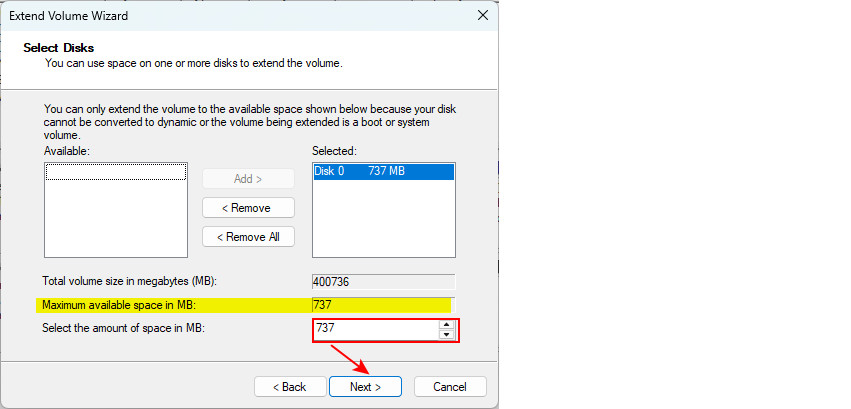
Step 3. Under “Select Disks”, specify how much space to use from the unallocated partition to extend the volume.
Step 4. You can leave it as the default (Maximum size). Or, if you plan to create other volumes in the available empty space, you can select a smaller amount of space to use to extend the volume.
Step 5. Select Next, and then select Finish to extend the volume.
Method 4. Use DiskPart to Create a New Partition
If Disk Management cannot create a new volume, you can consider using DiskPart, a command-line utility built into Windows.
Step 1. Search for “cmd” in the Windows search box and run Command Prompt as an administrator.
Step 2. Enter this and press Enter to launch DiskPart.
diskpart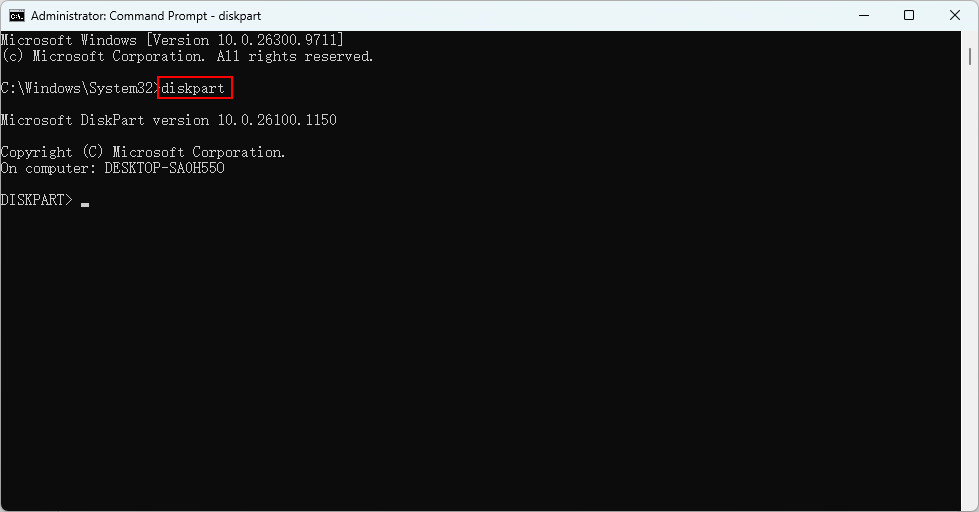
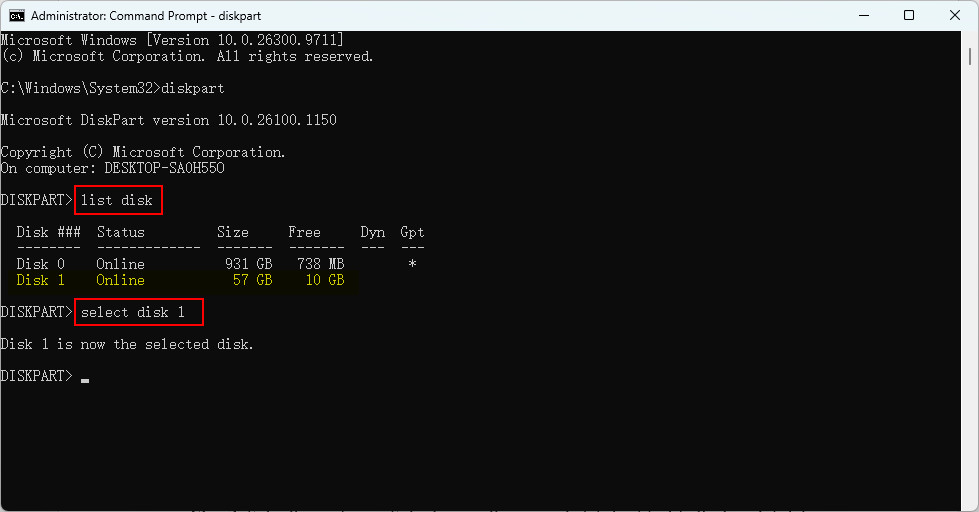
Step 3. Enter this and press Enter to view the connected disks. Identify the target disk by its capacity.
list diskStep 4. Enter the following command, replacing “X” with the affected disk number:
select disk X❗Double-check the selected disk before continuing. Selecting the wrong disk may affect another storage device.
Step 5. If the disk is already in a suitable state for partition creation, run this and press Enter.
create partition primary❗If DiskPart reports that the disk needs initialization or has another partition-layout issue, stop and verify the disk’s state before trying additional commands.
Step 6. If you have confirmed that the new partition is the intended target, you can format it with a suitable file system. For example, format the partition to NTFS:
format fs=ntfs quickStep 7. Then assign a drive letter if needed. Run:
assign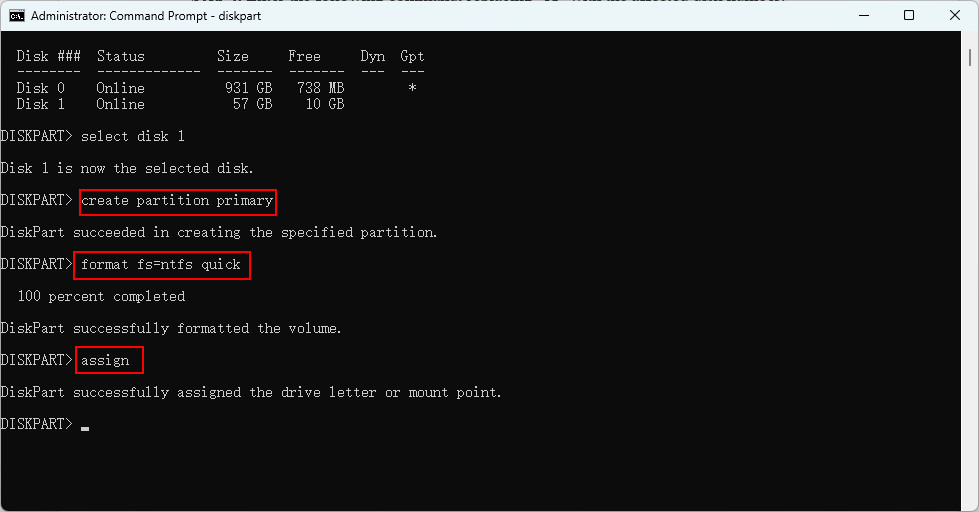
Method 5. Update the Disk Driver
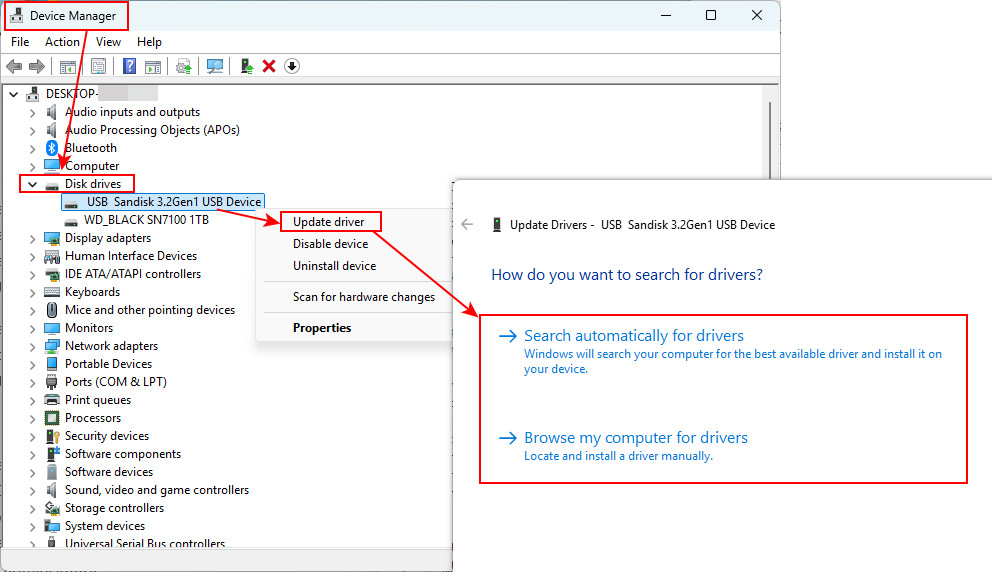
Sometimes, a device recognition problem may be related to the disk driver or its connection to Windows. Updating the driver is a relatively low-risk troubleshooting step, although it will not restore a deleted partition by itself.
Step 1. Right-click Start and select Device Manager.
Step 2. Expand Disk drives and locate the affected device.
Step 3. Right-click the device and select Update driver. Follow the instructions to search for an available driver.
Step 4. Restart your computer if necessary, then check Disk Management again.
Method 6. Seek Professional Help
If the unallocated status appeared unexpectedly, check whether the physical drive is working reliably.
For an external drive, try a different compatible cable or USB port. If you use an external enclosure, a connection or enclosure issue may also affect how Windows detects the device.
You can also check whether the disk appears consistently in Disk Management and whether its reported capacity looks correct.
If the disk repeatedly disappears, disconnects, or makes unusual mechanical noises, stop using it. Continued scans and repair attempts may place additional stress on a failing device. Consider professional recovery assistance if the data is valuable.
In Conclusion
An unallocated partition does not necessarily mean your data is permanently lost. Windows may simply be unable to recognize the original partition information.
If the drive contains important files, recover the unallocated partition data first using suitable data recovery software, or restore the files from a backup. RecoveryFox AI can scan detected unallocated, RAW, or logically corrupted drives and lets you preview supported recoverable files before choosing what to restore. Just give it try:
Once your data is safe, you can use TestDisk, Disk Management, DiskPart, or other appropriate Windows tools to fix the unallocated partition and make the disk usable again.
Recover Unallocated Partition FAQs
Q1. Can a lost partition be recovered?
Yes. Depending on the cause of the problem, you may recover a lost partition using the partition recovery tool like TestDisk, or reformat it using Windows Disk Management or DiskPart.
📚 Related: USB Drive Shows as Unallocated? How to Safely Recover Your Data and Fix the Error?
Q2. Why is my disk showing up as unallocated?
A disk may show as unallocated due to accidental partition deletion, a corrupted partition table, logical errors, an interrupted disk operation, or even physical disk damages.
Q3. Can I recover data from an unallocated partition?
Yes, you may be able to recover unallocated partition data using RecoveryFox AI. Stop using the affected drive and recover files to another drive to avoid overwriting recoverable data.
Q4. Can I fix an unallocated partition without losing data?
Sometimes. The best approach is to recover the data first using a reliable partition recovery tool and avoid formatting or creating a new volume before recovering important files. Some partition recovery tools may help restore the original partition, but results depend on the cause of the problem.
Q5. Why can’t I format an unallocated partition?
Unallocated space is not a recognized volume, so you may fail to format it directly in the File Explorer. Try Disk Management to create a new partition first and then format it. If the drive contains important data, recover it before proceeding.
📚 Related: How to Format a USB Drive without Losing Data on Windows?

A technical content writer for RecoveryFox AI at WonderFox Soft, creating clear guides on data recovery, storage technologies, and Windows troubleshooting. She specializes in simplifying complex technical topics and enjoys exploring technology, running, and discovering new experiences.





 English ^


